TekRevue

  • Home
  • Mac
  • Windows
  • Mobile
  • Games
  • Home Theater
  • Reviews
  • Editorials
  • Tips
    • Windows
    • Mac
    • Mobile
  • Twitter
  • Facebook
  • Google+
  • Feed

Tips

How to Turn on Google 2-Step Verification (And Why You Should!)

By Melissa Holt on March 3, 2017 at 5:54 PM • @MelissaCHolt

If you’re using services and accounts that support two-step verification (like iCloud or Google, for example), then configuring that extra security step is well worth your time. So what does “two-step verification” (also known as “two-factor authentication”) even do? Well, it means that the account in question will ask you for two pieces of information (such as both your password and a second code sent via text message to your phone) instead of just one (your password).

The benefit of two-factor authentication is that if, as an example, a thief steals your Google password, he still won’t be able to access your account without having your phone too, which greatly (although not completely) decreases your risk of getting your data stolen! So let’s go over how to turn on Google’s 2-Step Verification. Trust me, you’ll be glad you did.

Enable 2-Step Verification in Google

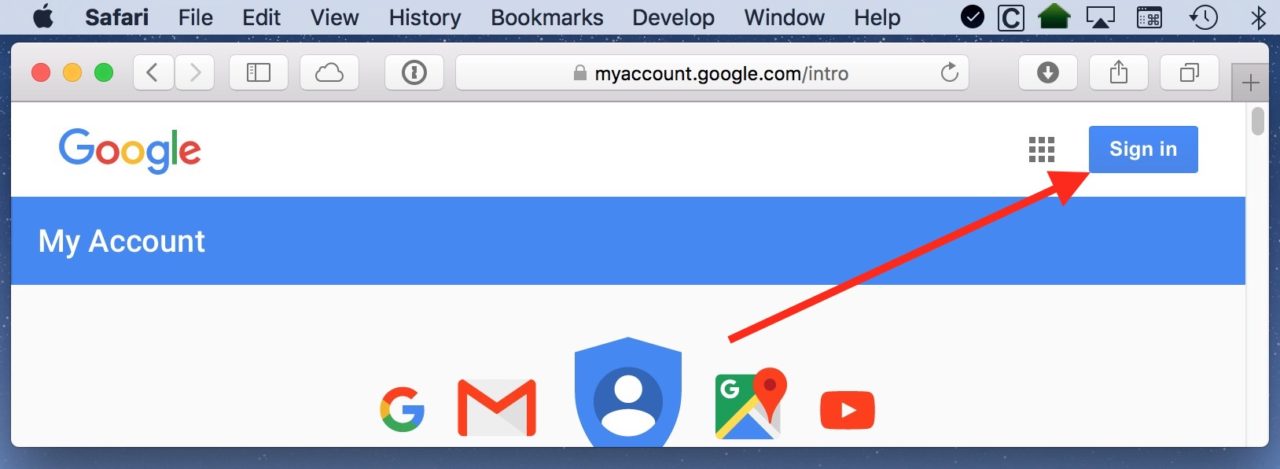
To get started, go to Google’s Accounts page and sign in using the big blue button in the upper-right corner of the window.

Sign In

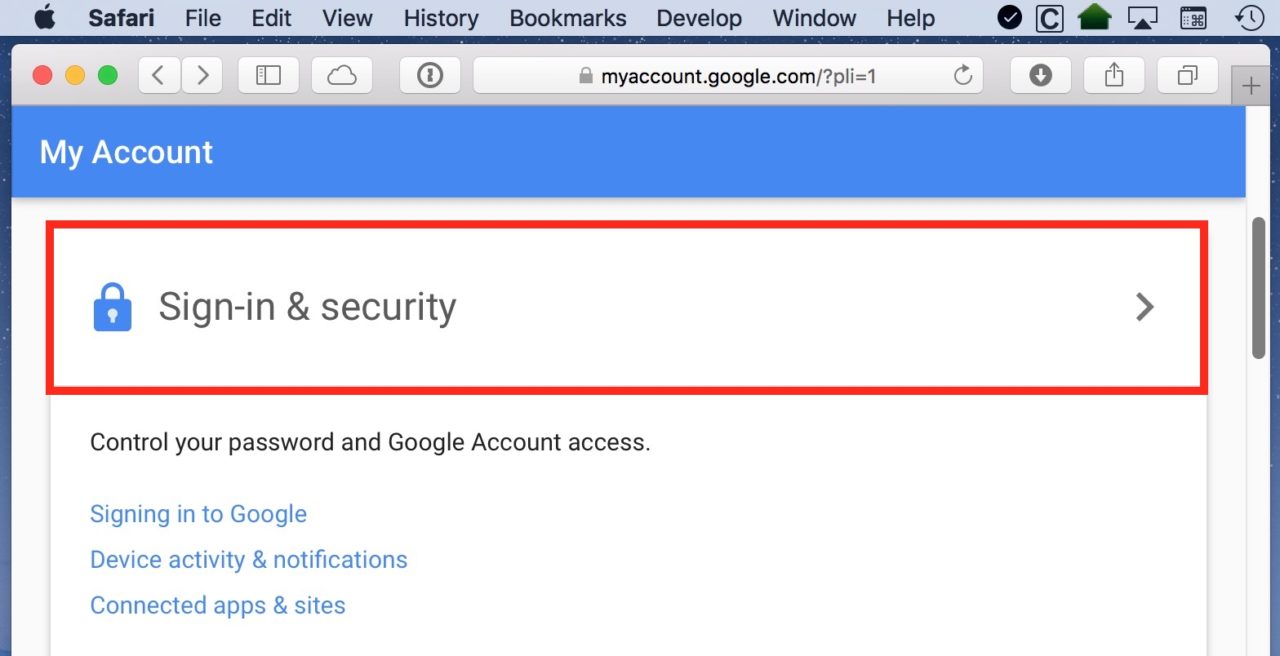
Then scroll down just a bit on the page that’ll appear until you see “Sign-in & security.” Click that section to move on.

Sign-in and Security

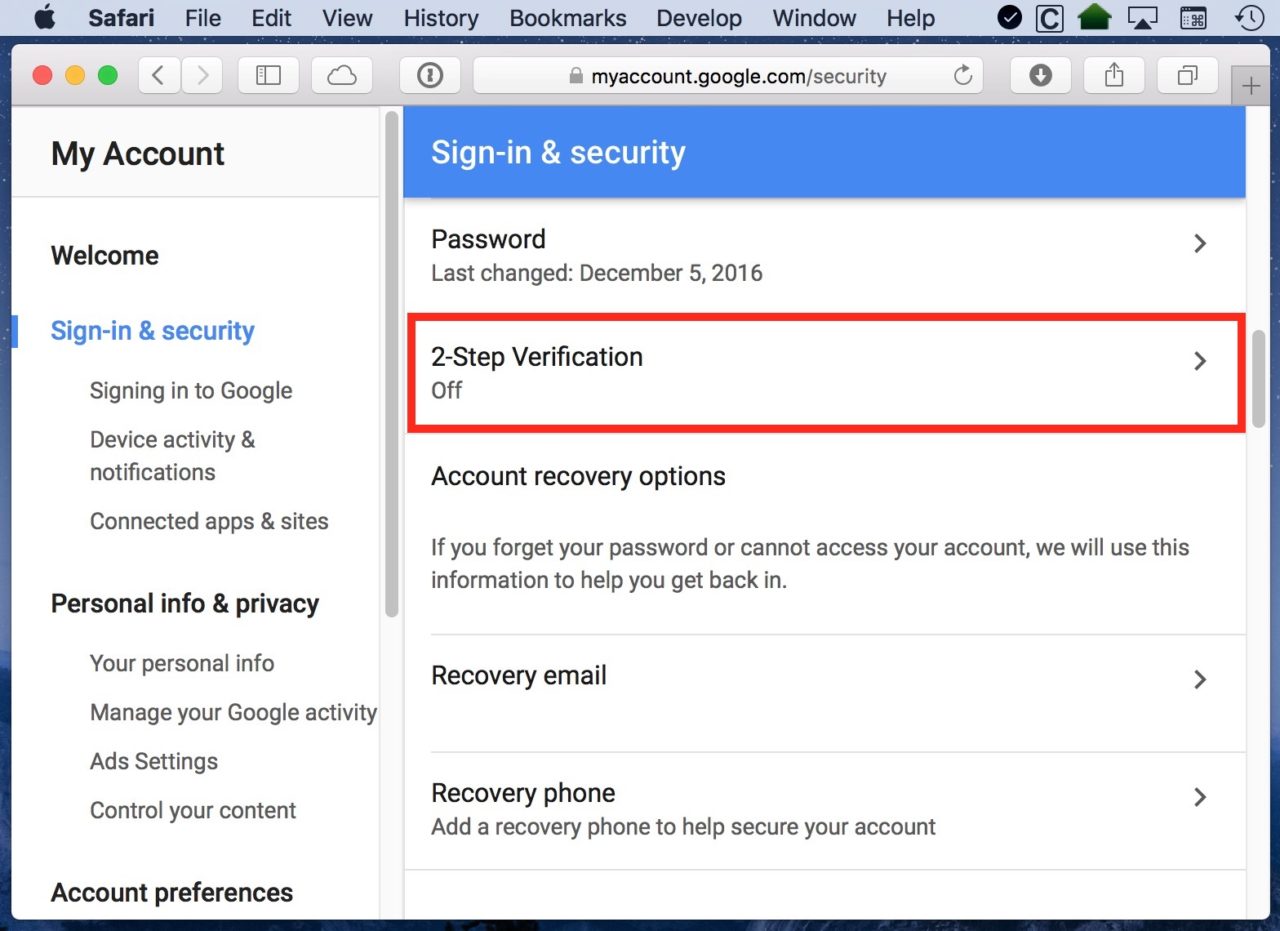
On the next page, scroll down on the right column until you see “2-Step Verification” and click there.

2-Step Verification

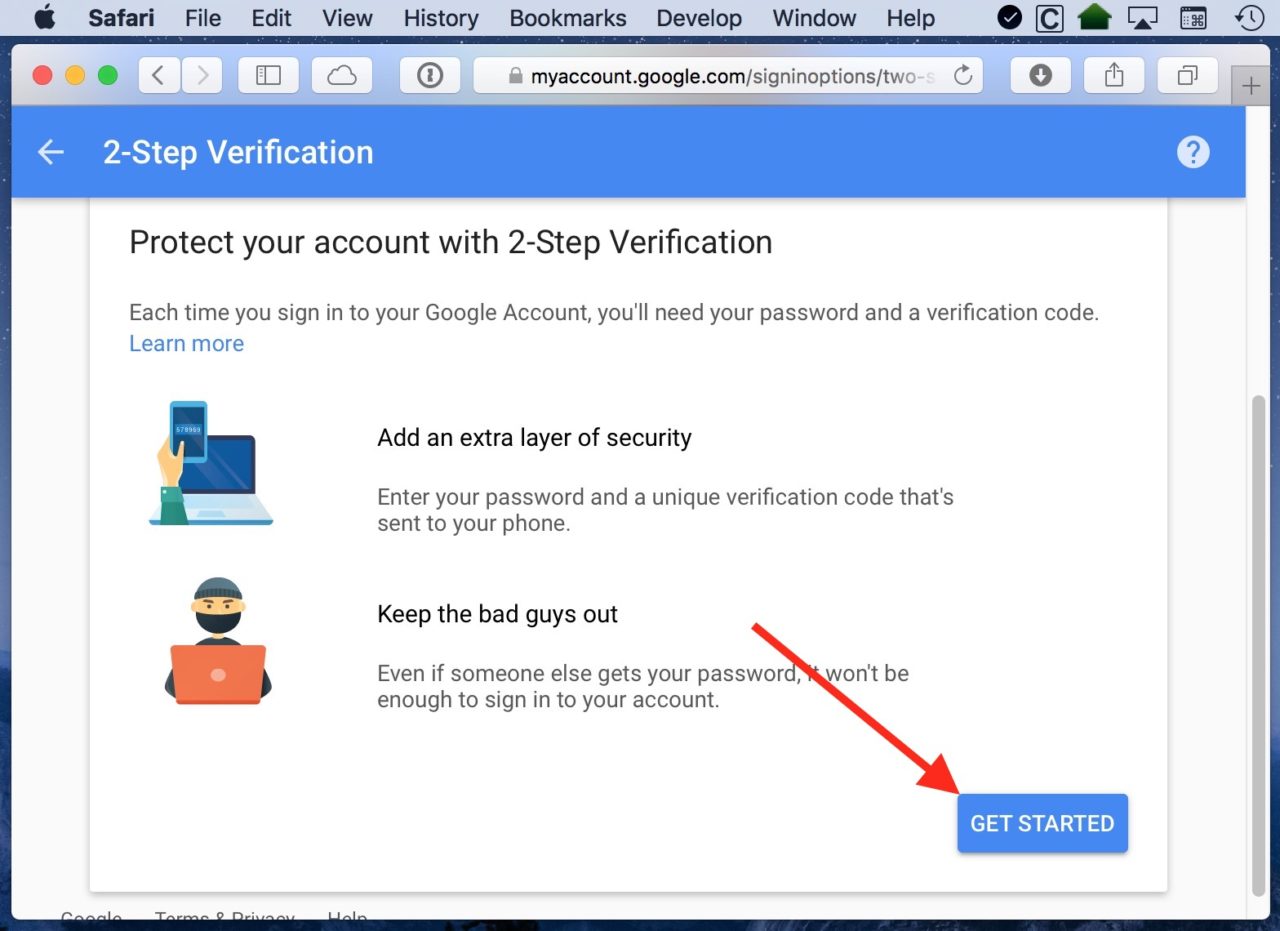
You’ll then see a big “Get Started” button. Select that, and then you’ll likely have to enter your Google password again, just so they can make sure you’re you.

Get Started Button

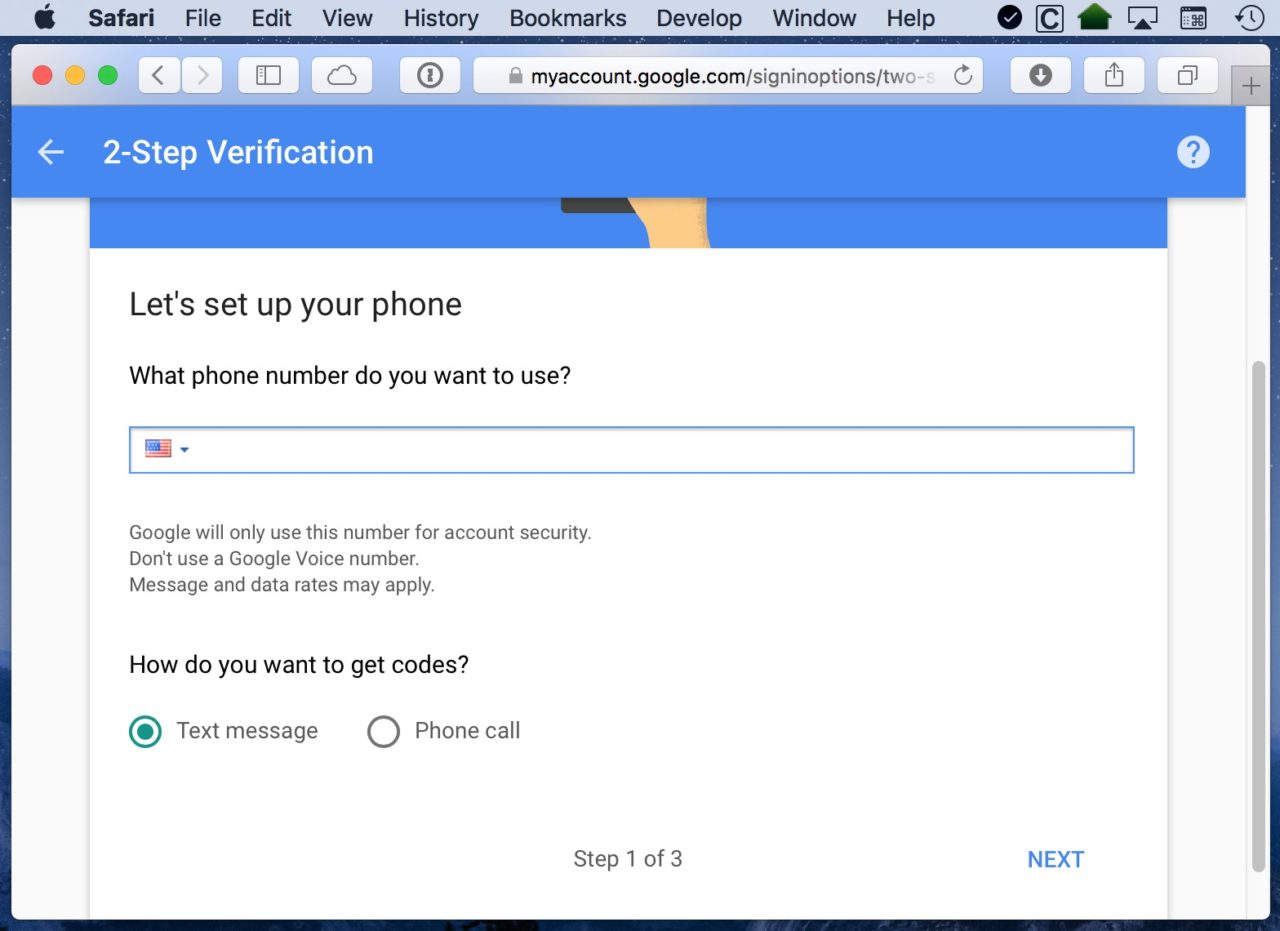
This is where the magic happens. You’ll need to assign a phone number to your Google account if you haven’t already, and you’ll also need to pick whether to get your security codes via text messages or phone calls. (I always opt for texts, as that’s just easier and faster, but you do you.)

Insert Phone Number

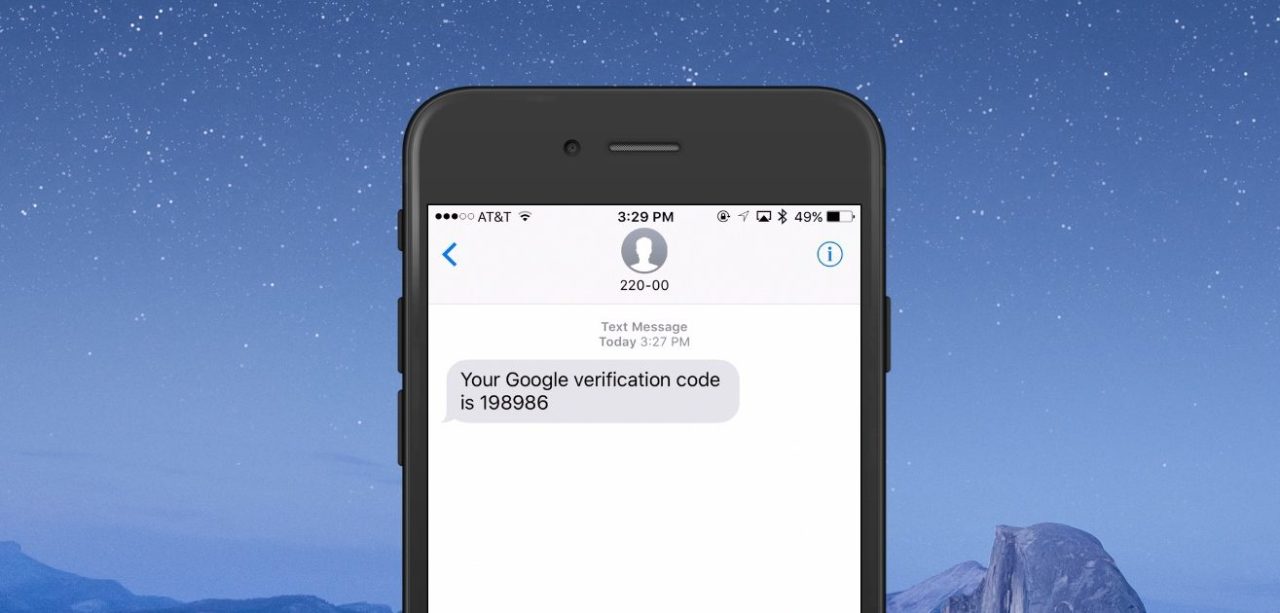
Click “Next” after you type in your number, and then Google will call or text you with the code:

Phone Code

Enter the code in the designated spot in your Web browser:

Code Typed In

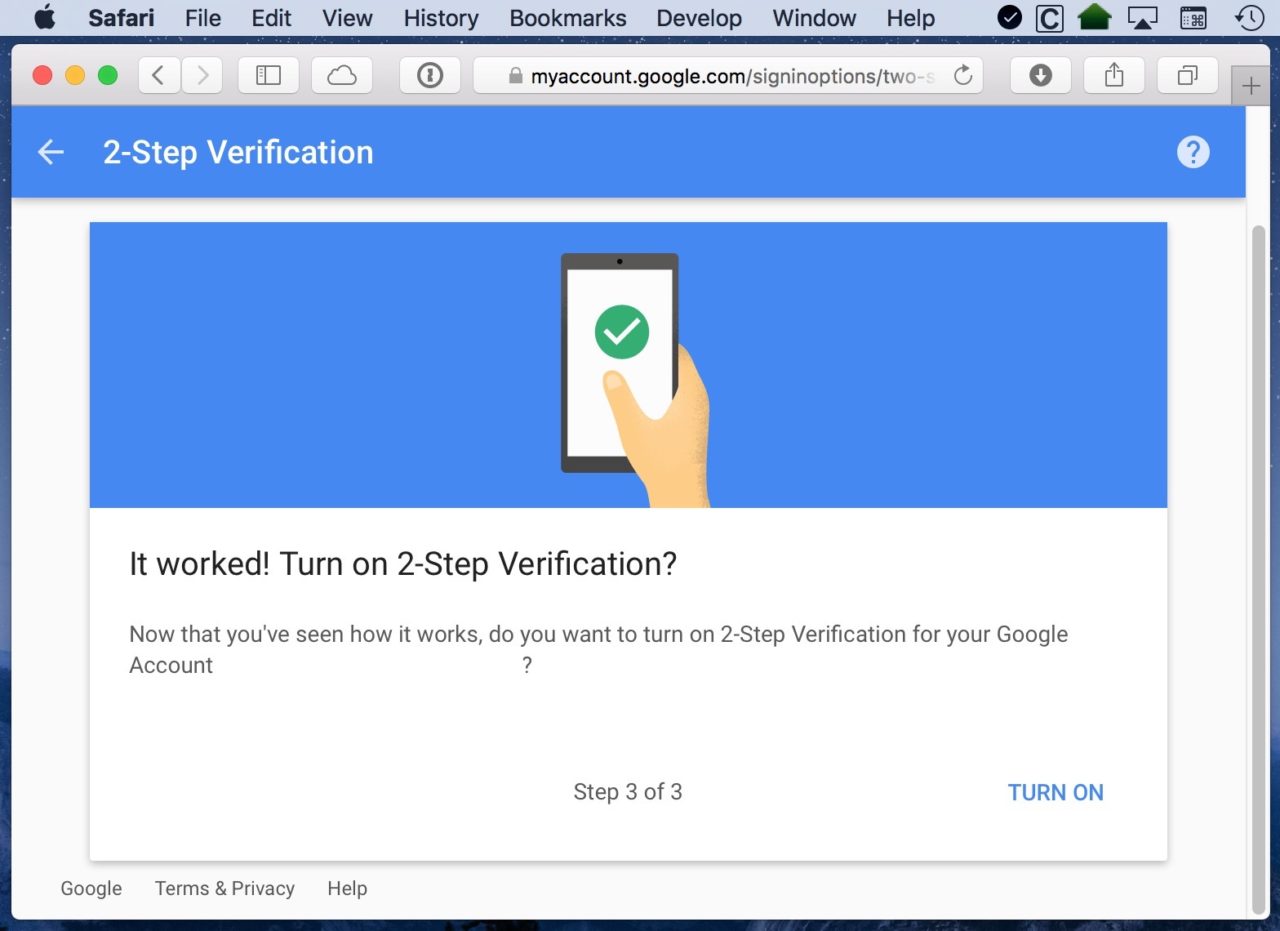
After you’ve typed in that code and clicked “Next” again (whew!), you’ll be asked to confirm that you’re all right with turning this feature on now that you know how it works.

Confirm Turning On

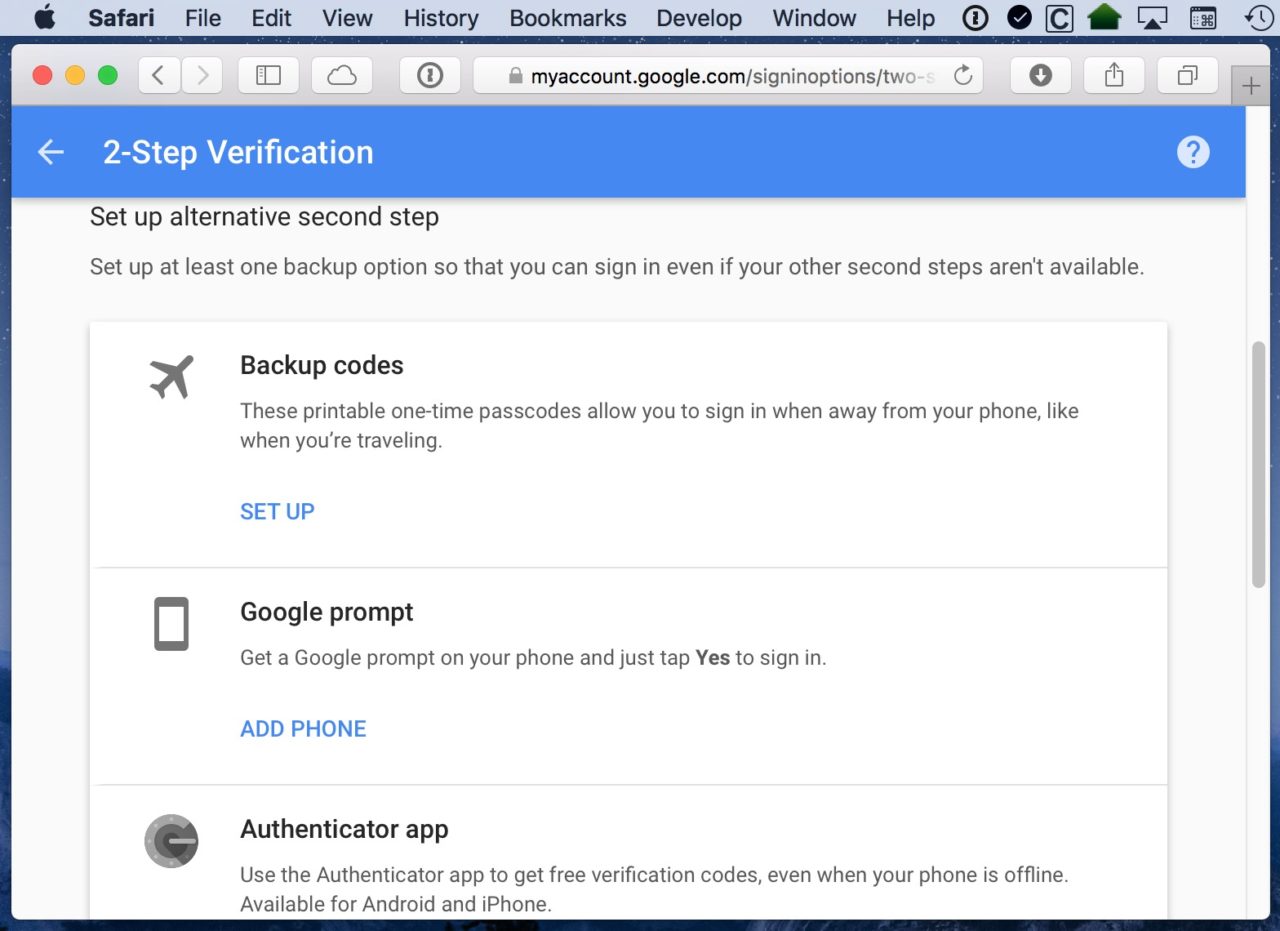
If you are, click “Turn On,” and you’ve done it! On the next page, Google will give you options for configuring some so-called alternative second steps, so if you’re worried you won’t have access to your phone, you can set up an emergency plan. (And for more info on those features, be sure to click on the links on that page to read all about them.)

Second Steps

Two Caveats to 2-Factor Authentication

So now you’re up and running with 2-Factor Authentication. Great! But there are a few caveats you need to keep in mind. First, once 2-Factor is enabled, you’ll have to re-enter your password for your Google account on any devices you’re signed in on. For example, if you’re using Apple Mail on the Mac, you’ll likely get a notification that you need to update the password.

Password Notification

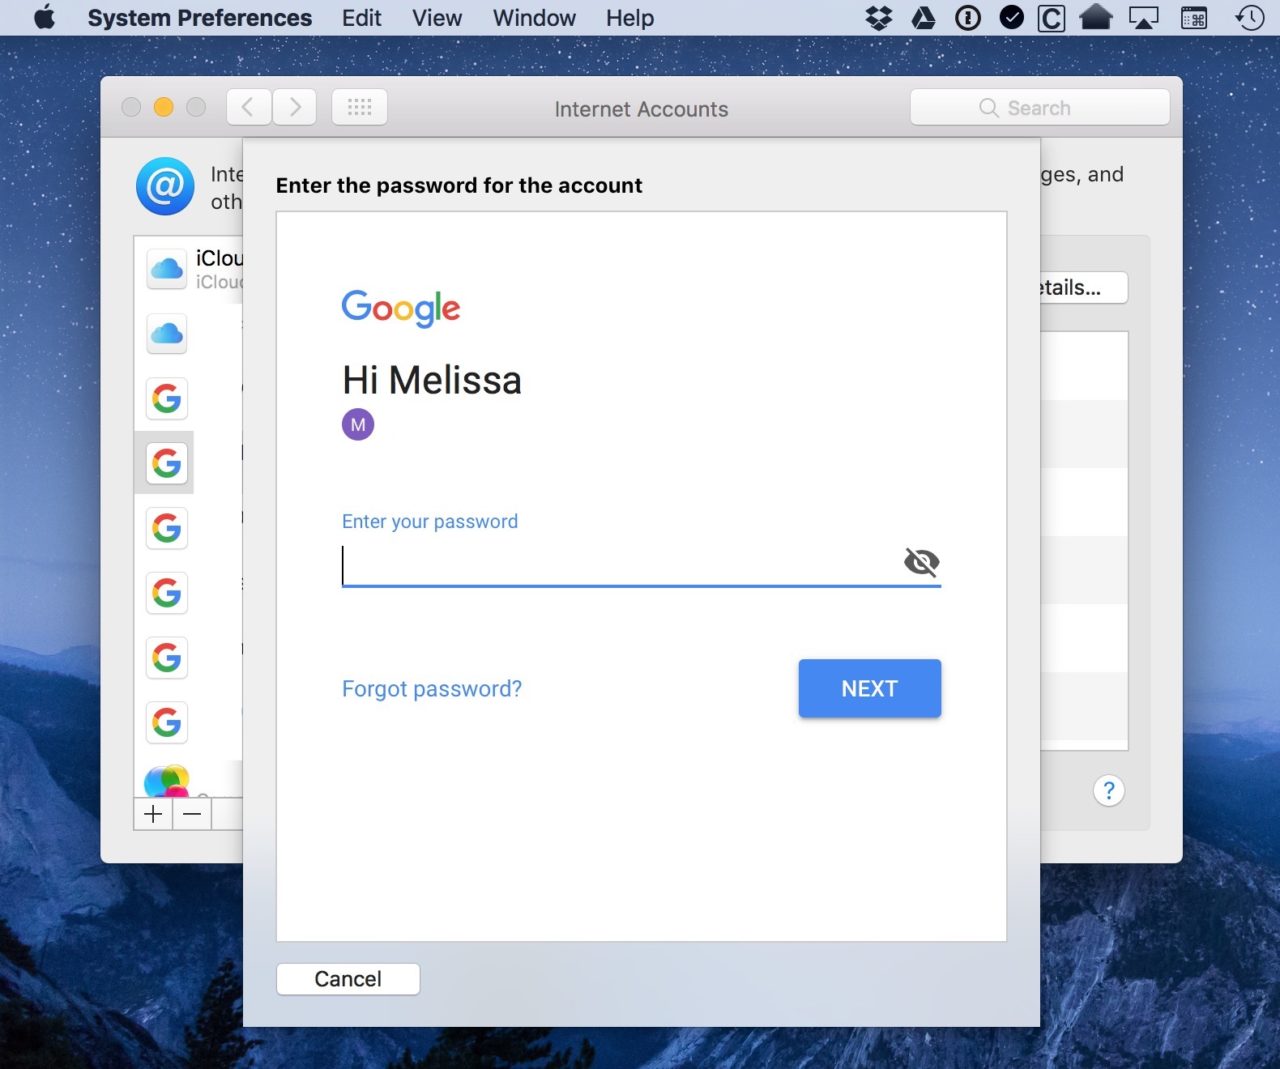
Click “Continue” there, and you’ll be automatically taken to System Preferences to type the password in.

Type in Password

Afterward, you’ll see again how two-step verification works, because you’ll receive a six-digit code to your phone that you’ll have to enter to verify your identity.

Second, know that if you’re running very old or incompatible software, you may have to use what are called App Passwords (or “App Specific Passwords”) to sign in instead of your main account password when you start using two-step verification. If you turn this feature on and you keep getting an error about an incorrect password on your older iPhone, for example, then you’ll want to visit the link above to learn how to generate and use an App Password for email on that device.

So, yeah, there is a little bit of pain-in-the-butt stuff that has to happen, but still, go and do this anyway. It’s a lot of security for very little hassle! And if you’d like to read more on how to turn on Google’s two-step verification and how it’ll protect you, be sure to check out their support page.

Want news and tips from TekRevue delivered directly to your inbox? Sign up for the TekRevue Weekly Digest using the box below. Get tips, reviews, news, and giveaways reserved exclusively for subscribers.
Share this:

  • Click to share on Facebook (Opens in new window)
  • Click to share on Twitter (Opens in new window)
  • Click to share on Google+ (Opens in new window)

  • Categories: Tips
  • Tags: #Gmail #Google #How To #iCloud #Passwords #Security #Tips

Sign Up for the TekRevue Weekly Digest

Read more in Tips on TekRevue

  • google docs macbook
    How to See What’s Taking up All of Your Google Storage Space

    Filed Under: Tips

  • office 365
    How to Deactivate Office 365 on an Old Computer

    Filed Under: Tips

  • google docs macbook
    How to Clear Formatting in Google Docs

    Filed Under: Tips

Search

Related Articles

  • airport nuke
    How to Securely Erase an Apple Time Capsule
  • private browsing iPad
    How to Check Your iPad and iPhone Privacy Settings
  • chrome offline installer
    How to Enable Offline Access of Google Drive Documents on the Mac
  • macos sierra gatekeeper
    How to Disable Gatekeeper and Allow Apps From Anywhere in macOS Sierra

Connect with TekRevue

  • TekRevue on Twitter
  • TekRevue on Facebook
  • TekRevue on Google+
  • Cheats
  • Deals
  • Distractions
  • Editorials
  • Gadgets
  • Games
  • Giveaway
  • Hardware
  • Home Theater
  • Mac
  • Mobile
  • News
  • Podcast
  • Reviews
  • Sponsor
  • More in Tips
  • Windows
  • google docs macbook
    How to See What’s Taking up All of Your Google Storage Space
  • office 365
    How to Deactivate Office 365 on an Old Computer
  • google docs macbook
    How to Clear Formatting in Google Docs
  • photoshop load as layers
    How to Open Multiple Images as Layers in a Single Photoshop Document
  • block notification firefox
    How to Block Website Notifications in Firefox
  • Gmail Tabbed Inbox Update
    Email Tip: How to Block Senders in Gmail
  • center embedded tweet
    Twitter Tip: How to Center Embedded Tweets
  • plex news
    How to Turn Off or Disable Plex News
  • twitter night mode
    How to Enable Twitter Night Mode for iOS, Android, and the Web
  • gmail calendar
    How to Turn Off Gmail Events in Google Calendar
  • amazon ads web
    How to Turn Off Amazon Personalized Ads on the Web
  • reset kindle gift
    How to Factory Reset Your Kindle Before Selling or Giving It Away
  • dropbox file request
    How to Get Files From Anyone Using Dropbox File Request
  • How to Turn on Google 2-Step Verification (And Why You Should!)
  • adobe acrobat
    How to Change the Default View for PDFs in Adobe Acrobat
  • gotomeeting mac
    Quick Tip: Remove Old Versions of GoToMeeting for Mac
  • iCloud
    Stay Organized and Fight Spam With Server-Side iCloud Email Rules
  • spell check word
    How to Turn Off Real-Time Spell Check in Microsoft Word
  • format skype text chats
    How to Format Skype Text Chats
  • chrome for mac os x
    How to Test Chrome’s Native Notifications for Mac

Tips

  • Apps
  • Gaming
  • Mac
  • Mobile
  • Online
  • Windows
  • plex display scaling windows
    How to Adjust Plex Media Player Display Scaling in Windows
  • photoshop load as layers
    How to Open Multiple Images as Layers in a Single Photoshop Document
  • iphone youtube dark theme
    How to Use the New Dark Theme in YouTube for iOS
  • typing keyboard
    How to Paste Text Only By Default in Microsoft Word
  • slow steam browser windows
    Here’s One Potential Fix for a Slow Steam Browser in Windows
  • How to Manually Dim the Xbox One Screen
  • xbox one store games
    How to Browse Games by Genre in the Xbox One Store
  • classic solitaire windows xp
    How to Play Classic Windows XP Solitaire in Windows 10
  • mail email
    Apple Mail: How to Include Only Selected Text in Email Replies
  • photos for mac
    Photos for Mac: Add Images to an Album With a Keyboard Shortcut
  • remote desktop gpu glitch
    Disable Microsoft Remote Desktop Hardware Acceleration to Fix Graphical Glitches
  • microsoft remote desktop mac always trust certificate
    Microsoft Remote Desktop for Mac: Always Trust Certificate
  • mail email
    Apple Mail: How to Include Only Selected Text in Email Replies
  • How to Stop Apple Pay From Appearing on the iPhone Lock Screen
  • iphone control center 3d touch
    How to See Additional Options in Control Center on the iPhone
  • iphone serial number imei
    How to Find Your iPhone Serial Number, UDID, and IMEI
  • google docs macbook
    How to See What’s Taking up All of Your Google Storage Space
  • google docs macbook
    How to Clear Formatting in Google Docs
  • block notification firefox
    How to Block Website Notifications in Firefox
  • Gmail Tabbed Inbox Update
    Email Tip: How to Block Senders in Gmail
  • color explosion laptop
    How to Enable Title Bar Color for Desktop Apps in Windows 10
  • windows 10 lock screen surface studio
    How to Disable the Windows 10 Lock Screen
  • disable sticky keys prompt windows 10
    Windows 10: Disable the Sticky Keys Warning & Beep
  • slow steam browser windows
    Here’s One Potential Fix for a Slow Steam Browser in Windows
Company
  • About TekRevue
  • Get in Touch
  • Sponsorships

Sign Up for the TekRevue Weekly Digest

© TekRevue LLC. All Rights Reserved.

  • TekRevue User Agreement
  • TekRevue Privacy Policy

Built by Blazer Six