


Become a Time Machine Power User With These Terminal Commands

Time Machine was built by Apple to be a simple, easy-to-use method of backing up your Mac’s data. Although a few options for configuring and controlling Time Machine appear in OS X’s System Preferences, the overall level of functionality given to the user via the GUI is lacking, and matches Apple’s “On/Off” mentality for the service. Thankfully, the company includes a more detailed method of controlling Time Machine via the Terminal. Here’s how to become a Time Machine power user!
Say Hello to Time Machine Utility
All of Time Machine’s magic is controlled by tmutil, or Time Machine Utility. This is what you’ll access via Terminal to control and configure the service, but, like most Terminal commands, you’ll need to know the verbs and syntax in order to give the command instructions it can understand. Just about everything you need to know can be found in the command’s manual page, which can be accessed by typing the following in Terminal:
man tmutil
Alternatively, you can access Time Machine Utility’s manual page at Apple’s Mac Developer Library, allowing you to view the manual in a separate browser window while you work inside Terminal.
The manual page explains what the command does and how to use it via a series of verbs, locations, and the correct syntax. Reading over the list of functions, you’ll see options that range from the simple – turn Time Machine on or off – to the more complex – checking to see if a particular file or folder is excluded from a backup, manually associating a backup drive with a new source drive, and comparing two backups to see what’s changed. The functions offered by the latter category are usually available only via the Terminal and are often helpful during advanced troubleshooting.
Enable and Disable Time Machine
Some commands require root privileges, so you’ll need to preface the command with sudo (“superuser do“) and then enter an administrative password when prompted. For example, we’ll start with a simple command to disable Time Machine. Because the manual identifies this as a command that requires root privileges, we’ll type the following into Terminal and then press Return:
sudo tmutil disable
After entering our admin password and pressing Return once again, we’ll find that Time Machine is now disabled on our Mac.
Exclude Specific Files & Folders
Next, let’s try something a bit more advanced, such as excluding an item from a Time Machine backup. For our example, we’ll use a folder on our Desktop called “Scratch.” We don’t want that folder, or its contents, included in our backups. To accomplish this, head back to Terminal and use the “addexclusion” verb of the Time Machine Utility (replace the directory path with a path to your own file, folder, or volume when using this command):
tmutil addexclusion "/Users/TekRevue/Desktop/Scratch"
This is easy enough to do in the Time Machine System Preference pane, but here’s an example of where the Terminal command is more powerful: using the command above, Time Machine will use a location-independent (or “sticky”) method of excluding the identified file or folder. That means that if we run the above command, but then move the Scratch folder to another location on our Mac, it will still be excluded during Time Machine backups.
If you want to exclude items only from a specific location, you can append an option to the command, in this case [-p], to tell Time Machine to use a fixed-path method of exclusion. In our example, the Scratch folder is used for temporary items that we’re not likely to save. But if we change our mind and move a file out of Scratch to, say, our Documents folder, we still want to have that backed up. This is a perfect case for the fixed-path exclusion method. To enable this, we’ll type the same command as above and also add the [-p] option. Note that this requires root privileges so we’ll also use the sudo prefix:
sudo tmutil addexclusion -p "/Users/TekRevue/Desktop/Scratch"
If we change our mind about any exclusion, we can simply re-run the command and replace “addexclusion” with “removeexclusion:”
tmutil removeexclusion "/Users/TekRevue/Desktop/Scratch"
See a Log of Changes Over Time
You can also use the Time Machine Utility to view and analyze usage and changes over time. The “calculatedrift” command looks at each Time Machine snapshot and calculates the difference in file size: how much data was added during the backup, how much was removed, and how much was changed. To get this information, type the following command (note that you may or may not need root privileges for this command depending on the contents of your Time Machine backups):
tmutil calculatedrift [Time Machine Backup Location]
Type, or better yet drag and drop, the location of your Mac’s Time Machine backup location in place of the bracketed placeholder above. Note that this is not your top-level Backups.backupdb folder, but rather your individual Mac’s location, which by default is located one level down. In our case, our Time Machine drive is fittingly labeled “Time Machine” and our Mac is labeled “iMac,” so we typed:
tmutil calculatedrift “/Volumes/Time Machine/Backups.backupdb/iMac”
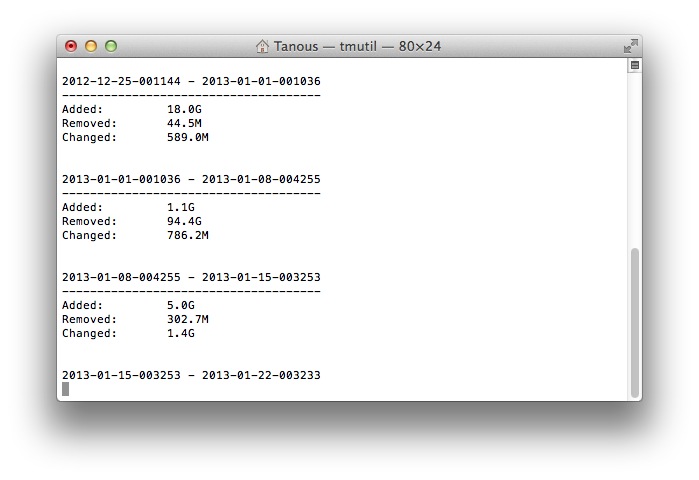
The output of this command can take a long time depending on how many snapshots you have and how fast your Time Machine drive is. Once completed, you’ll get an individual report on the changes during each snapshot as well as a final report on the average changes across all snapshots.
Associate a New Drive with an Existing Time Machine Backup
Apple configured Time Machine to identify source drives with a unique identifier (UUID), something that is assigned when the drive is formatted and a new file system is created. Time Machine won’t incrementally back up a new drive to an existing set of snapshots; it will instead create a separate backup point when enabled and backup everything anew. This usually works fine, and helps prevent critical Time Machine data from getting mixed up between drives if you connect your external Time Machine drive to another computer, for example.
But what if your Mac’s system drive is starting to fail and you clone the data to a new drive? Or what if you’ve just restored a new Mac from a Time Machine backup? In both cases, most users would want to continue to use the existing Time Machine backup instead of starting from scratch but, because any new or reformatted drive has a different UUID, Time Machine won’t recognize it.
To solve this problem, you can manually associate a Time Machine backup with a new drive using the “associatedisk” command. To start, browse to your Time Machine backup drive and find the latest snapshot, which should be located at /Volumes/[Time Machine Drive]/Backups.backupdb/[System Name]/Latest/[Drive].
Next, open Terminal, type the following command, and press Return. Use the path above for “Snapshot Volume” and the path of your new or newly formatted drive as “Source:”
sudo tmutil associatedisk [-a] “[Source]” “[Snapshot Volume]”
In our iMac example, the command is:
sudo tmutil associatedisk [-a] “/Volumes/System” “/Volumes/Time Machine/Backups.backupdb/iMac/System”
You’ll need to enter your admin password but, after doing so, you’ll find that Time Machine now treats your new drive exactly the same as your old drive, and your backups will be incremental instead of complete backups from scratch. This can save both time and allow you to access and restore older data.
Keep Exploring
There are many more Time Machine Utility functions and commands to explore, so check out the manual page for more info. You can also use these commands in conjunction with AppleScripts to create just about any custom workflow you can think of.
Apple may have made Time Machine seem simple, but with a little experimentation in Terminal with tmutil, you can unlock its true power.


5 thoughts on “Become a Time Machine Power User With These Terminal Commands”
Here’s my setup..
I have a 2012 15″ macbook pro
I’ve taken out the optical drive and have a second harddrive
and I own an older 2TB Time Capsule
I used to have 2 smaller drives (SSD and mechanical) that were combined as a fusion drive
Combined it was 120+750 = 870GB, so backing up to a 2TB thing was fine.
In my current setup I have 1TB SSD and 1TB mechanical drive
Not combined as a fusion. But together, the 2TB time capsule no longer cuts it.
What I want… is the 1TB SSD drive backed up to the time capsule’s internal drive and the secondary 1TB hard drive backed up to another external drive (maybe connected to the USB port on the time capsule)
Is there an elegant way to send 1 drive to 1 drive and another drive to another drive?
Before reading, excuse my english, I’m german…
My designated 3TB external USB3 Time Machine hard disk stopped working. The OS would not recognize it as a TM volume.
I think the reason were to many shutdowns without a clean dismounting.
So I stopped TM and was able to copy all data to a new 500GB USB3 drive. After that 170GB were still left on that volume. Should be enough to continue the backup.
When I tried to start TM again it said that there was not enough space left on the new disk.
As I found out TM wanted to create a new backup. At least the disk was recognized as a suitable TM volume.
So I thought OK, let’s try the “old” 3TB disk again and copied all data from “USB3_500GBP” to “Conrad”.
Btw: the old 3TB disks name is “Conrad”, the new ones name is “USB3_500GBP”, my machine is called “Michaels-Mini” and my user name is “mo”.
So i followed your instructions and opened a terminal and typed:
sudo tmutil associatedisk -a “/Volumes/USB3_500GBP” “/Volumes/Conrad/Backups.backupdb/Michaels Mac mini/2015-07-02-150037/Mac OS X/System”
the system returned:
/Volumes/Conrad/Backups.backupdb/Michaels Mac mini/2015-07-02-150037/Mac OS X/System: Not a snapshot volume.
I tried it the other way round
sudo tmutil associatedisk -a “/Volumes/Conrad” “/Volumes/USB3_500GBP/Backups.backupdb/Michaels Mac mini/2015-07-02-150037/Mac OS X/System”
same result
/Volumes/USB3_500GBP/Backups.backupdb/Michaels Mac mini/2015-07-02-150037/Mac OS X/System: Not a snapshot volume.
What am I doing wrong?
Any help is highly appreciated
sincerely
Michael
I will explain my system, and what I would like to do.
I have a Mac Pro, and the HDD system is this:
Bay1 MacHD
Bay2 User folders
Bay3 Data (Import folder for raw images/raw music/wav files, VM machines etc)
Bay4 Internal 3TB TM volume.
Selection of External NAS4Free home built servers. These have Time Machine volume option, where any added HDD can be setup and instantly recognised by TM as a correct TM volume.
Curent Strategy:
Mac HD and User HD backup to internal TM volume..with exclusions (Data HDD, trash folders, etc)
Data HDD backups up run manually using Chronosync to the external NAS4Free servers.
What I would like:
Mac HD and User HD backup to internal TM volume..with exclusions (Data HDD, trash folders, etc)
When I power up the external server, manually change the TM volume to the external TM volume and use a different exclusion list and use TM to backup my internal Data volume rather than Chronosync.
To do this at the moment requires manual editing of the Exclusion list each time, and then putting it back as it was afterwards
Drive A is 4TB and is big enough to backup my entire computer. However, Drive B is only 2TB and is not large enough to backup my entire computer. What I would like to do is backup everything to Drive A, but exclude certain files from Drive B.