FileVault Tips
Now that you’re set up with FileVault encryption on your Mac, you’ll want to make sure you’re taking full advantage of the protection that FileVault provides. First, don’t leave your Mac logged in and unattended in any public location. It’s a good idea to make sure that you configure your Mac to require a password when waking from sleep or a screensaver (you can do this in System Preferences > Security & Privacy > General), and you’ll want to get in the habit of fully shutting down your Mac whenever there’s a chance of unauthorized access.
The reason for the above precautions is that FileVault 2 is transparent to the user after an authorized log in. Your data may still be encrypted, but if you’re logged in with an authorized user account, anyone with physical or remote access to your system can see, edit, copy, or destroy your data just the same as you could. Securing the Mac with a screensaver or sleep password helps, but to fully “lock down” the encrypted drive, you’ll want to perform a complete shutdown.
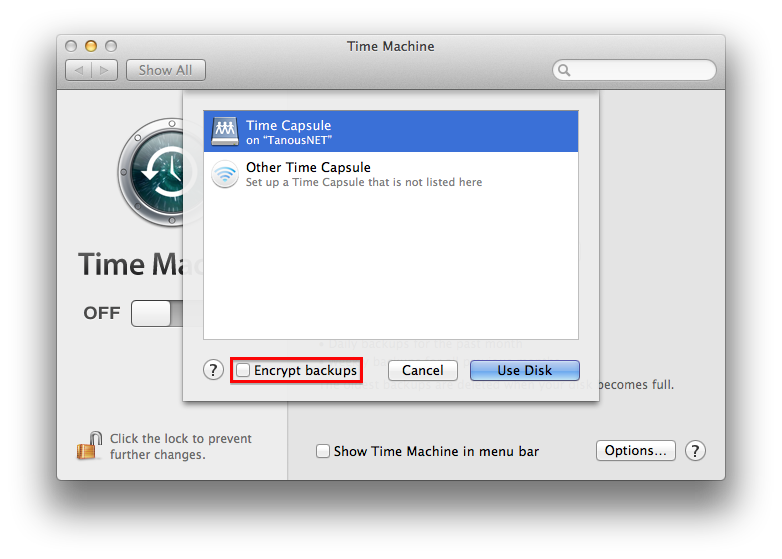
Next, you’ll need to consider the protection of your backups. Your Mac’s system drive may be encrypted, but your backups may not be by default. If you’re using Apple’s Time Machine, you can easily rectify this by going to System Preferences > Time Machine > Select Disk and checking the box Encrypt Backups. If you’re using a third party backup solution, check to see if the software or service offers an option for encrypted backups.
Finally, for Macs with multiple user accounts, you can manage which users can unlock a FileVault-protected Mac. In our examples and discussions above, there was only a single admin user account. If a Mac has multiple user accounts, you’ll be prompted to choose authorized users when first enabling FileVault in System Preferences. Simply click the Enable User button and enter that user’s password for each account that you want to be able to boot and decrypt the Mac. Note that while these users will be able to decrypt the entire system drive, the standard OS X user protections remain in place, meaning that one user won’t be able to see another user’s non-shared data from the Finder.
Lock it Down
Not every user needs (or will be able to use) FileVault, but Apple’s whole disk encryption feature has many benefits and should definitely be considered by users with sensitive data (especially MacBook users frequently on the go). While no security scheme is ever completely guaranteed, with the right hardware and a proper backup solution FileVault can offer excellent protection for critical data via an easy setup process and minimal performance hit.
Those with multiple drives or non-standard drive configurations will need to look elsewhere for their encryption needs, but for most Mac users FileVault provides a great benefit with Apple’s usual “set it and forget it” configuration.
This article aimed to present a general overview of FileVault and why an average Mac user might consider enabling it. Those interested in a deeper technical discussion of FileVault encryption and deployment strategies can check out Apple’s FileVault 2 White Paper (PDF). There are also numerous independent analyses of FileVault’s encryption, including this 2012 paper (PDF) explaining how FileVault 2 can be defeated (don’t worry, it requires physical access to a logged-in Mac).
Finally, FileVault can be turned off just as easily as it can be turned on. If you’d like to disable FileVault, simply head back to System Preferences > Security & Privacy > FileVault, unlock the padlock with an admin account and password, and click “Turn FileVault Off.”
Want more tips like this? Sign up for the TekRevue Weekly Digest using the box below. Get tips, reviews, news, and giveaways reserved exclusively for subscribers.

