TekRevue

  • HOME
  • MAC
  • macOS MOJAVE
  • iOS 12
  • WINDOWS
  • MOBILE
  • GAMES
  • REVIEWS
  • EDITORIALS
  • TIPS
    • Windows
    • Mac
    • Mobile
  • Twitter
  • Facebook
  • Google+
  • Feed
document watermark

Mac

How to Watermark PDFs on the Mac

By Melissa Holt on May 7, 2019 at 3:55 PM • @MelissaCHolt

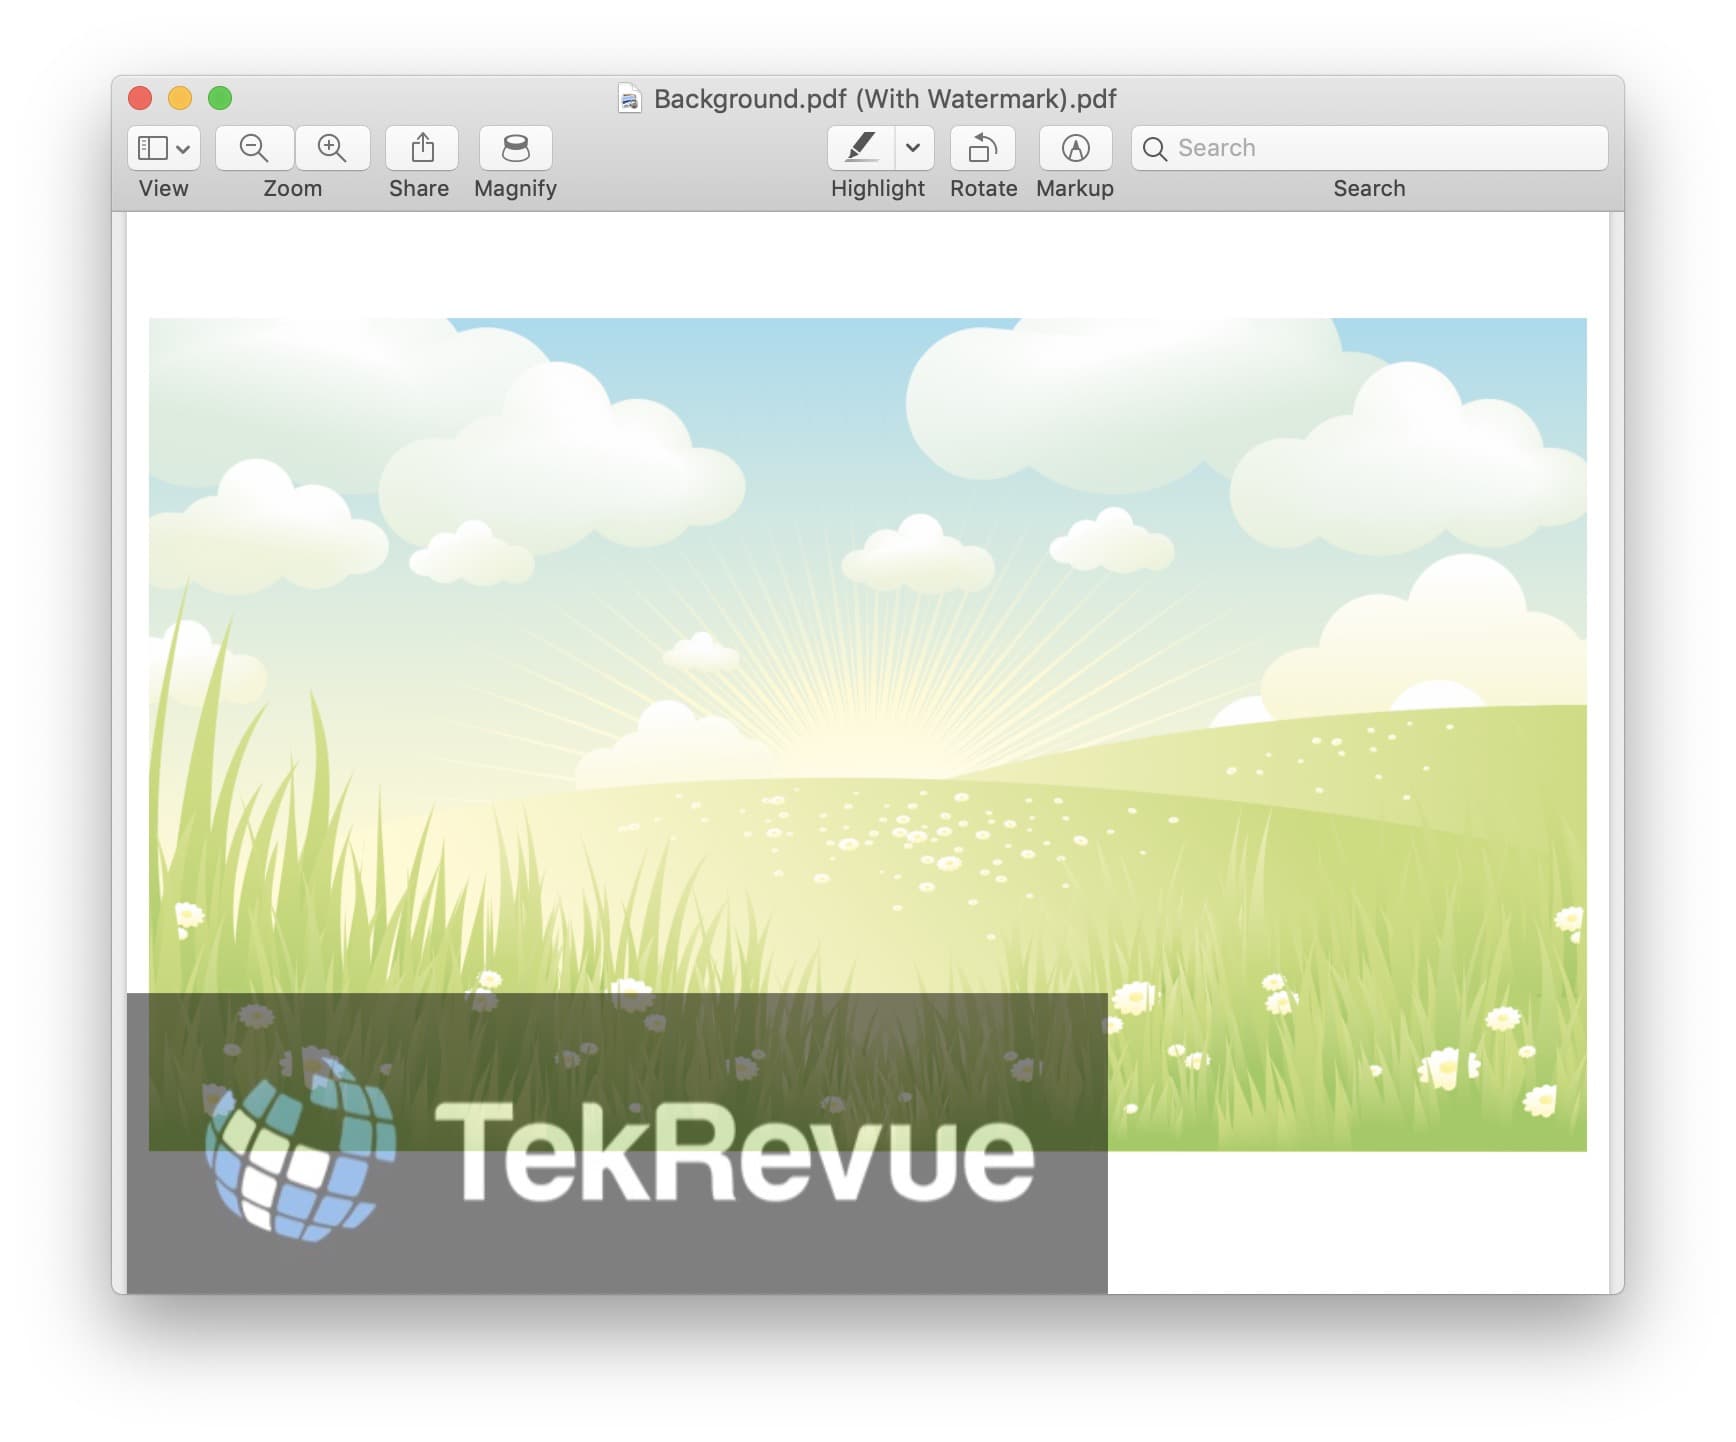
If you’ve got some assets you would like to protect in a PDF, one way you could try to do so is to watermark the whole file. This won’t necessarily stop someone from copying and pasting out of your PDF, of course, but it would prevent casual users from being able to pass your work off as their own. Hey, anything we can do to thwart thieves is good, right?

We’ll do this by creating our very own tiny little watermarking program through the magic of an app on our Macs called Automator. Automator is incredibly powerful but also not very well known; even if you’ve been on a Mac for years, you may have never opened it. It’s used for basic scripting tasks and creating plugins of different types, but don’t let that scare you off! I’ll get you through it, friends.

Step 1: Locate Your Watermark Image

The very first thing you’ll need to do is locate the image (such as a file in JPEG, TIFF, or PNG format) you’d like to use as a watermark. This could be your logo. This could be a photo of your face. This could be pretty much anything you want, but not only do you have to know where it lives in your file system, you’ll have to leave it there for my steps below to work. If you create this watermark app but then move the file you’re using to watermark PDFs, it’ll break everything. Just so you know.

Step 2: Create Your Automator Watermark App

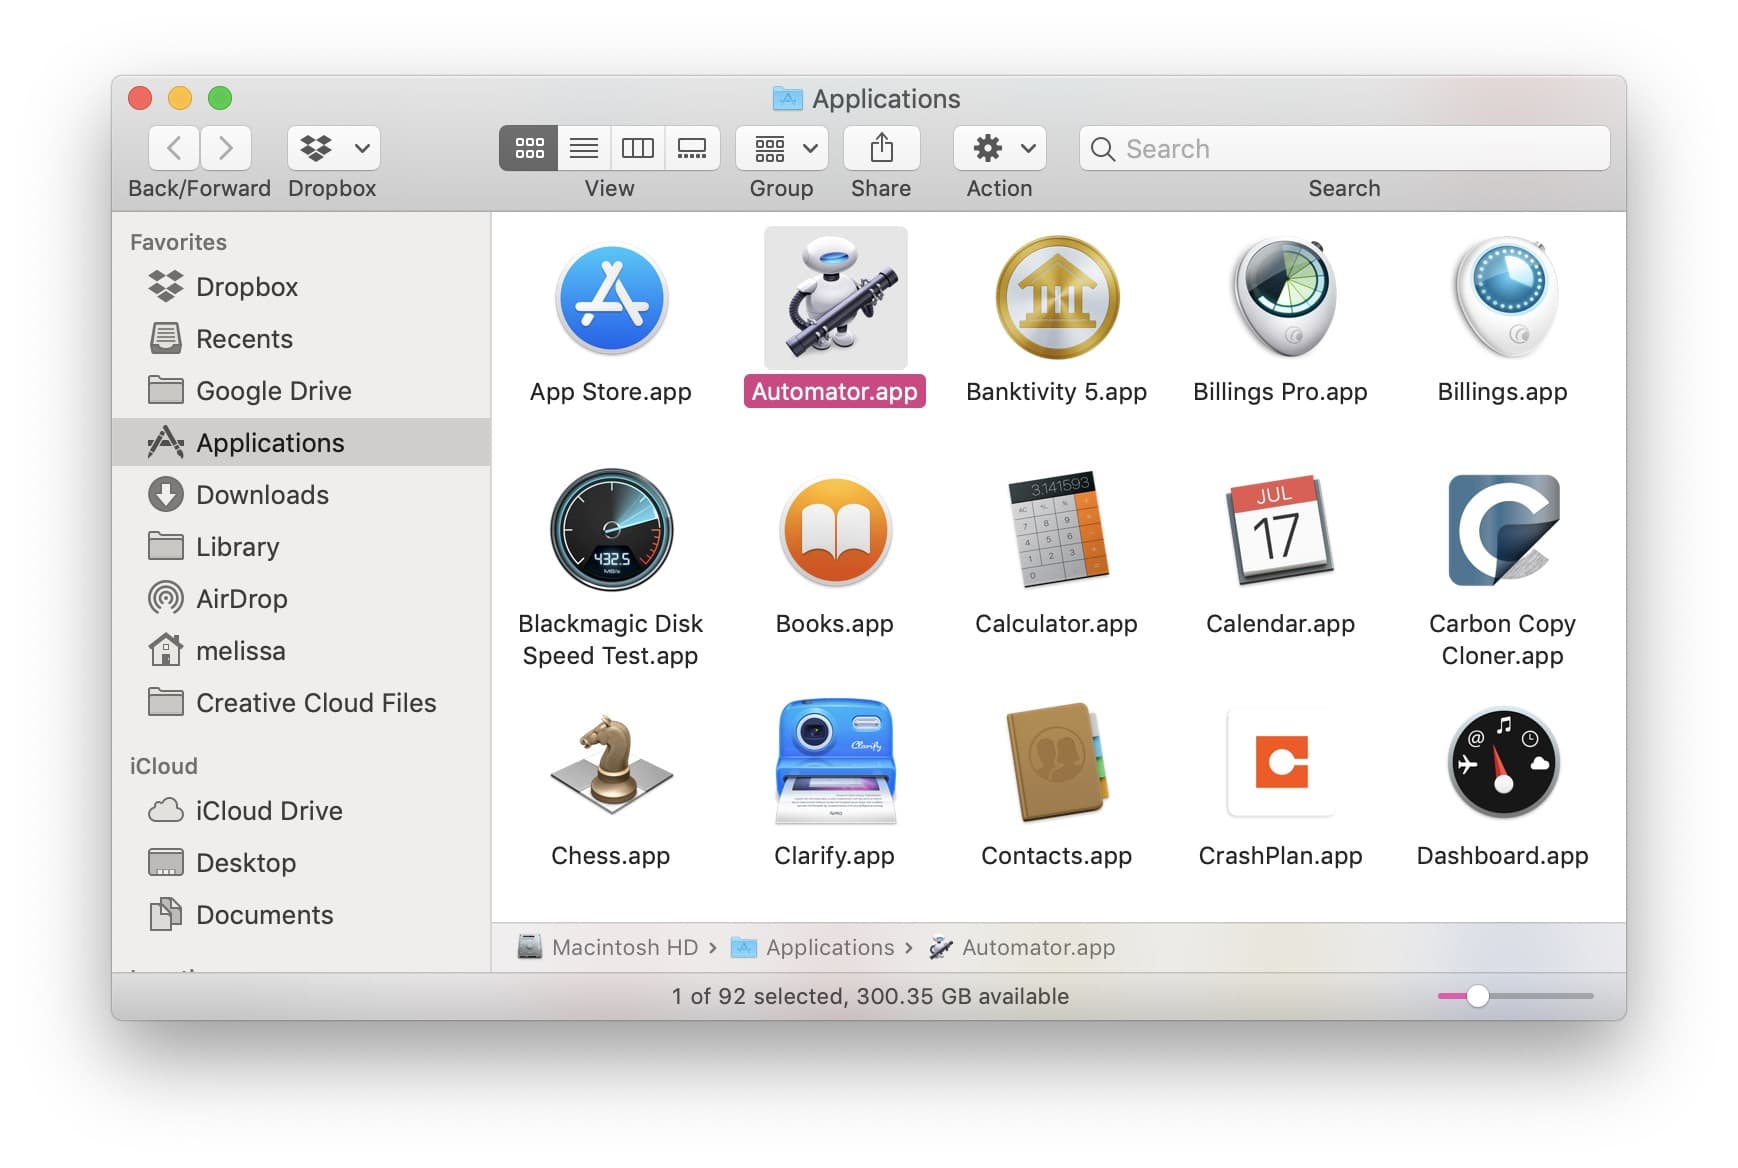
First, launch Automator, which is located by default in your Applications folder.

automator app mac

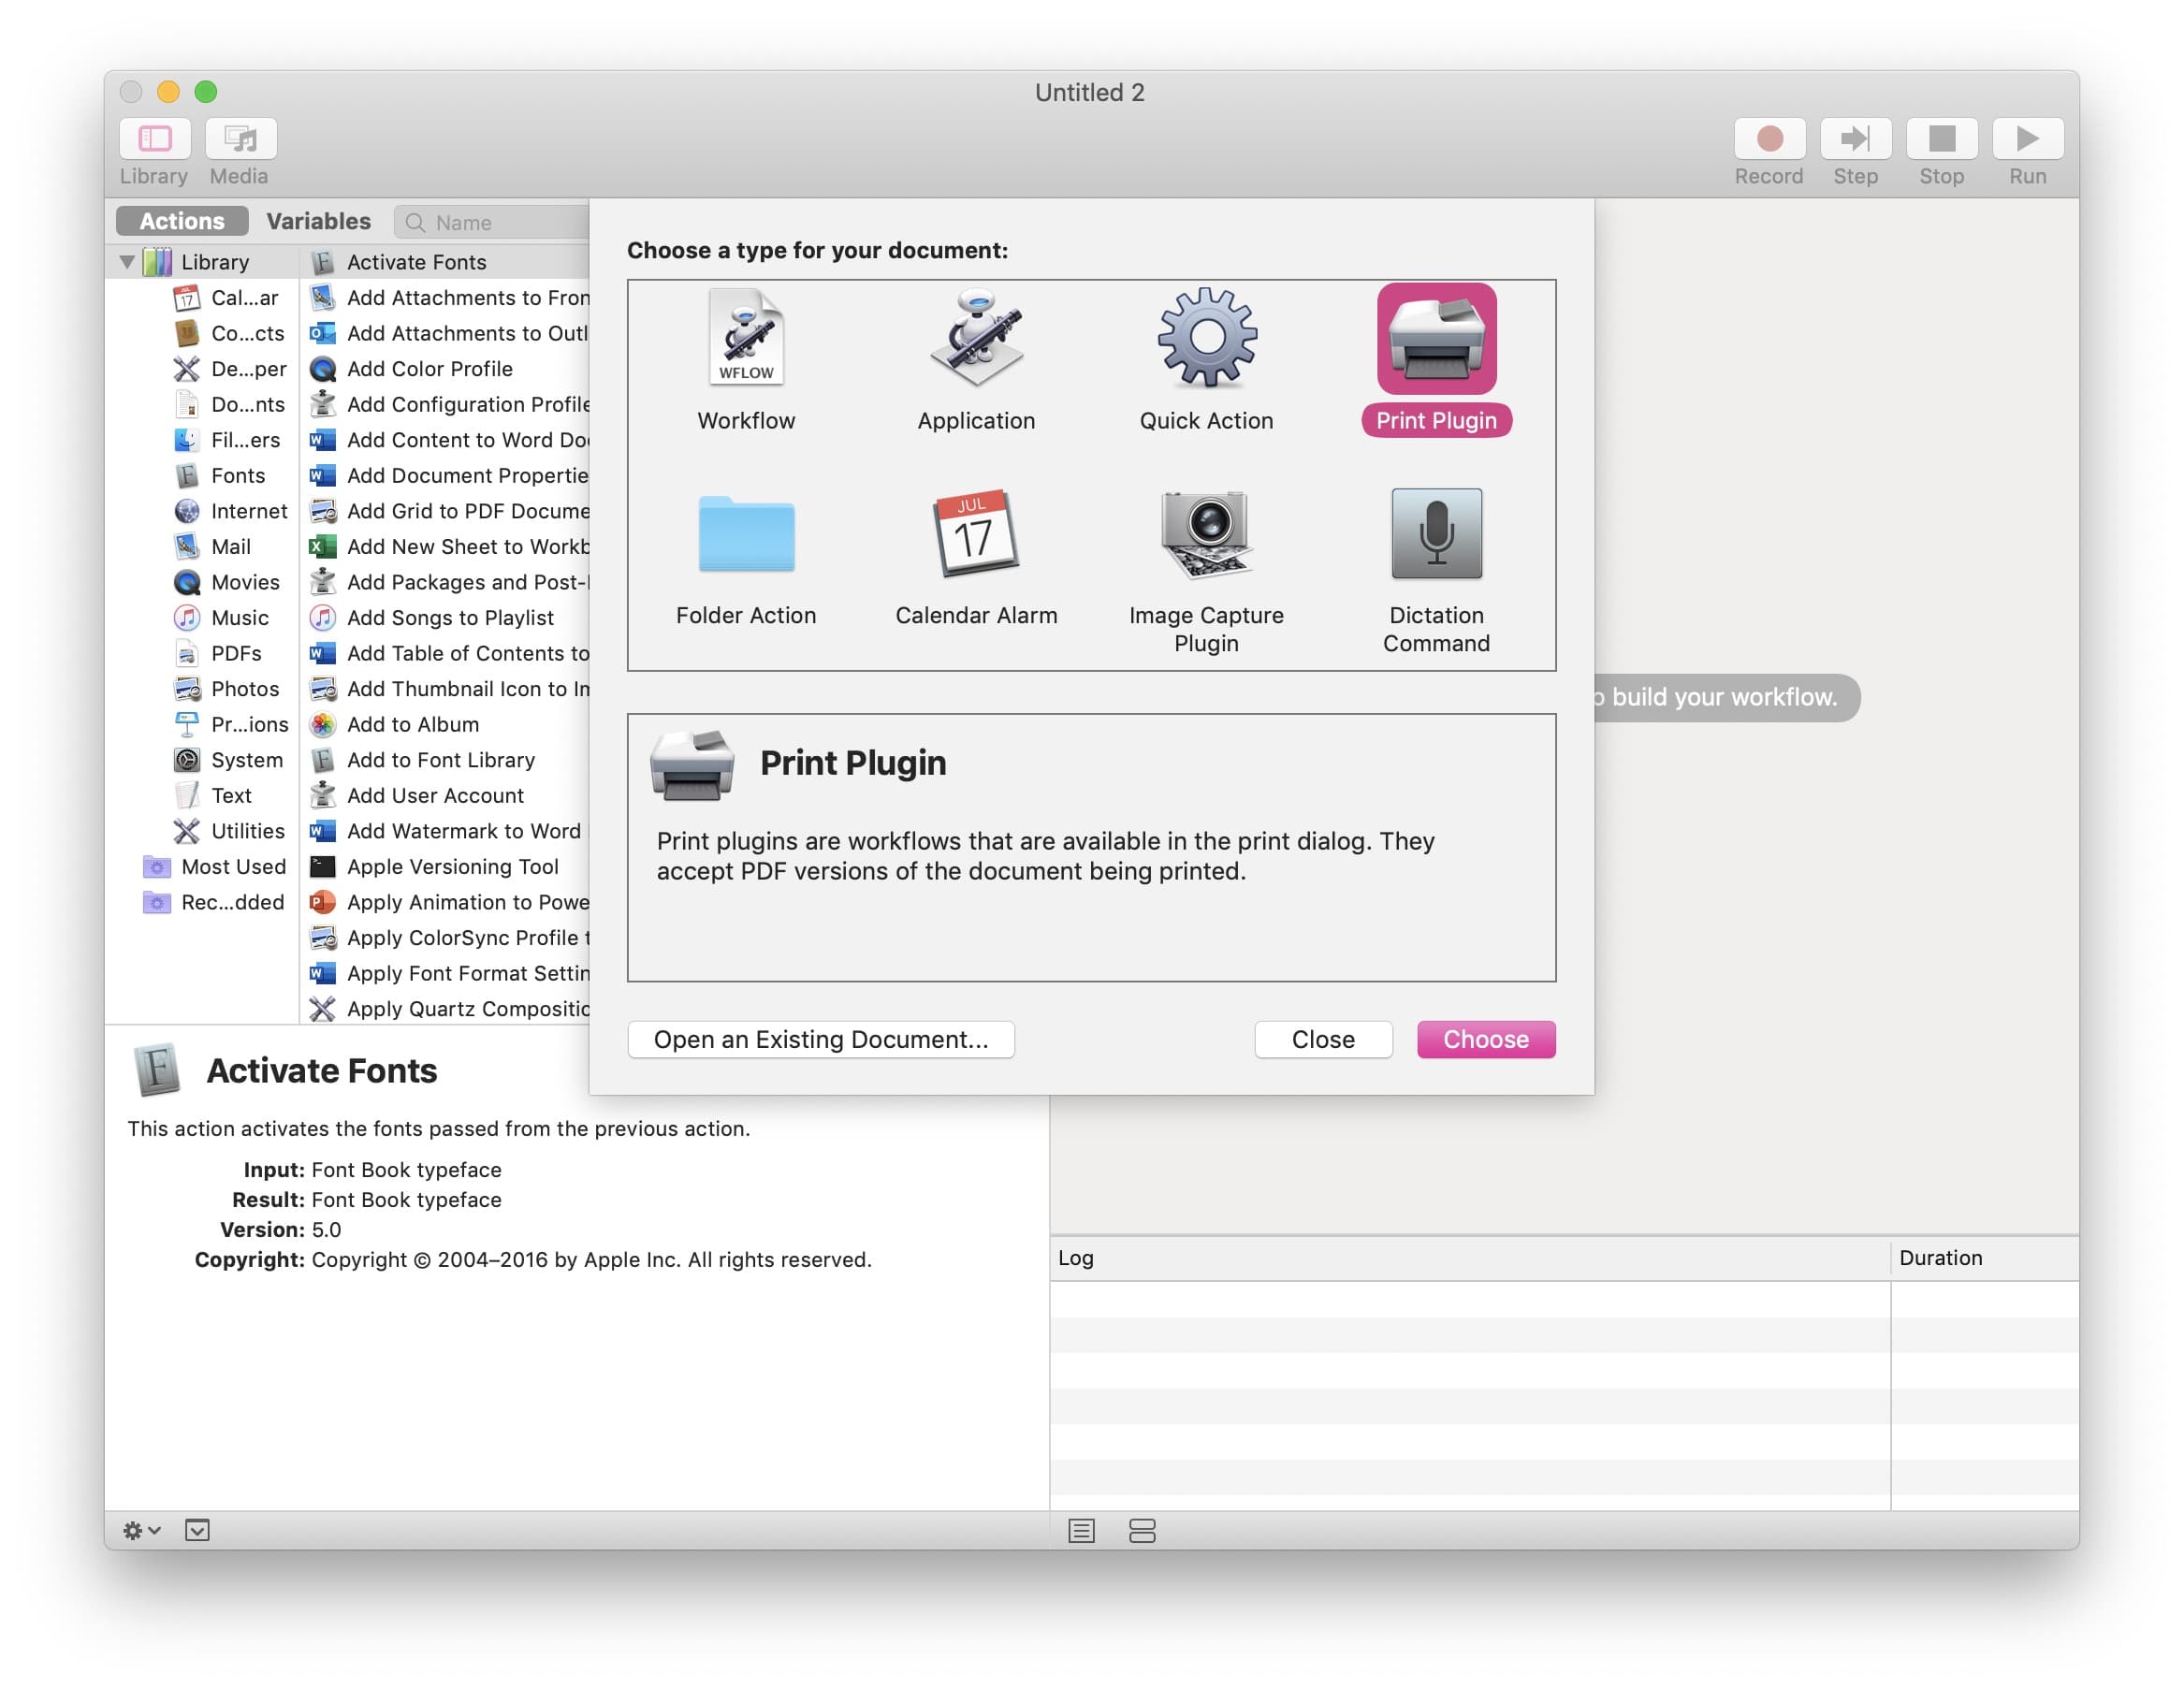
Launch Automator and select New Document or choose File > New from the menu bar at the top of the screen. From the window that appears, select Print Plugin and click Choose.

automator new print plugin

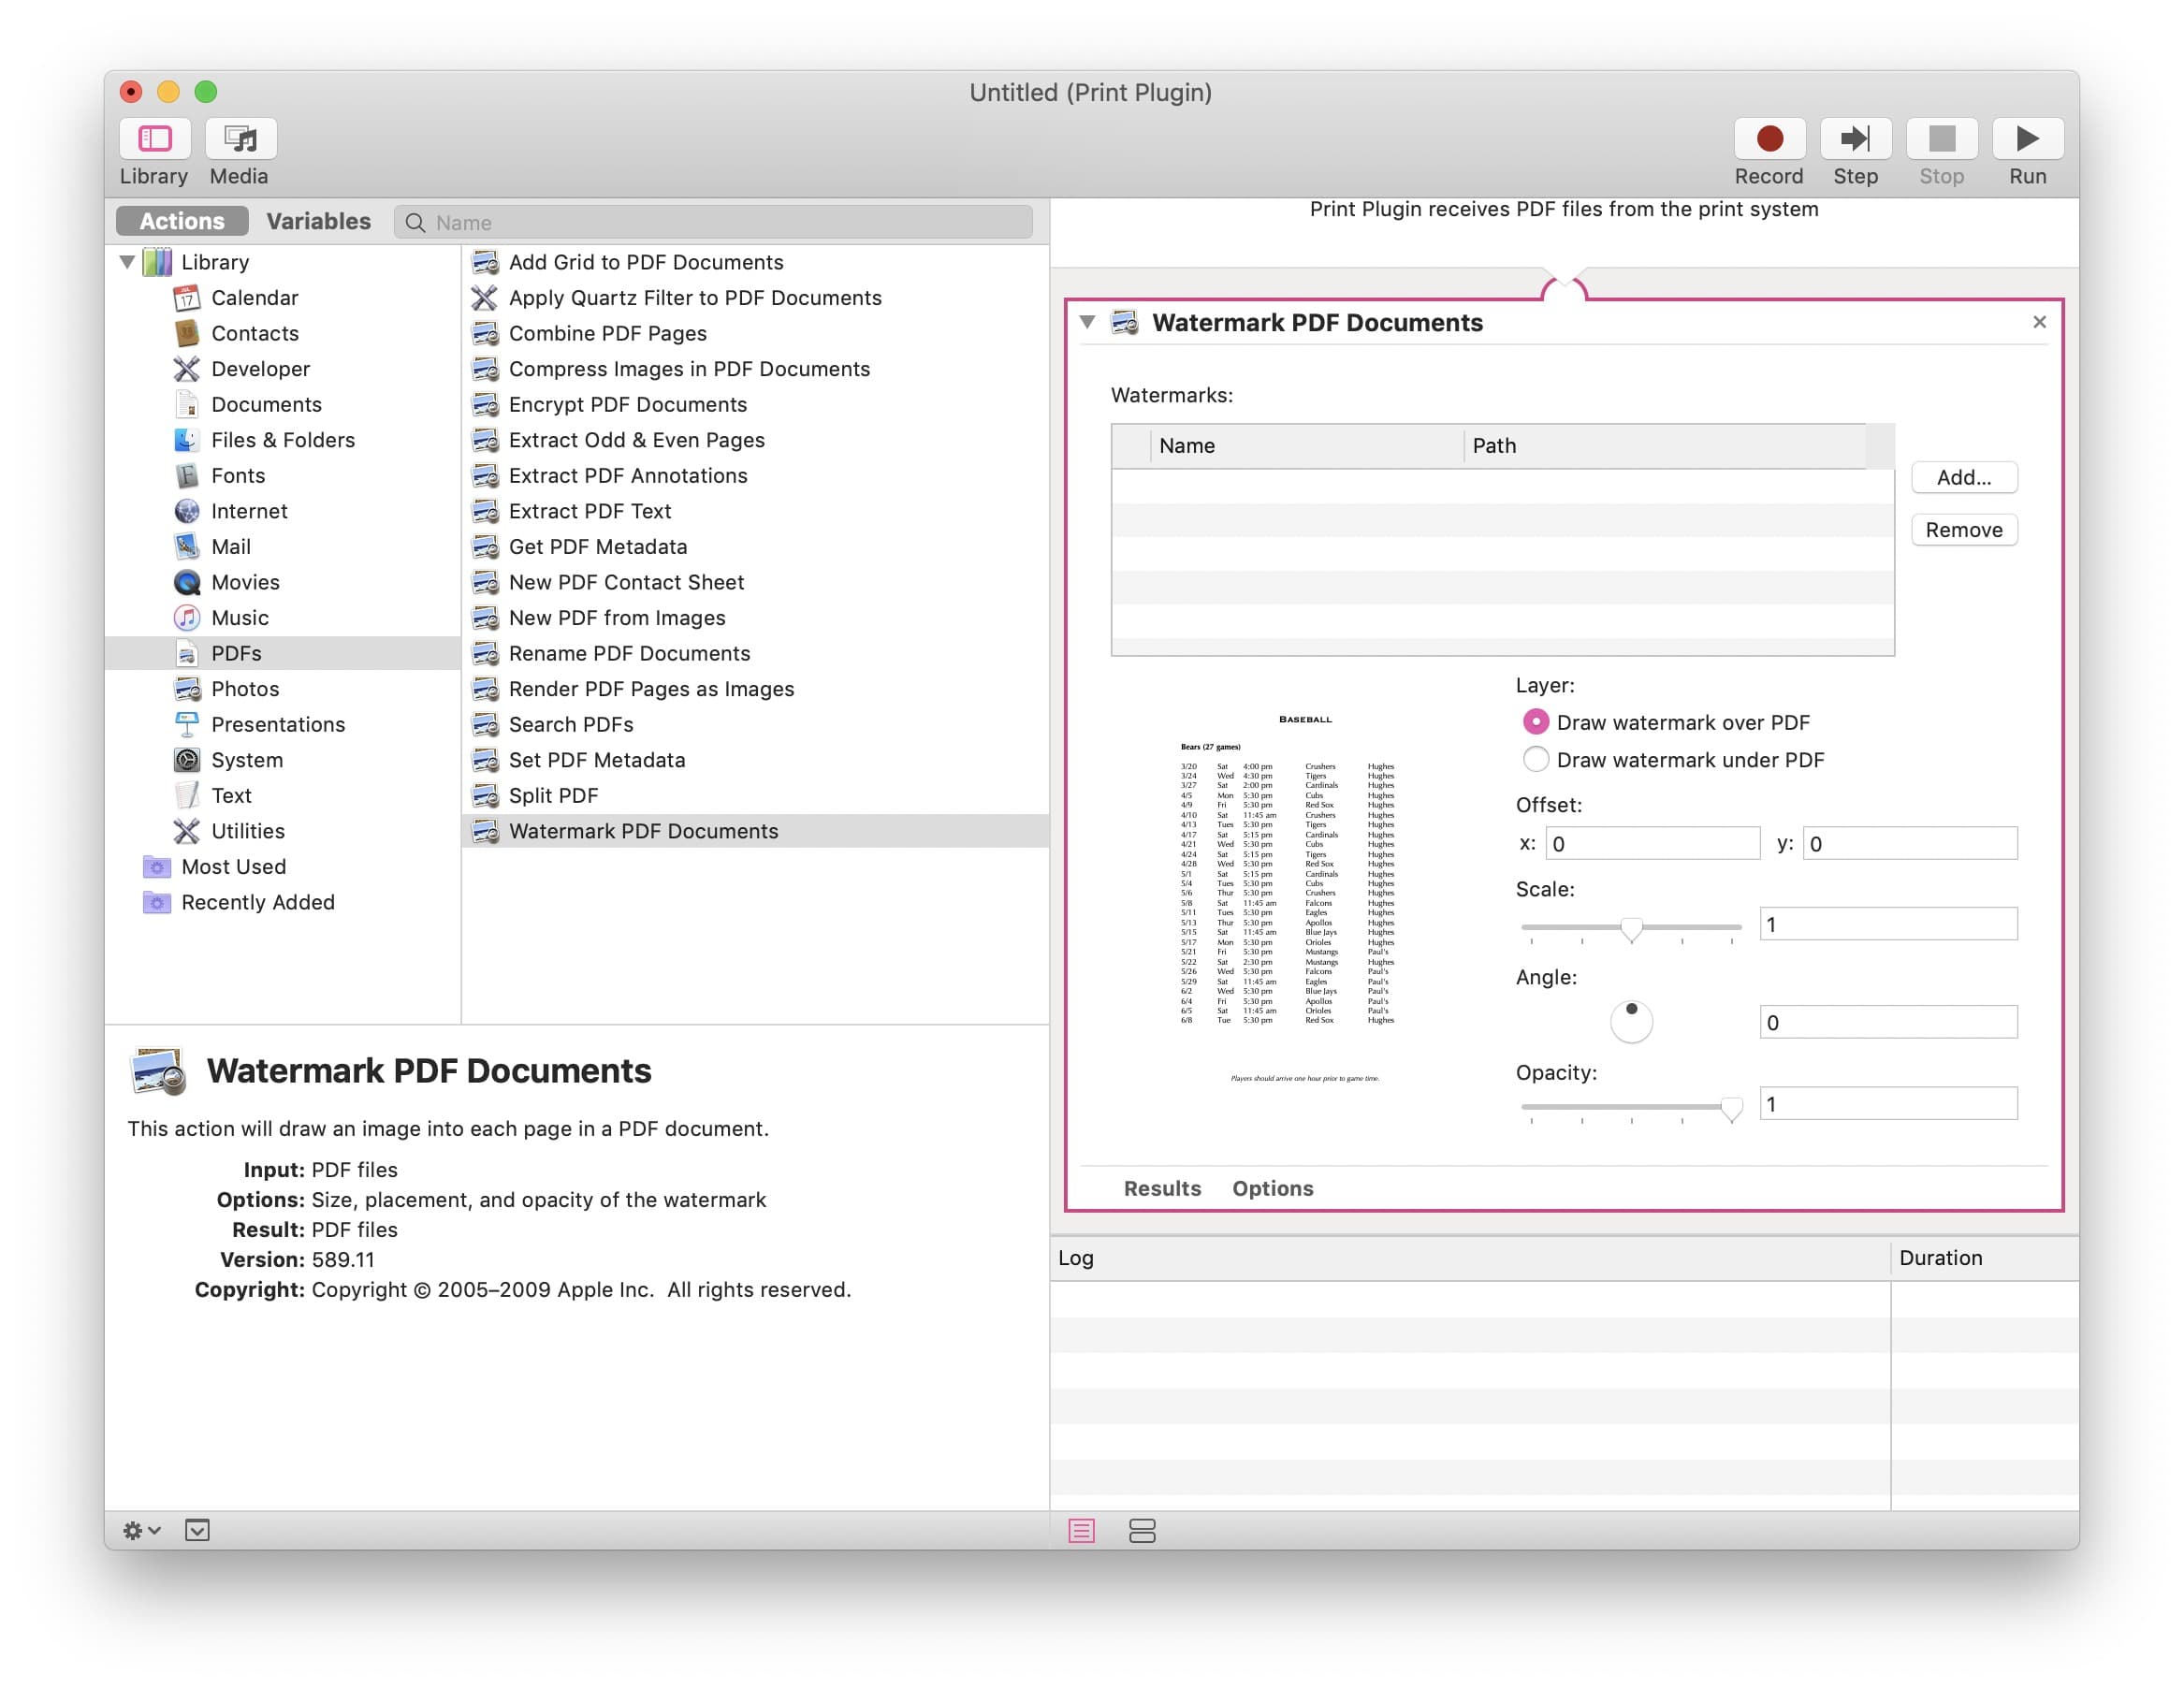
Now select PDFs from the leftmost sidebar, and then Watermark PDF Documents in the middle pane. Then drag and drop Watermark PDF Documents onto the rightmost section of the window.

automater watermark pdf

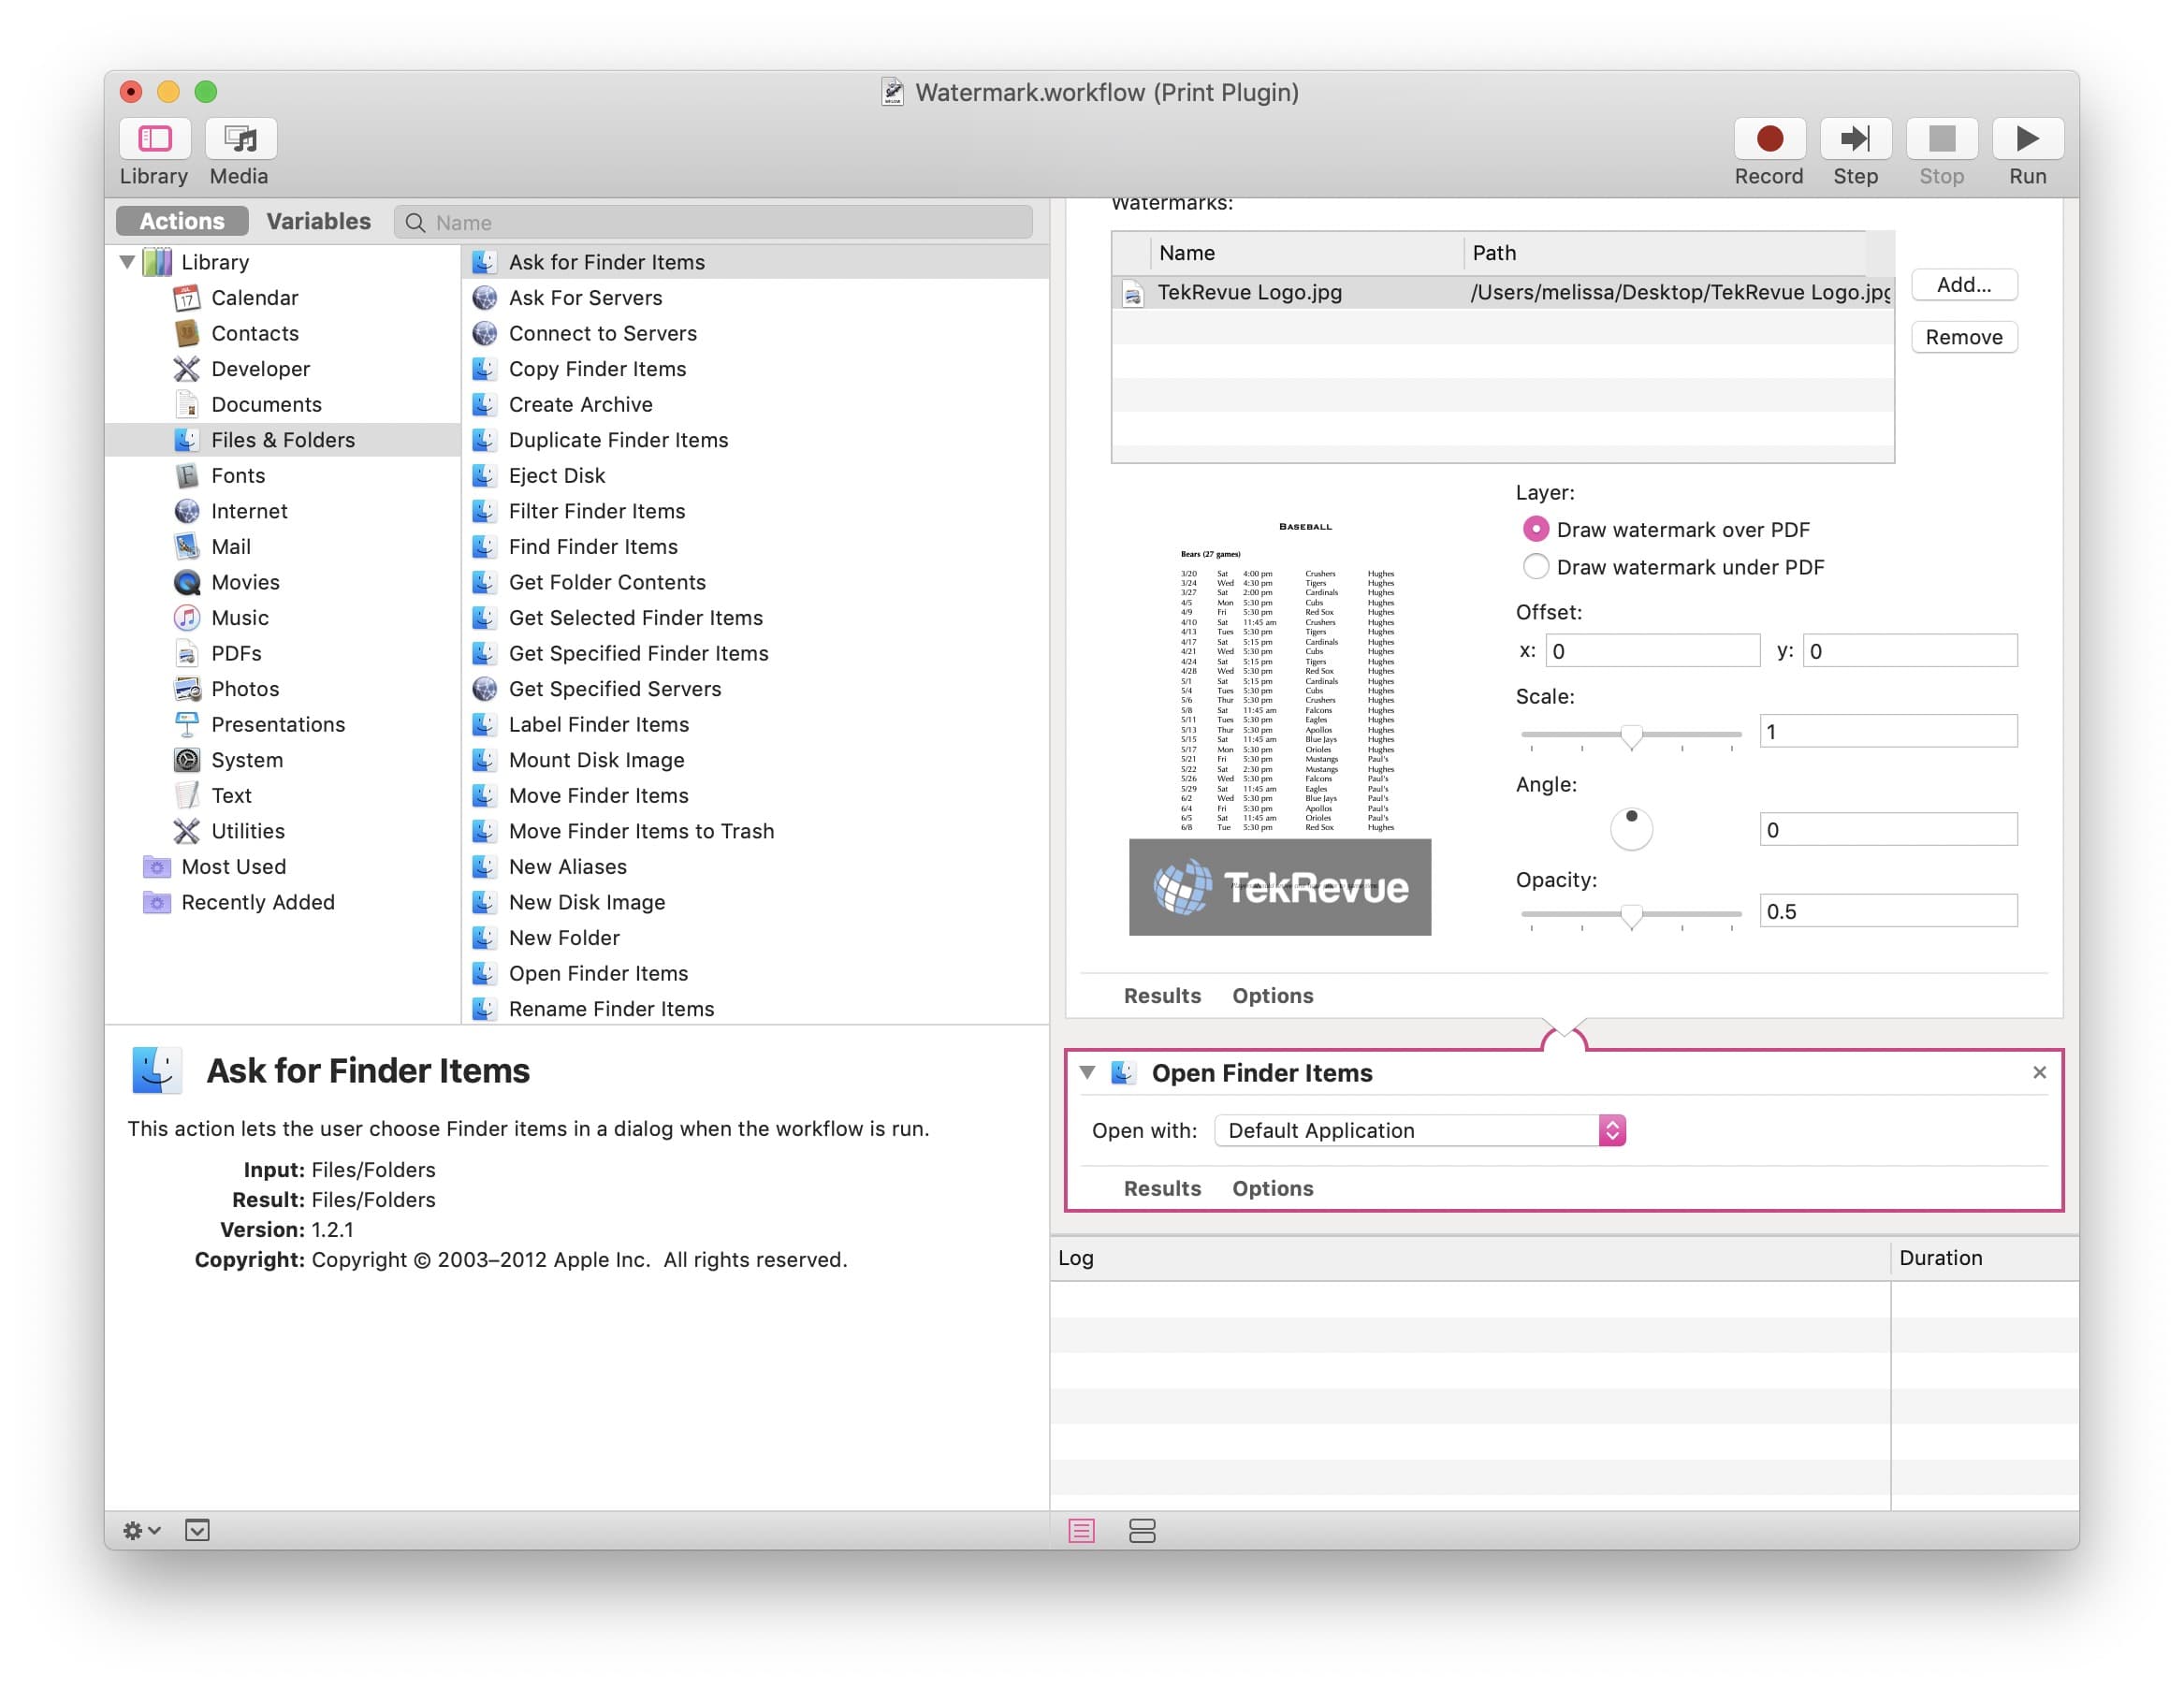
Click the Add button shown at the top of the Watermark PDF Documents action and navigate to the file you chose to be your watermark image. Then click Open.automator watermark pdf logo
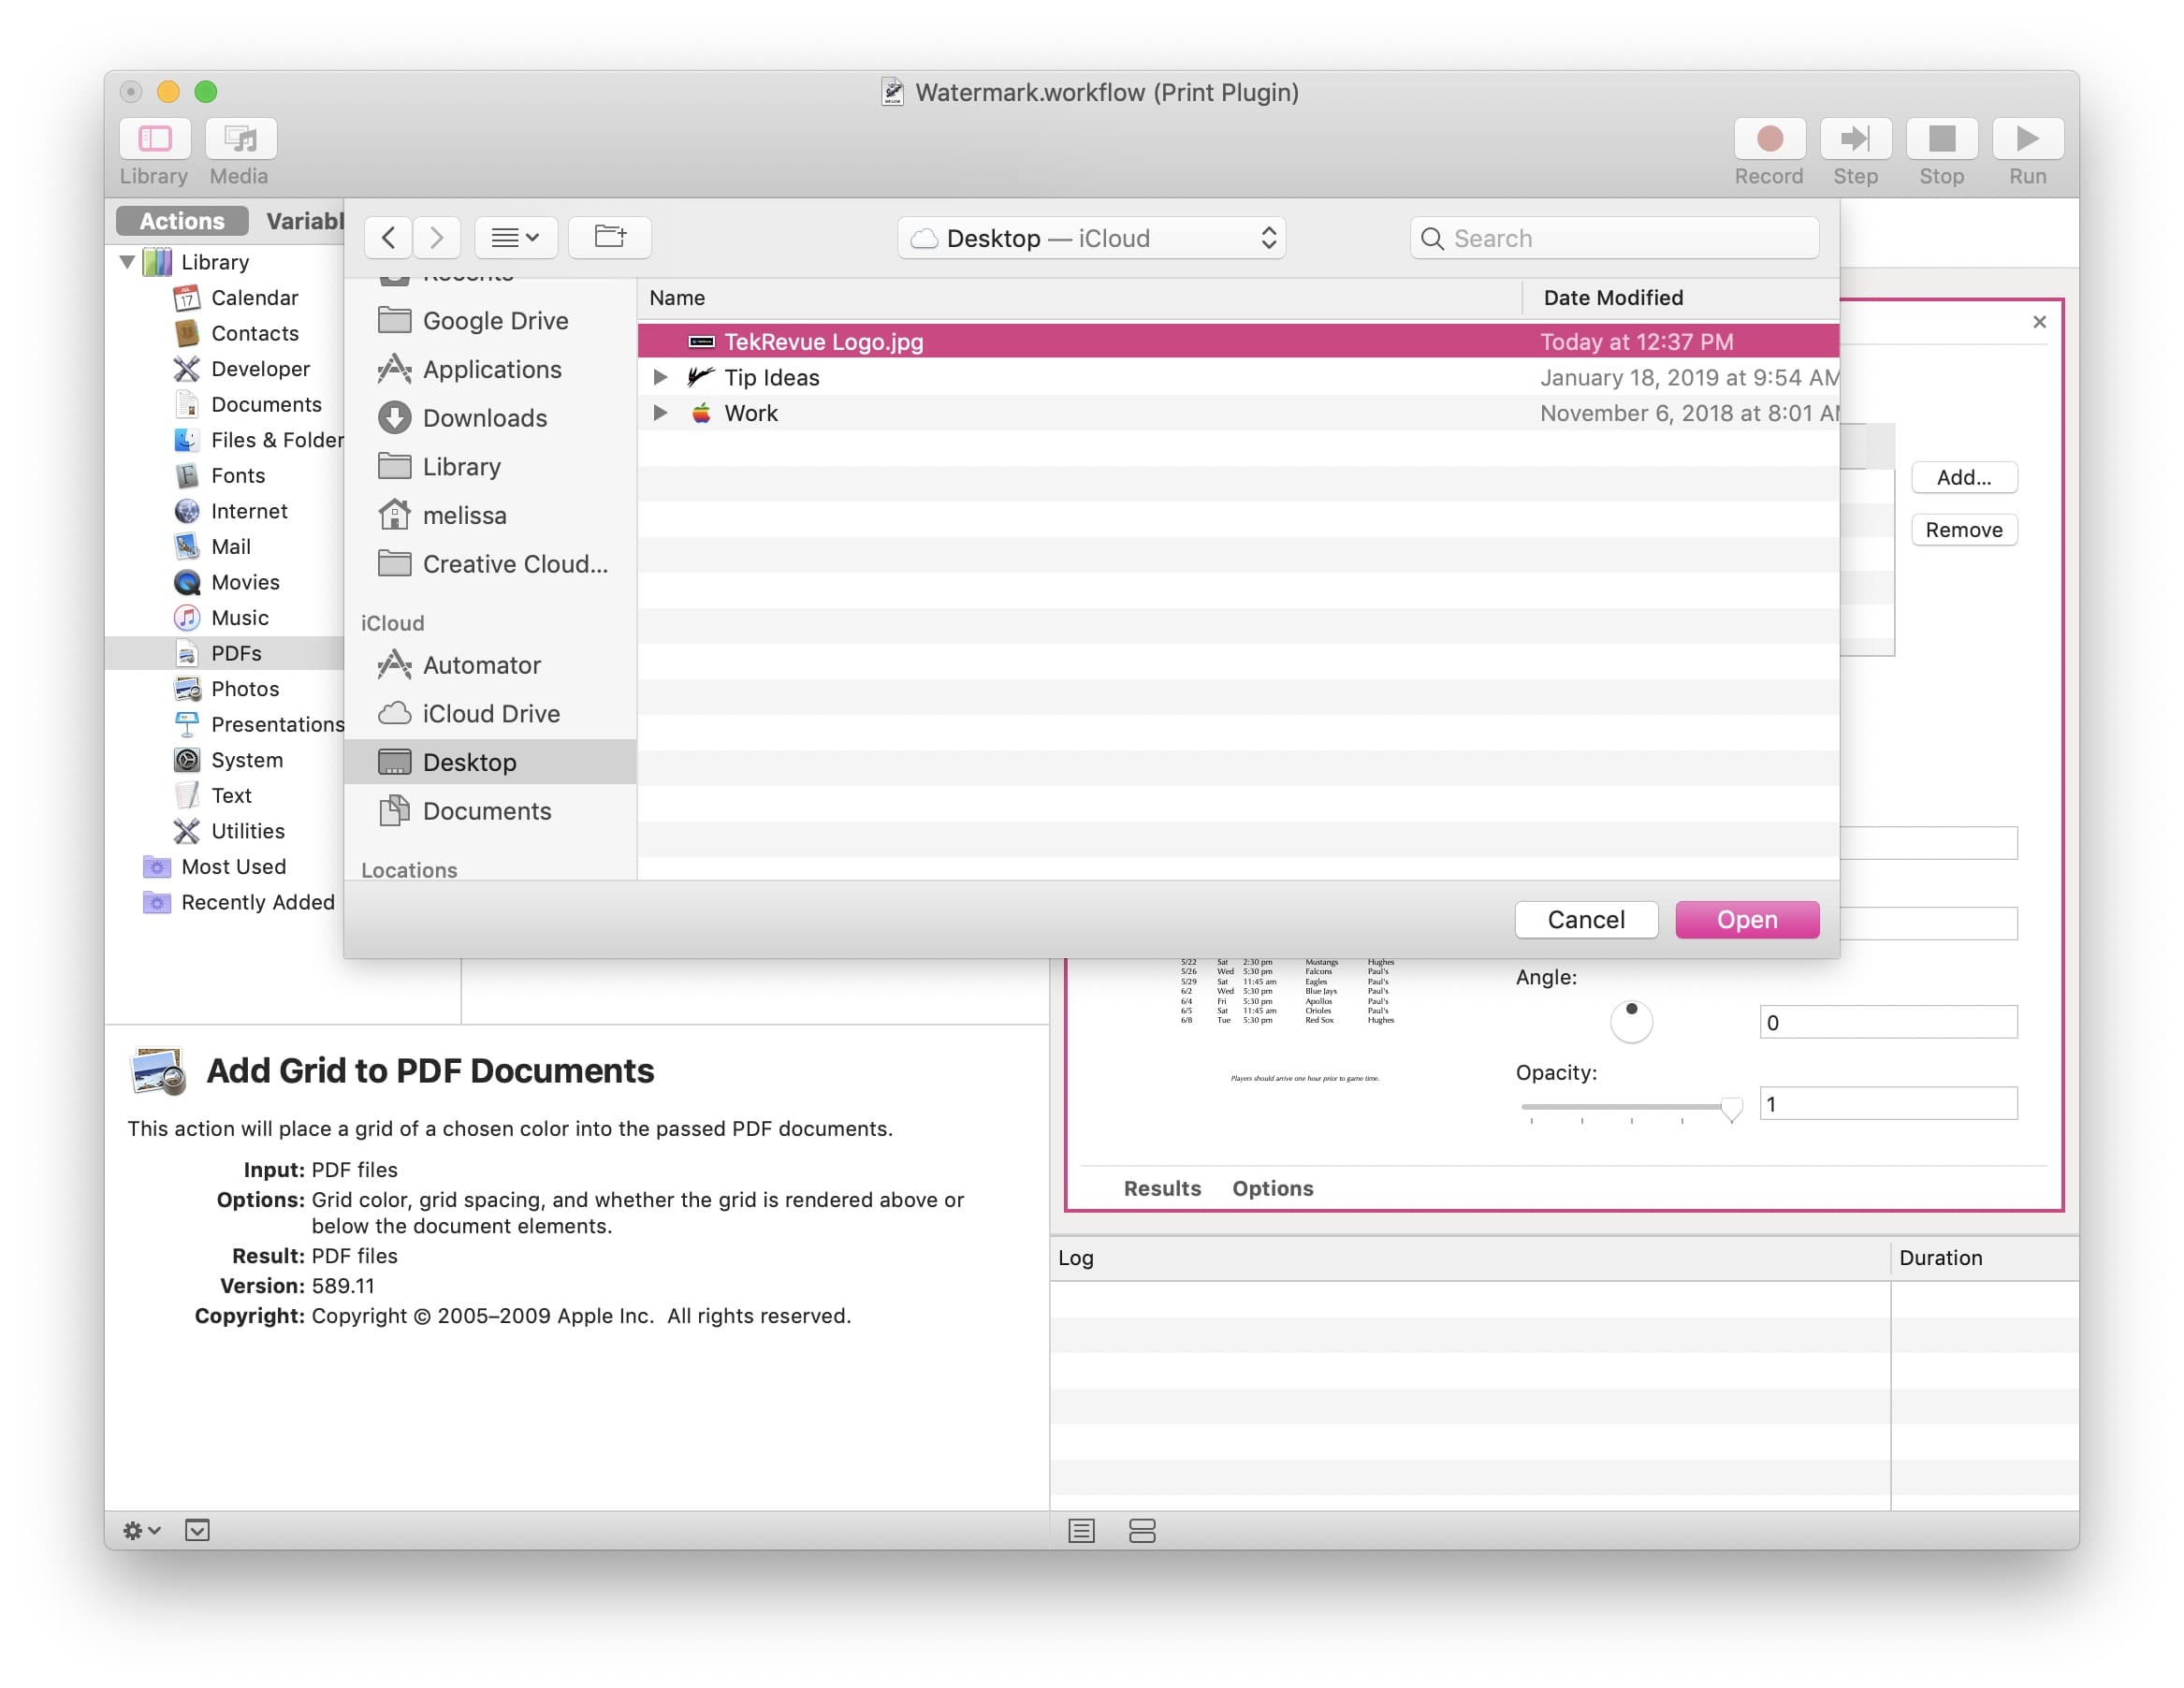
Now that you’ve chosen your watermark image, use the rest of the sliders and options to configure the action to your preferences. For example, you can change the size of the watermark with the Scale slider, or use the Opacity slider to set the right balance between visibility and opacity in order to not make the text under the mark unreadable. As you make changes, the preview window will update to give you some idea of how your final watermark will look.

Next, select Files & Folders from the sidebar on the left and Open Finder Items from the middle pane. Then drag Open Finder Items into the rightmost section of the window beneath the Watermark PDF Documents action.

watermark pdf mac automator action


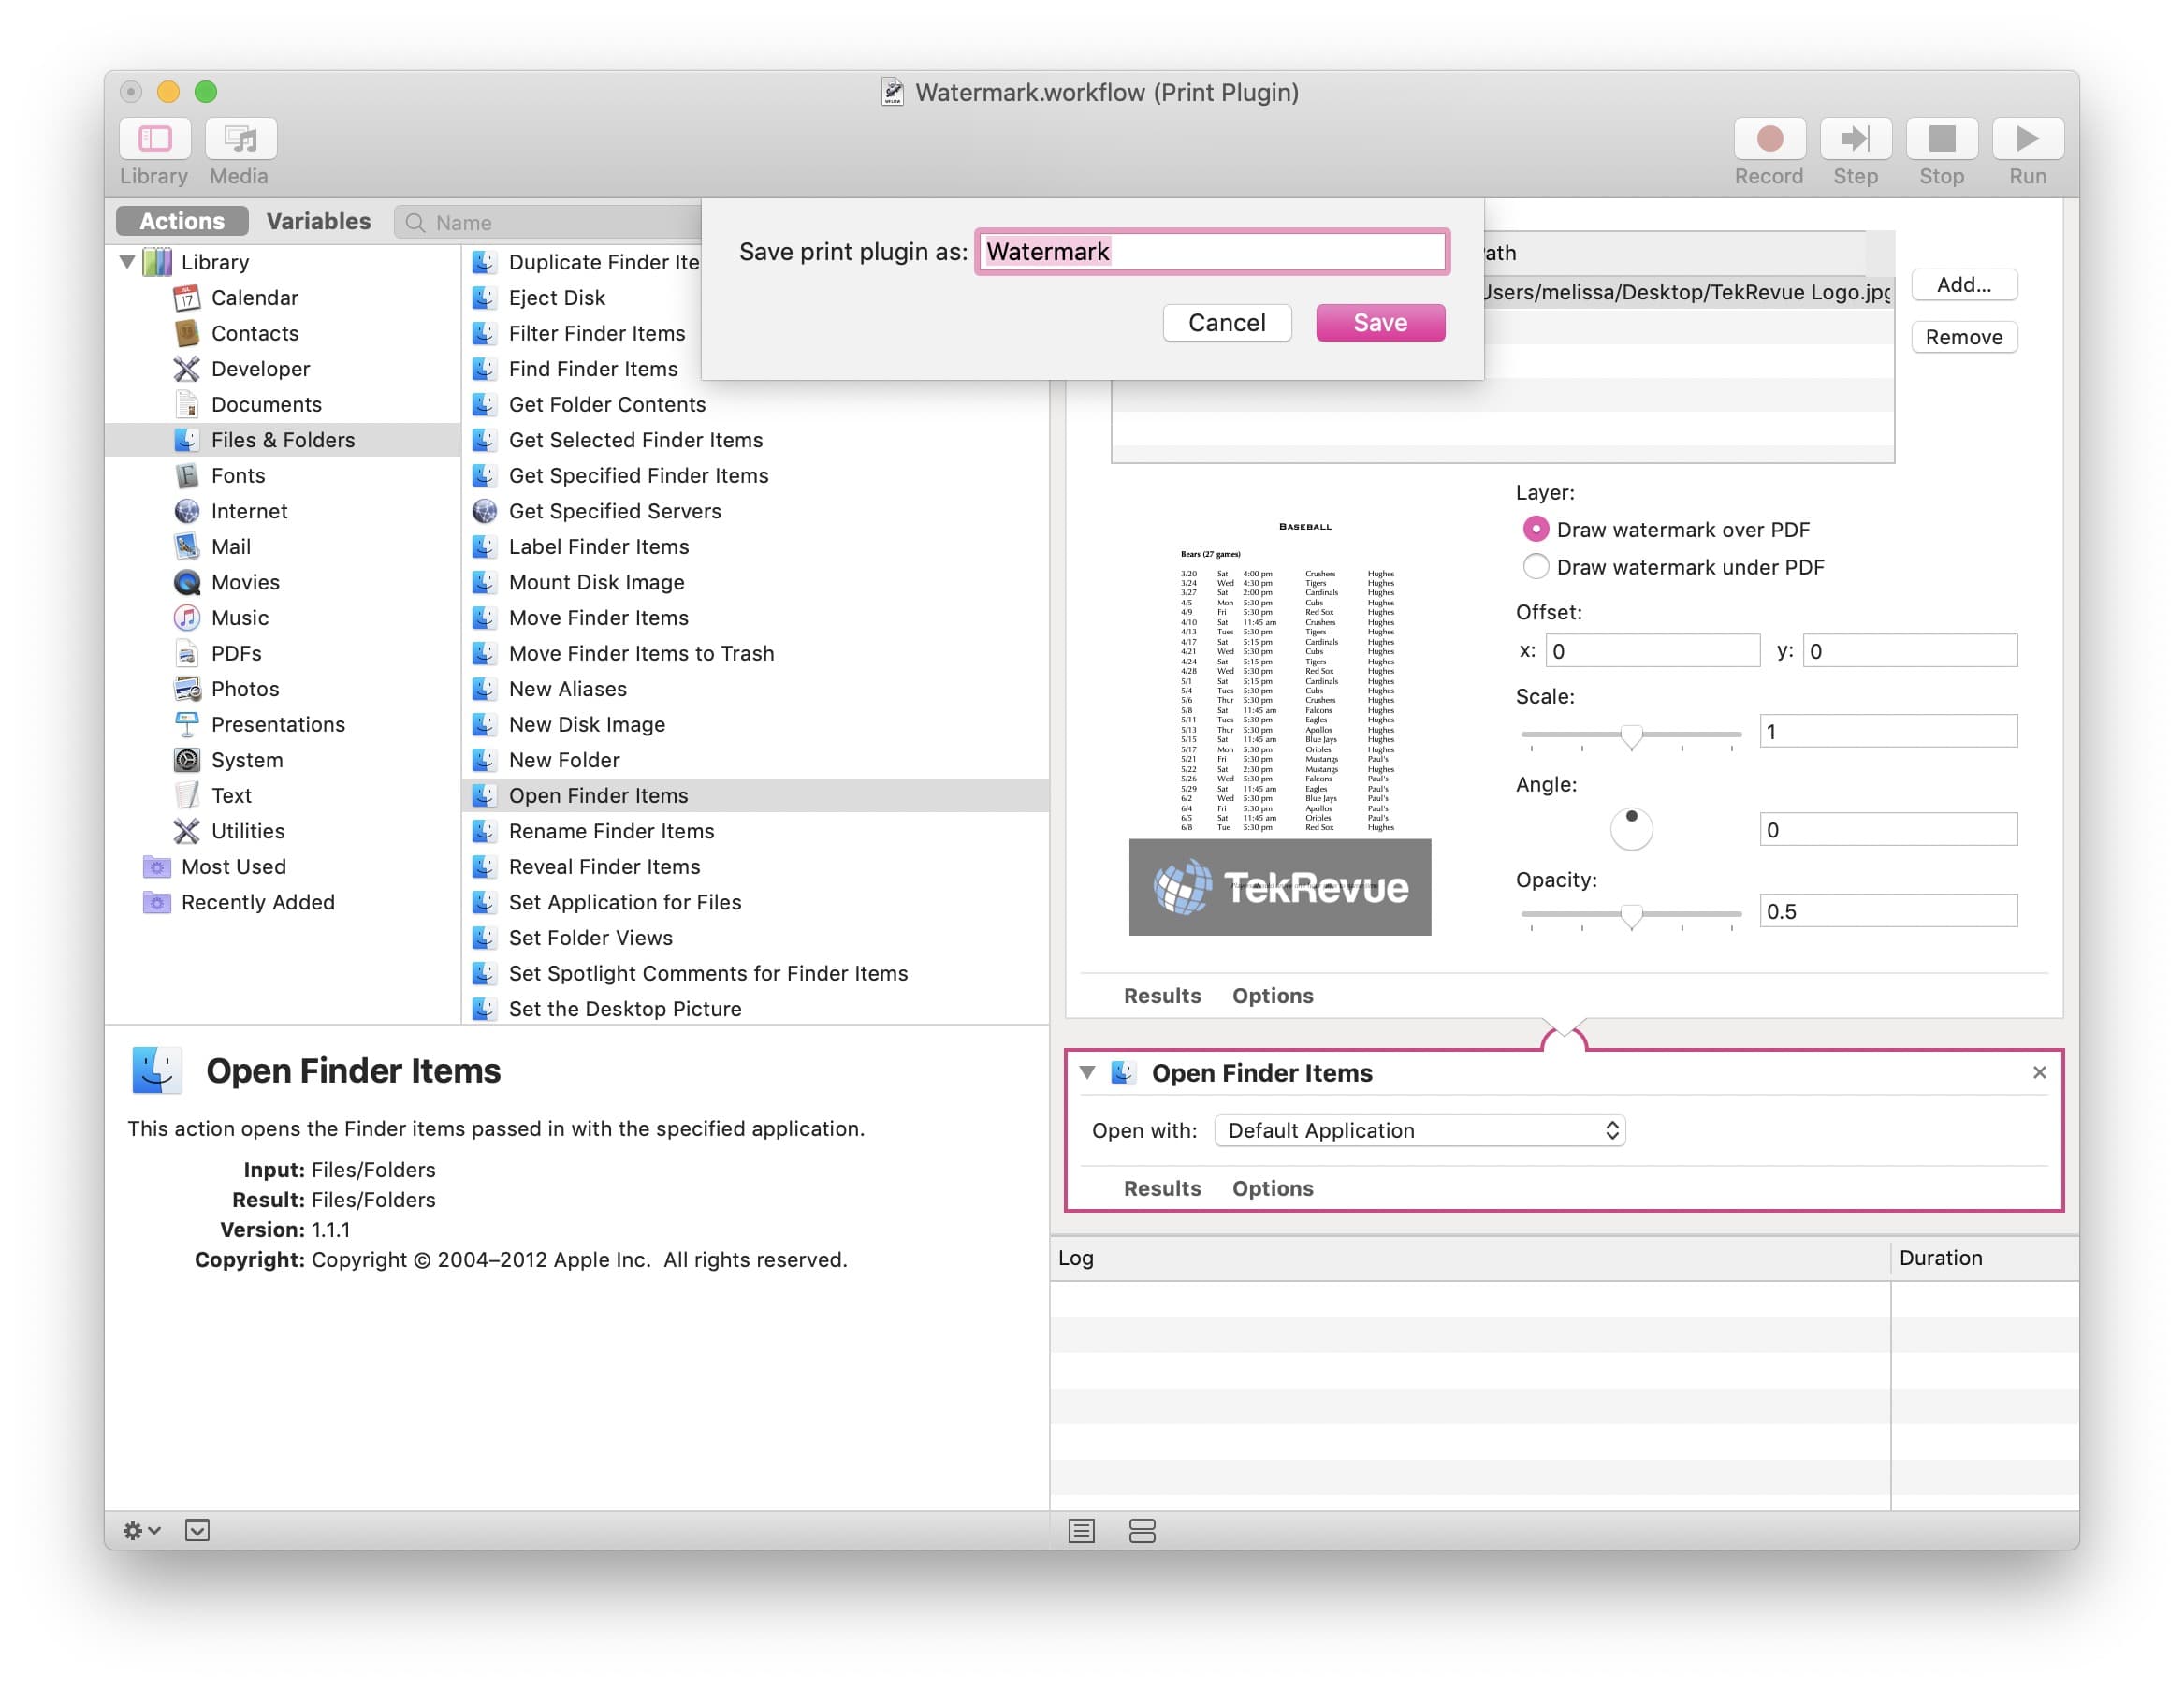
Finally, save you Automator action by choosing File > Save or pressing Command-S. When you do so, you’ll be asked to name it, so type in something recognizable.

name watermark pdf action

Step 3: Use Your Watermark App

Here’s where the fun comes in. Now that you’ve created your watermark app using Automator’s print plugin action, you can access it from almost any program, such as the Mac’s built-in PDF viewer, Preview. So if you open a PDF within that program, you’ll find and use your Print Plugin creation like so:

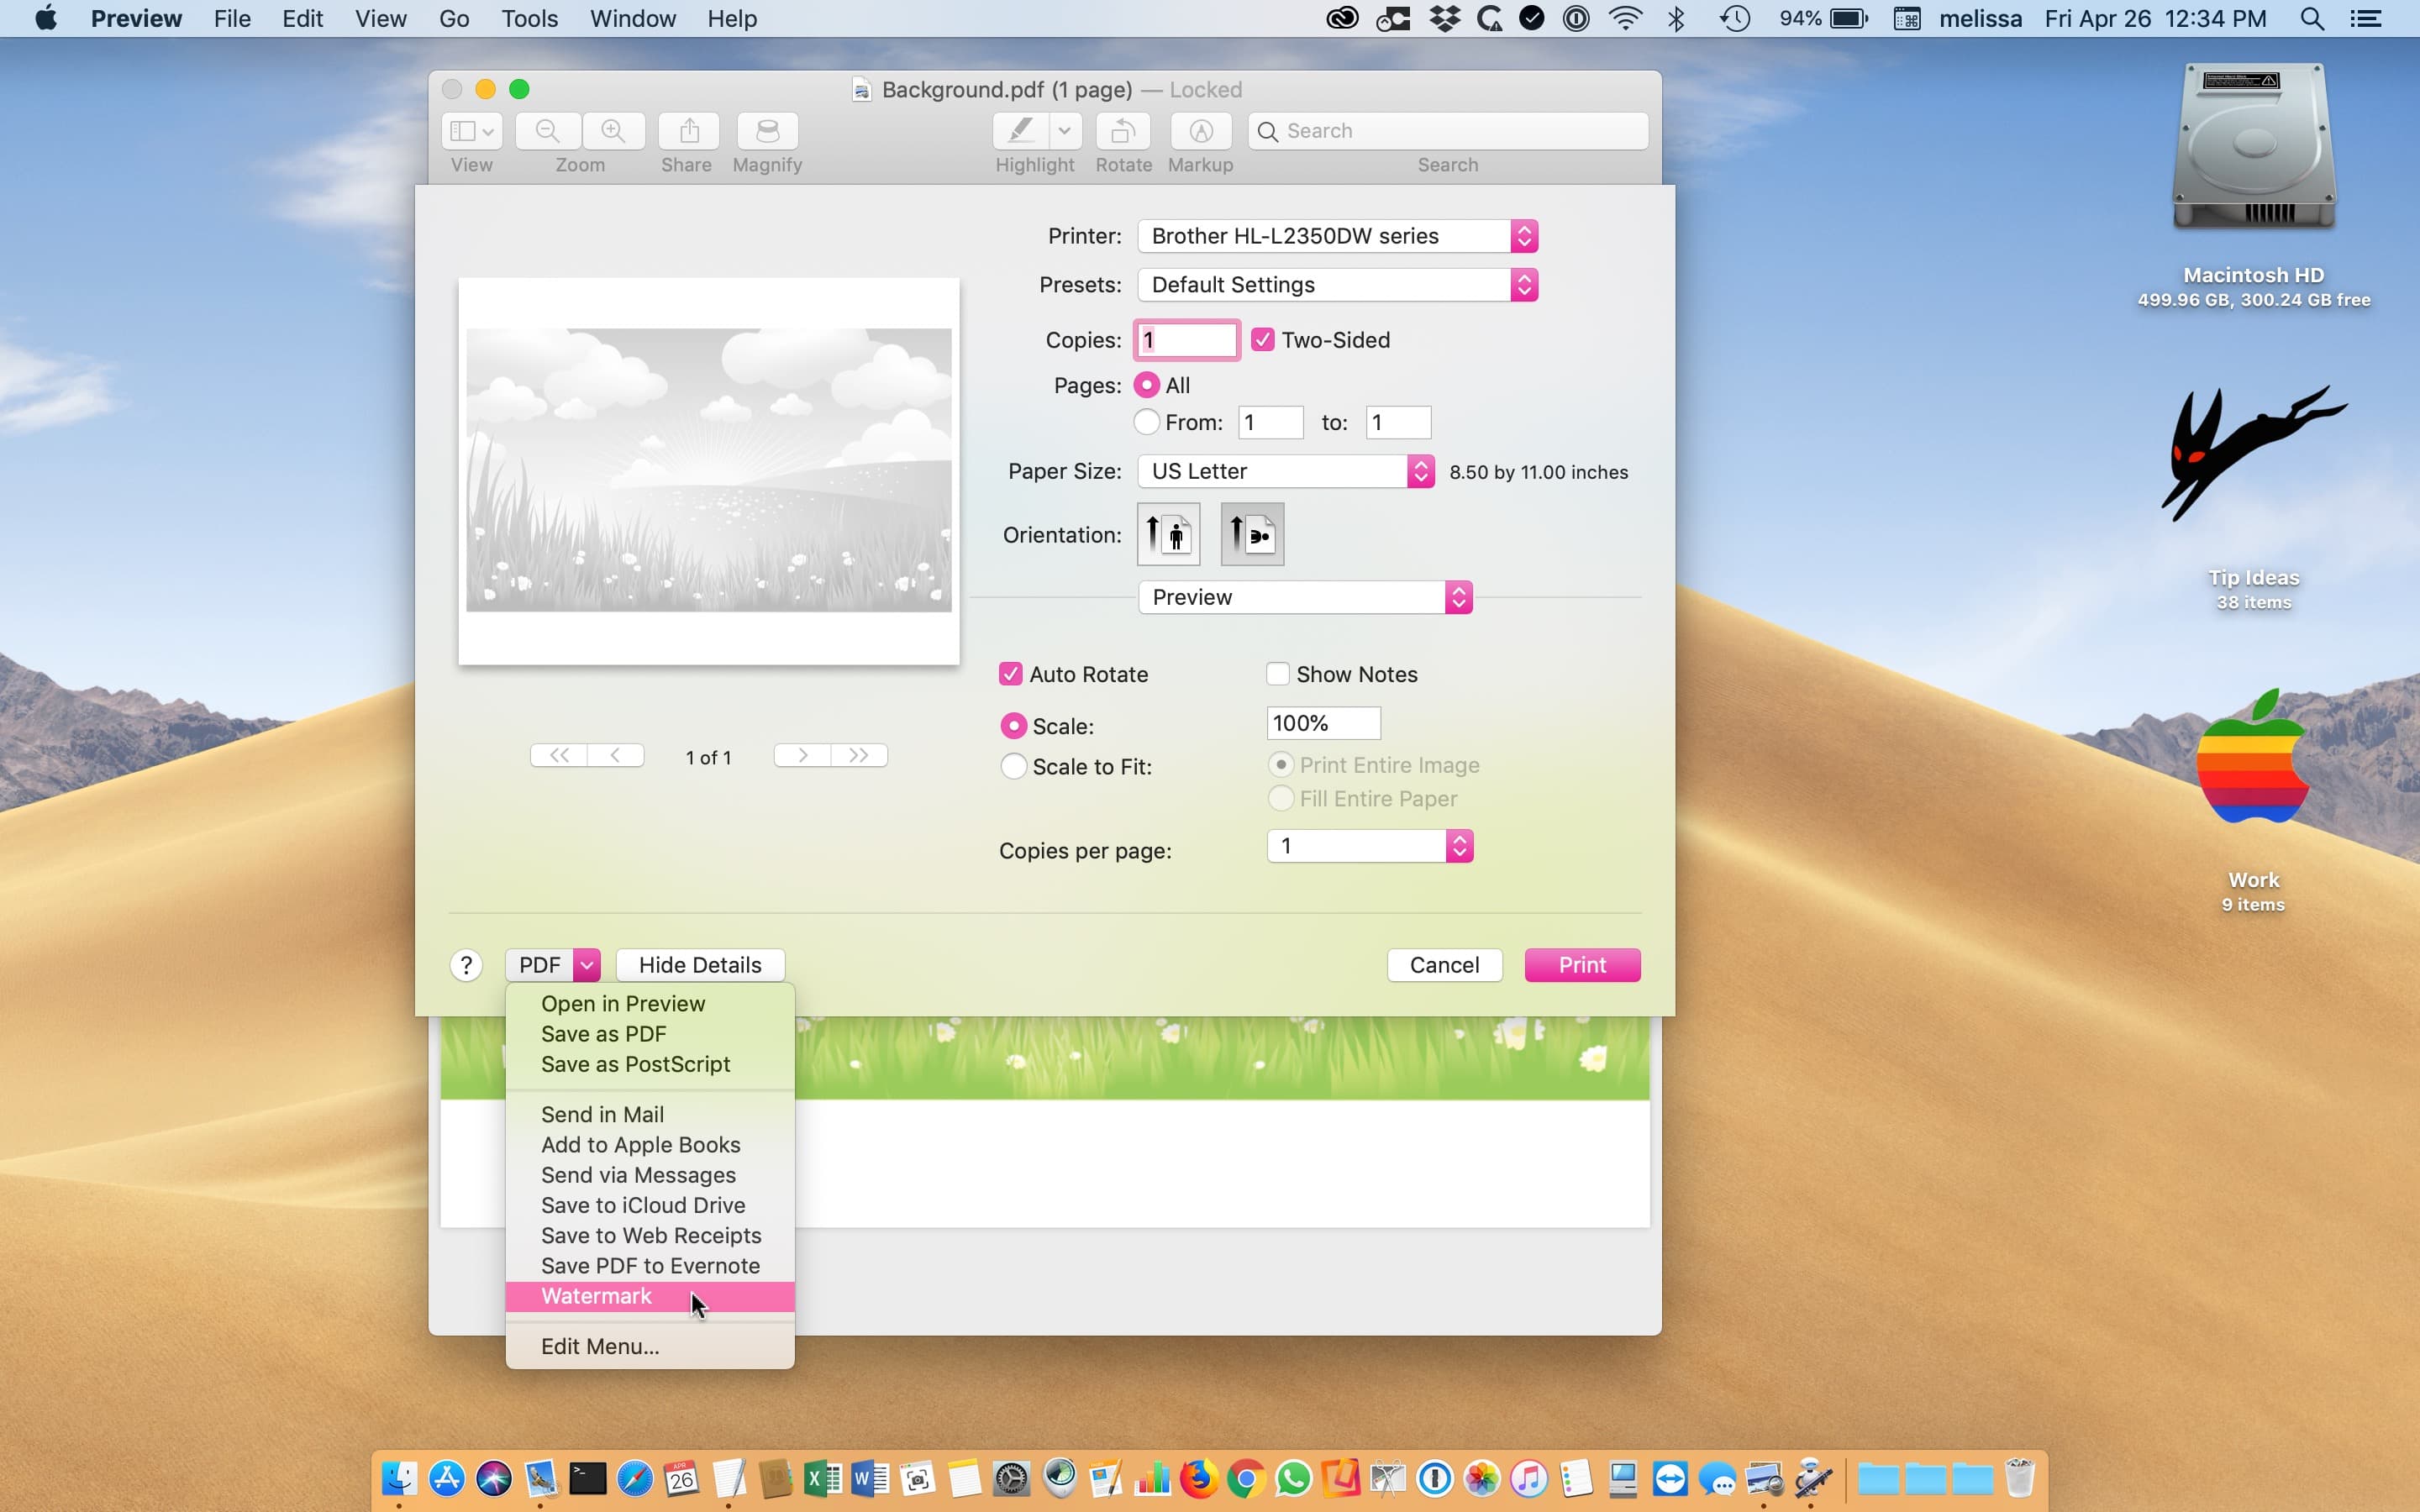
First, act as if you’re going to print the file you’d like to watermark by choosing File > Print from the menus at the top or by pressing Command-P. Within the print dialog box, look for the “PDF” drop-down on the bottom-left. Click on it, and you should see the name of the Automator Print Plugin you created.

print watermark pdf mac

Choose that Watermark option and the app will automatically create a PDF for you with the watermark you defined in Automator.

watermark pdf mac

At that point, you’ll need to be sure to save your newly watermarked PDF somewhere that you can find it easily, but then you can feel free to email, upload, or archive it as needed.

And as I noted, this process will work in most programs; if you’re typing in Word or Pages, for example, you can select File > Print and then find your Print Plugin as shown above to generate a PDF and watermark it all in one step (although it should be noted that Microsoft Word has its own watermark capabilities).

Oh, and one more thing: If you ever want to delete the plugin you created, you can do so by choosing Finder’s Go menu and then holding down the Option key on your keyboard to reveal the hidden Library entry and heading to the PDF Services folder. There, you’ll be able to find and delete the Automator workflow you created, which will remove that entry from the Print menu.

Want news and tips from TekRevue delivered directly to your inbox? Sign up for the TekRevue Weekly Digest using the box below. Get tips, reviews, news, and giveaways reserved exclusively for subscribers.
Share this:

  • Facebook
  • Twitter
  • LinkedIn
  • Reddit
  • Pinterest
  • Email

  • Categories: Mac
  • Tags: #Automator #How To #Mac #macOS #PDF #Preview #printing #Tips

Sign Up for the TekRevue Weekly Digest

Read more in Mac on TekRevue

  • apple news
    How to Open an Apple News Article in Safari

    Filed Under: Mac

  • remove creative cloud files finder mac
    How to Remove Creative Cloud Files From the Finder Sidebar in macOS

    Filed Under: Mac

  • locked pages document
    How to Lock Files on the Mac (And Why You Might Want To!)

    Filed Under: Mac

Search

Related Articles

  • edit video mac mojave
    How to Trim Videos with Quick Look in macOS Mojave
  • clipped documents
    How to Use Mojave’s Quick Actions to Quickly Combine PDFs on the Mac
  • combine pdf mac
    How to Combine PDFs with Preview on Your Mac
  • How to Extract Text from a PDF Using Your Mac’s Free Built-In Tools
  • signature
    How to Sign a PDF in Mail on the Mac

Connect with TekRevue

  • TekRevue on Twitter
  • TekRevue on Facebook
  • Cheats
  • Contributor
  • Deals
  • Distractions
  • Editorials
  • Gadgets
  • Games
  • Gaming
  • Giveaway
  • Hardware
  • Home Theater
  • More in Mac
  • Mobile
  • News
  • Podcast
  • Reviews
  • Sponsor
  • Tips
  • Windows
  • apple news
    How to Open an Apple News Article in Safari
  • remove creative cloud files finder mac
    How to Remove Creative Cloud Files From the Finder Sidebar in macOS
  • document watermark
    How to Watermark PDFs on the Mac
  • edge for mac
    How to Download Microsoft Edge for Mac
  • locked pages document
    How to Lock Files on the Mac (And Why You Might Want To!)
  • outlook for mac logo
    How to Clear Recent Contacts in Outlook for Mac
  • extract images pages document
    How to Extract Images from a Pages File on the Mac
  • mac calendar desk
    How to Merge iCloud Calendars on the Mac
  • mac drawing
    How to Draw in Word for Mac
  • macos mojave system requirements
    How to Keep All Windows When Closing an App on the Mac
  • change dropbox location mac
    How to Change the Dropbox Folder Location on the Mac
  • microsoft word for mac mojave
    How to Paste Without Formatting in Microsoft Word on the Mac
  • Adobe Creative Cloud
    How to Keep Old Versions of Creative Cloud Apps
  • uninstall flash mac
    How to Uninstall Flash in macOS
  • edit video mac mojave
    How to Trim Videos with Quick Look in macOS Mojave
  • disable auto-brightness mac
    How to Disable Auto-Brightness on Your Mac
  • siri touch bar mac
    How to Remove Siri from the Touch Bar
  • mac gpu usage history
    How to View GPU Usage in macOS via Activity Monitor
  • clipped documents
    How to Use Mojave’s Quick Actions to Quickly Combine PDFs on the Mac
  • razer core x egpu macbook pro
    MacBook Pro eGPU Benchmarks: Razer Core X & AMD Radeon Vega Frontier Edition

Tips

  • Apps
  • Gaming
  • Mac
  • Mobile
  • Online
  • Windows
  • chrome home button
    How to Show the Chrome Home Button
  • change dropbox location mac
    How to Change the Dropbox Folder Location on the Mac
  • Adobe Creative Cloud
    How to Keep Old Versions of Creative Cloud Apps
  • uninstall flash mac
    How to Uninstall Flash in macOS
  • xbox store autoplay video
    How to Turn Off Xbox Store Autoplay Videos on the Xbox One
  • slow steam browser windows
    Here’s One Potential Fix for a Slow Steam Browser in Windows
  • How to Manually Dim the Xbox One Screen
  • xbox one store games
    How to Browse Games by Genre in the Xbox One Store
  • apple news
    How to Open an Apple News Article in Safari
  • remove creative cloud files finder mac
    How to Remove Creative Cloud Files From the Finder Sidebar in macOS
  • document watermark
    How to Watermark PDFs on the Mac
  • locked pages document
    How to Lock Files on the Mac (And Why You Might Want To!)
  • airpod battery life
    How to Check AirPods Battery from Apple Watch
  • rearrange share menu iphone
    How to Rearrange the Share Menu Icons in iOS
  • broken screen iphone
    How to Check Warranty Coverage on the iPhone and iPad
  • iphone emergency alerts
    How to Turn Off Emergency and AMBER Alerts on the iPhone
  • plex web shows
    How to Disable Web Shows in Plex
  • youtube dark theme web
    How to Enable the YouTube Dark Theme in a Desktop Browser
  • chrome new look vs old
    How to Switch Back to the Old Chrome Design
  • google drive shared expiration
    How to Set Expiration Dates for Shared Google Drive Files
  • windows 10 lock screen tips
    How to Turn Off Windows 10 Lock Screen Tips
  • av1 windows 10
    How to Play AV1 Videos in Windows 10 With the Free AV1 Codec
  • replace notepad notepad plus plus
    How to Completely Replace Notepad With Notepad++ in Windows
  • windows 10 power user menu
    How to Edit the Power User Menu (Win+X Menu) in Windows 10
Company
  • About TekRevue
  • Get in Touch
  • Sponsorships

Sign Up for the TekRevue Weekly Digest

© TekRevue LLC. All Rights Reserved.

  • TekRevue User Agreement
  • TekRevue Privacy Policy

Built by Blazer Six

loading Cancel
Post was not sent - check your email addresses!
Email check failed, please try again
Sorry, your blog cannot share posts by email.