TekRevue

  • Home
  • Mac
  • Windows
  • Mobile
  • Games
  • Home Theater
  • Reviews
  • Editorials
  • Tips
    • Windows
    • Mac
    • Mobile
  • Twitter
  • Facebook
  • Google+
  • Feed
word 2016 for mac sierra

 012

Mac

How to Create a Table of Contents in Word 2016 for Mac

By Melissa Holt on December 2, 2016 at 3:38 AM • @MelissaCHolt

If you’re writing a book or a research paper, you may need to insert a table of contents at the beginning. Many people manually create their table of contents, and that’s certainly one way to do it. But a manually created table takes time, is subject to formatting inconsistencies, and needs to be updated by hand each time a section in your document changes.

Thankfully, there’s a much easier way to handle a table of contents if you’re using Microsoft Word 2016 for Mac. Word can not only generate one for you based on styles you’ve applied to your document, it can also update things with the click of a button when your document changes. No more spending your time tracking down and proofreading page numbers! You guys have no idea how happy that makes me, so let’s cover how to create a table of contents in Word 2016 for Mac.

Step 1: Add Styles to Your Document

Microsoft Word’s automatic table of contents generator relies on styles, which are special formats you apply to your document so that Word knows which parts of your text are headings, subheadings, paragraphs, and so on. Therefore, the first step to automatically generating a table of contents is to make sure that your document has the appropriate styles applied.

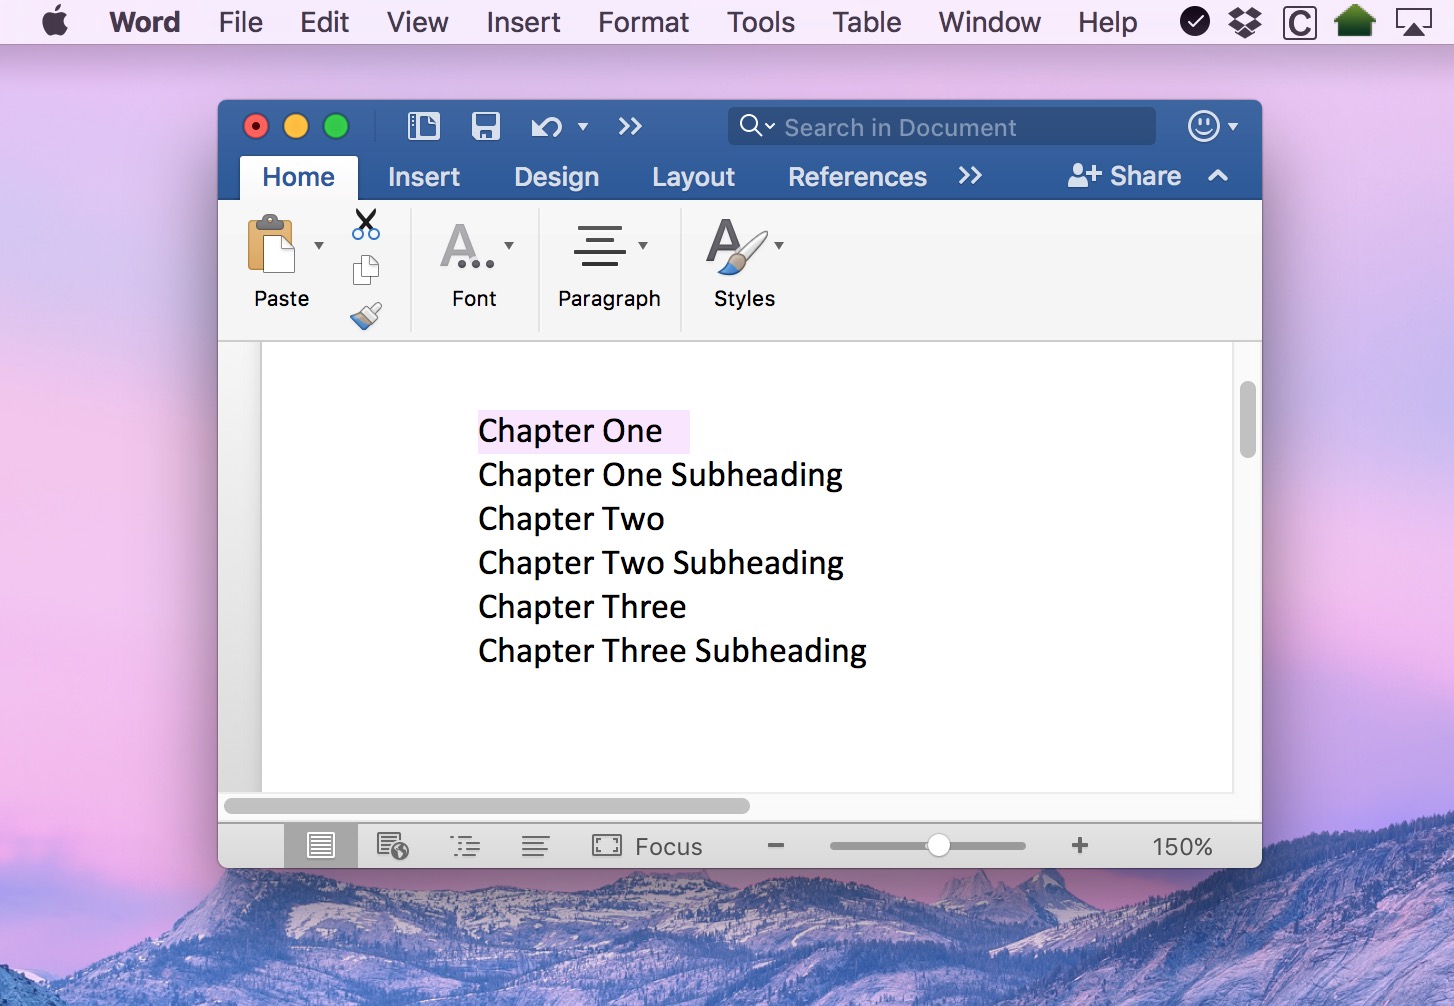
To start off, select your first chapter or heading by highlighting it in your document.

Select

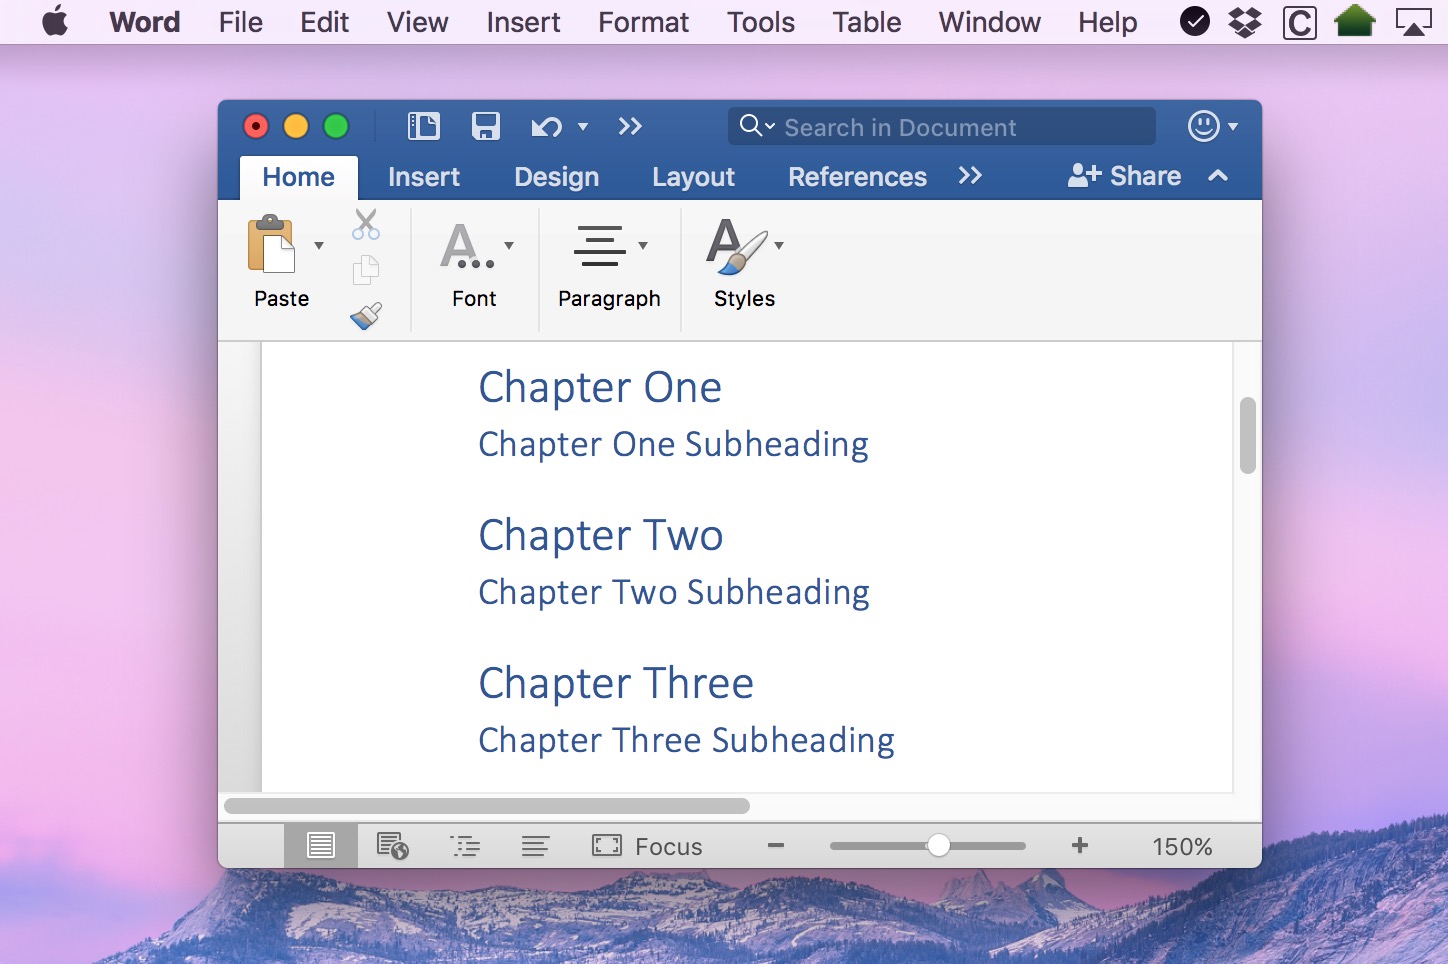
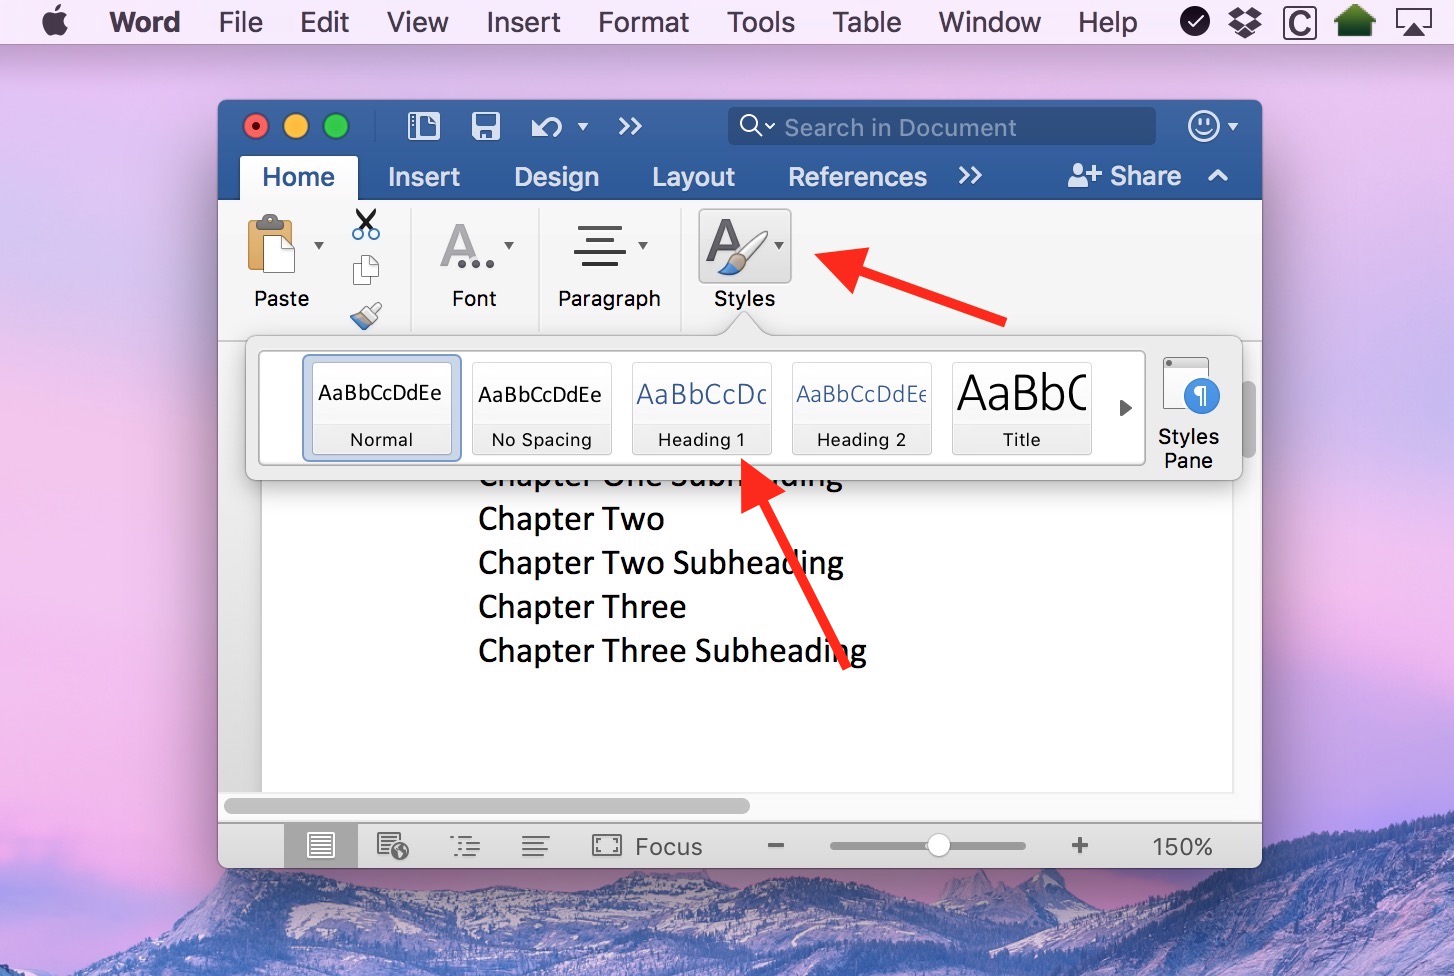
Next, head up to the Word toolbar (or the “Ribbon,” as Microsoft so adorably named it) and, from the Home tab, click the Styles button. In the drop-down list that appears, select “Heading 1” to define your selected text as the first primary heading. Note that if your Word window is wide enough, you may see the style options listed directly in the toolbar instead of the “Styles” button. In this case, select the desired heading style directly or click the small downward facing arrow at the bottom of the list to expand all of the styles options.

Styles Button

If your document has sub-headings, select the first one and repeat the steps above, this time choosing “Heading 2.” Repeat these steps as necessary and you’ll end up with something like the screenshot below. Remember, you’re applying these styles to your actual document, not to a manually created table of contents you may already have. In the screenshots, the text is omitted for simplicity. In your actual document, you’ll have paragraphs of text between each Chapter and Subheading.

Styles Applied

Step 2: Create a Table of Contents

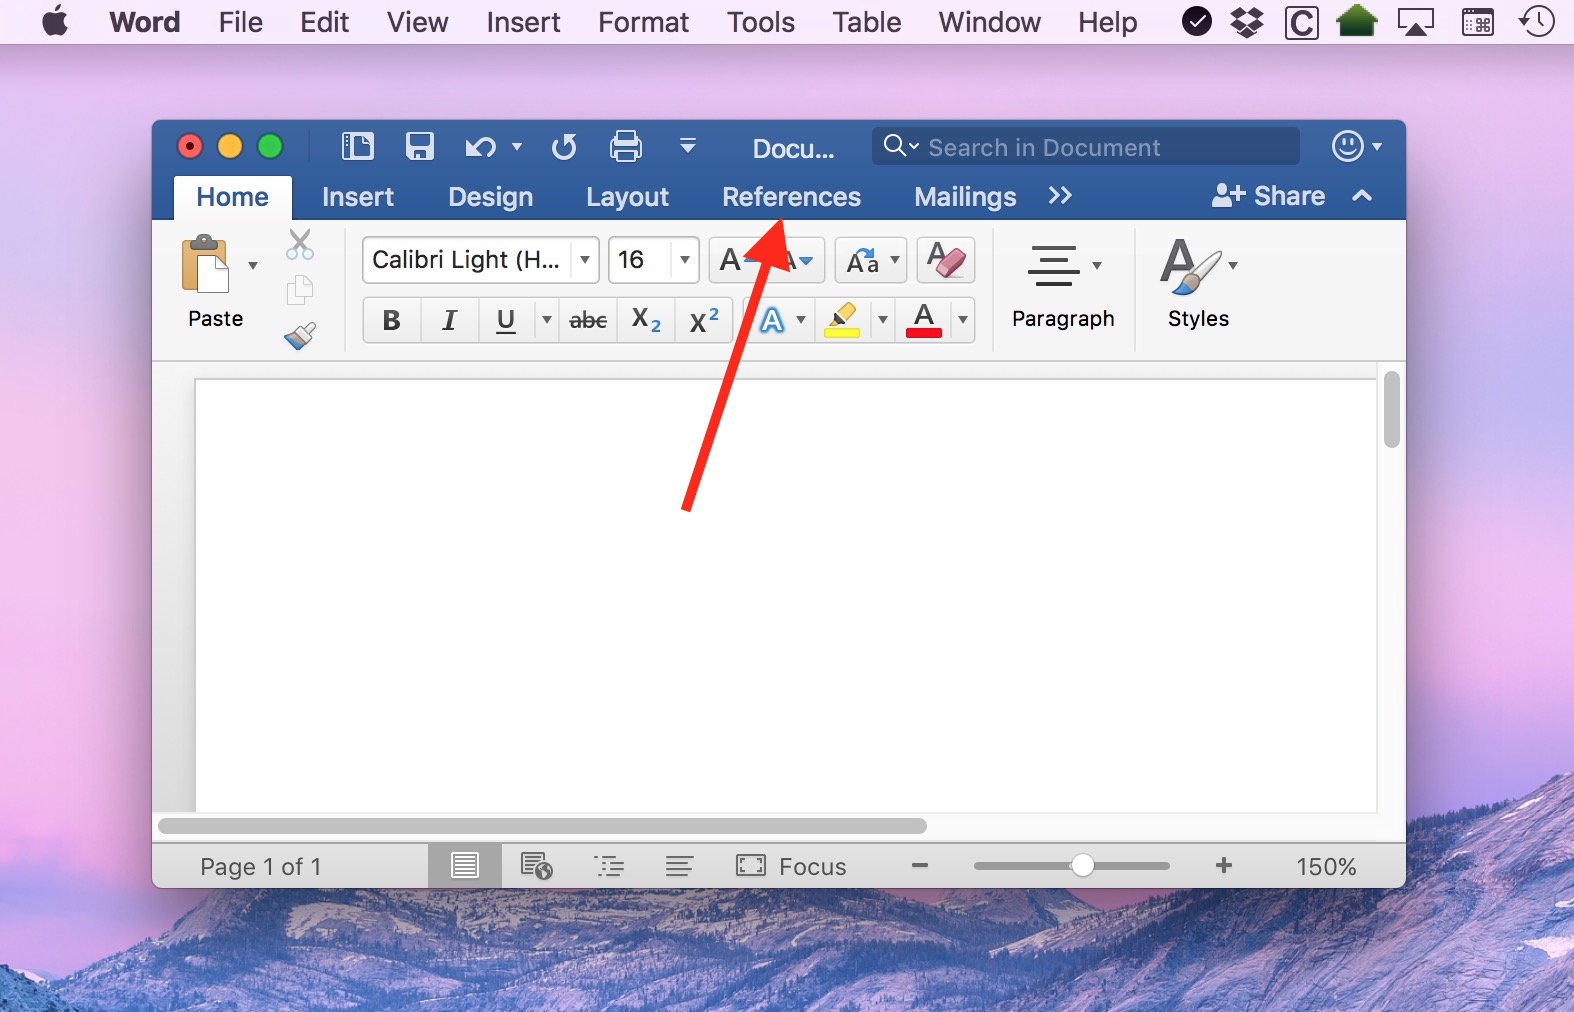
Once you’ve added all of your desired headings and subheadings, place your cursor in the location where you’d like your automatically generated table of contents to appear. For example, you may wish to insert a new blank page at the beginning of your document (Insert > Blank Page from the Word toolbar). Once there, click the References tab in the toolbar.

References

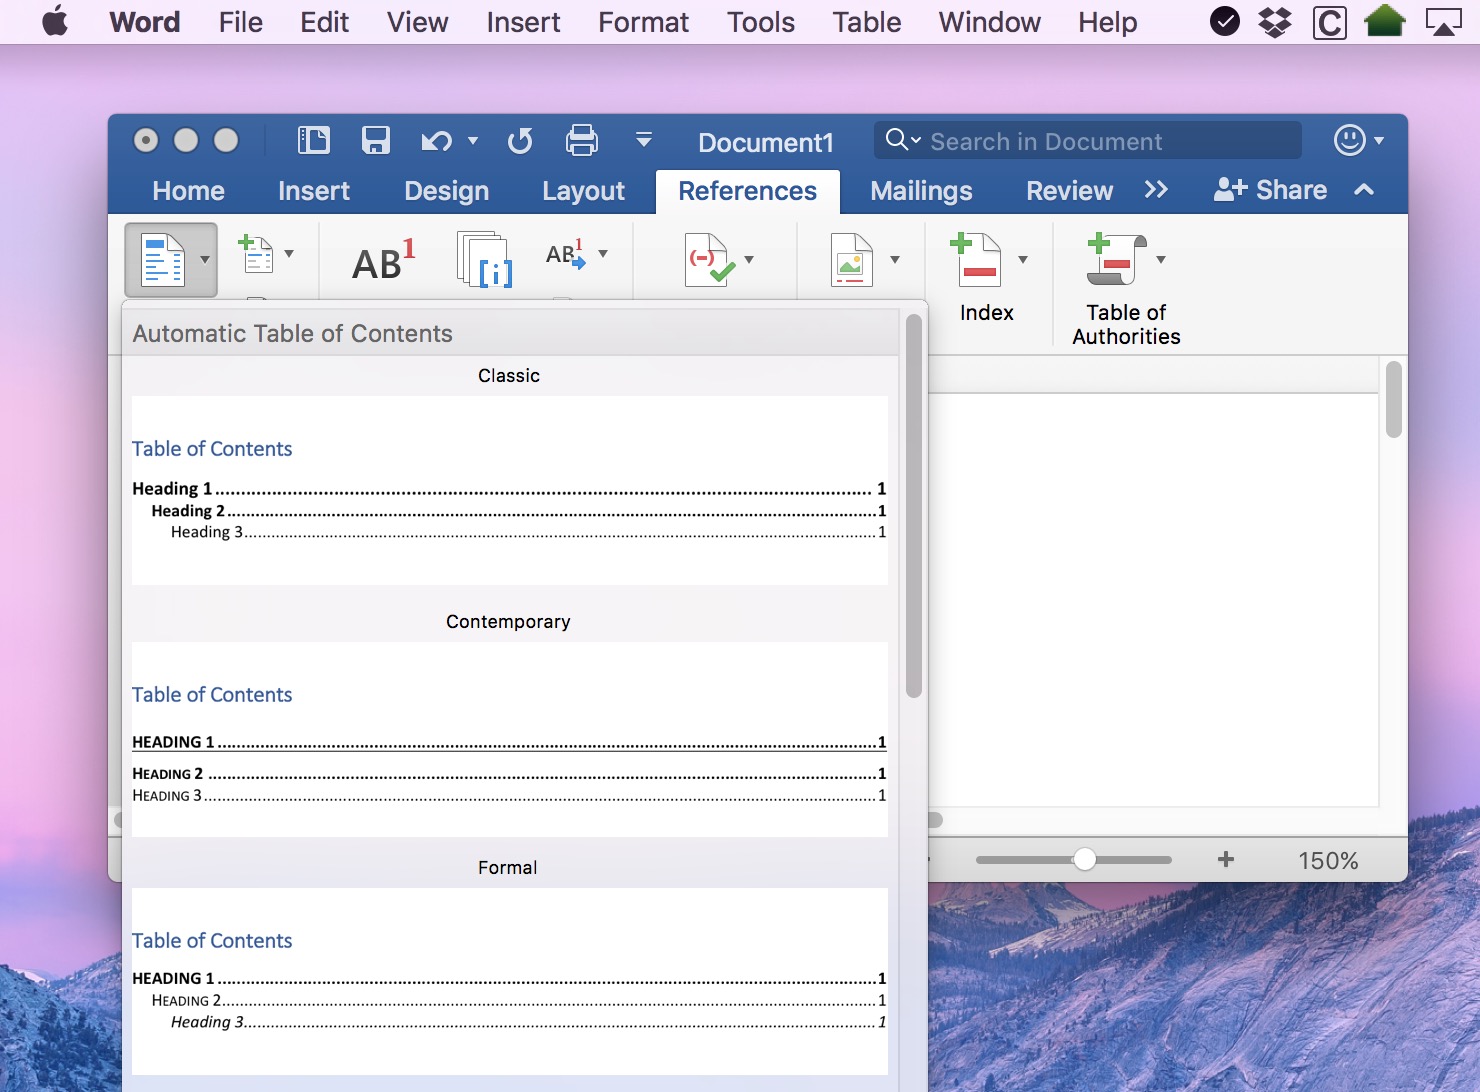
At the far left of the References tab you’ll see a button labeled Table of Contents. Click it to reveal a drop-down list of the various ways that Word can format your table for you.

Table of Contents Options

Click one of the styles to choose it, and Word will automatically generate your table of contents in the location you specified.

Step 3: Automatically Update Your Table of Contents

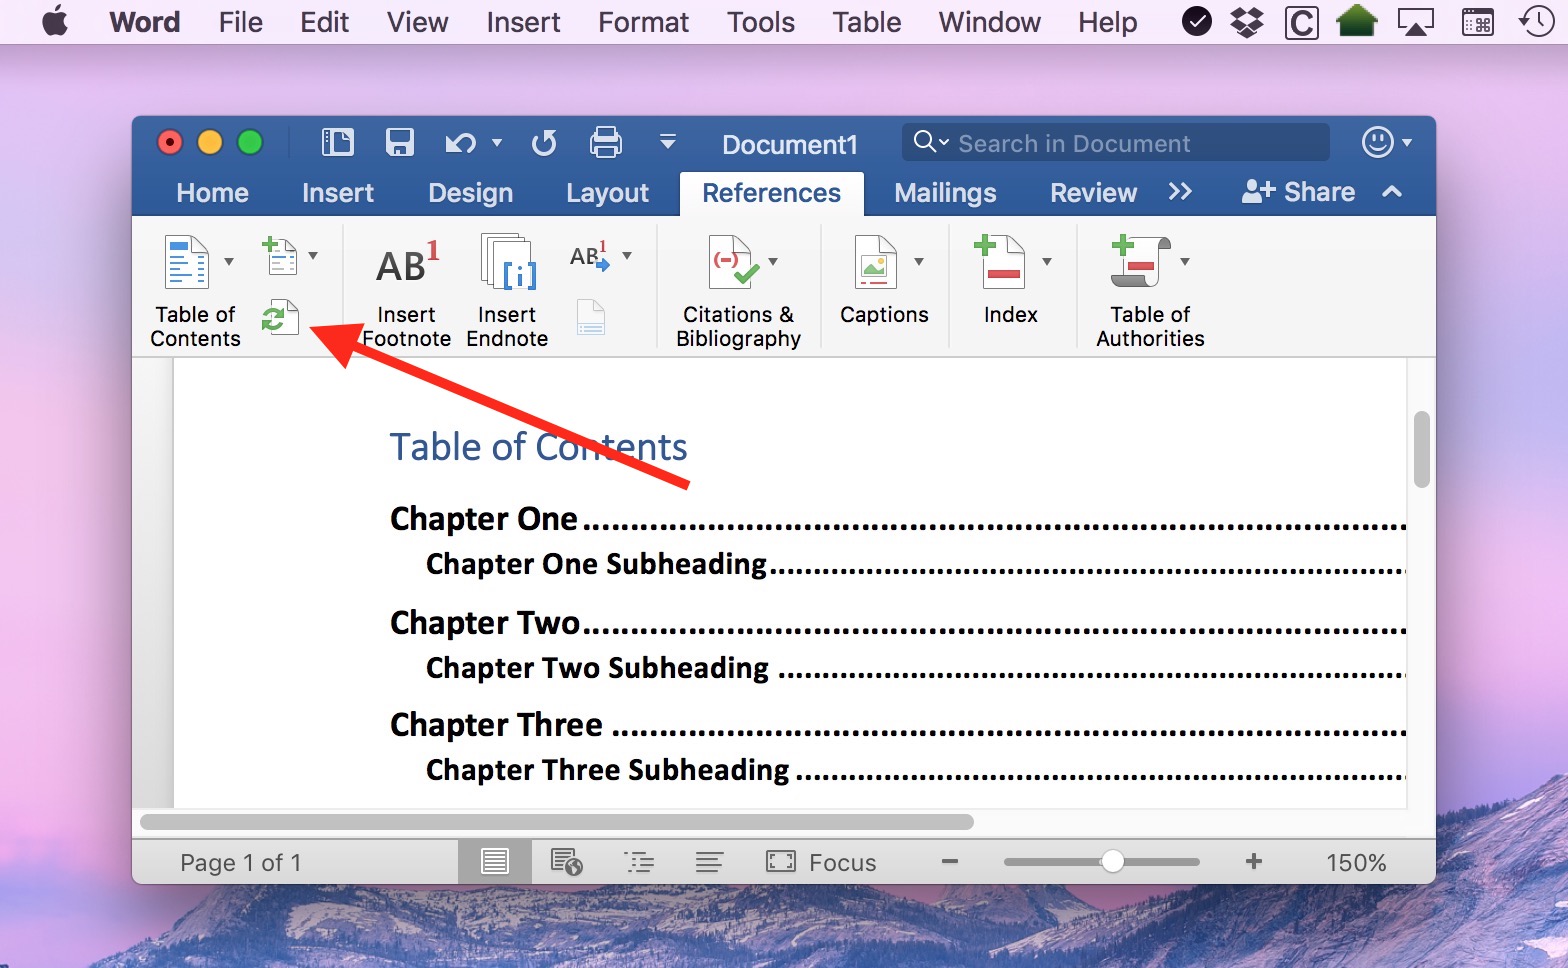
The table created in the steps above will list the current names of your defined headings and subheadings, along with the current page number of each. But here’s the great part of using this method: you can proceed to edit your document — add or remove headings, add text, change fonts and styles, etc. — and when you’re done, just head back to the References tab and click the “Update Table” button (shown with the red arrow in the screenshot below).

Refresh Button

Word will instantly update your table of contents to reflect all of the changes, including the updated page numbers for each entry. Just remember to keep applying heading styles as necessary when you modify your document and you’ll never have to worry that your chapter titles or your page numbers won’t match the table of contents. Nifty! I gotta admit that I’m not the biggest fan of Word, powerful though it is, but I like this feature a lot.

Want news and tips from TekRevue delivered directly to your inbox? Sign up for the TekRevue Weekly Digest using the box below. Get tips, reviews, news, and giveaways reserved exclusively for subscribers.
 012

  • Categories: Mac
  • Tags: #How To #Microsoft Office #Microsoft Office 2016 #Microsoft Word #Office for Mac #Tips #Word Processor

Sign Up for the TekRevue Weekly Digest

Read more in Mac on TekRevue

  • secure erase hard drive
    How to Securely Erase External Drives with Disk Utility on the Mac

    Filed Under: Mac

  • hide mac app store purchases
    How to Manage and Hide Mac App Store Purchases

    Filed Under: Mac

  • mac photos smart albums
    Organize Your Pictures Quickly with Smart Albums in Photos for Mac

    Filed Under: Mac

Search

Related Articles

  • macos sierra keyboard macbook
    New in macOS Sierra: Add a Period With Double-Space
  • siri mac sierra
    15 Cool Ways to Use Siri in macOS Sierra
  • email macbook
    Three Tips for Creating Professional Emails on the Mac
  • spell check word
    How to Turn Off Real-Time Spell Check in Microsoft Word
  • search with google
    How to Search with Google in Microsoft Word

Connect with TekRevue

  • TekRevue on Twitter
  • TekRevue on Facebook
  • TekRevue on Google+
  • Cheats
  • Deals
  • Distractions
  • Editorials
  • Gadgets
  • Games
  • Giveaway
  • Hardware
  • Home Theater
  • More in Mac
  • Mobile
  • News
  • Podcast
  • Reviews
  • Sponsor
  • Tips
  • Windows
  • secure erase hard drive
    How to Securely Erase External Drives with Disk Utility on the Mac
  • hide mac app store purchases
    How to Manage and Hide Mac App Store Purchases
  • mac photos smart albums
    Organize Your Pictures Quickly with Smart Albums in Photos for Mac
  • chrome offline installer
    How to Enable Offline Access of Google Drive Documents on the Mac
  • safari macos sierra
    Quickly View a List of Recently Closed Tabs in Safari for macOS Sierra
  • mac folders
    How to Keep Folders on Top When Sorting by Name in macOS Sierra
  • word 2016 for mac sierra
    How to Create a Table of Contents in Word 2016 for Mac
  • sierra mail filters
    How to Use Mail Filters in macOS Sierra
  • rolodex
    How to Share Multiple Contacts at Once on the Mac
  • mac weather forecast
    How to Add and Manage Cities in the macOS Weather Widget
  • custom toolbars mac
    How to Customize Toolbars in Your Mac Apps
  • macos sierra messages
    How to Manage iMessage Read Receipts on the iPhone and Mac
  • mac screenshots grab app
    How to Take Timed Screenshots on the Mac
  • mac web browsers
    How to Change the Default Downloads Folder on Your Mac
  • siri mac sierra
    How to Use Siri to Add Widgets to Notification Center in macOS Sierra
  • hide sierra upgrade
    How to Hide the macOS Sierra Upgrade Banner in the Mac App Store
  • macos sierra gatekeeper
    How to Disable Gatekeeper and Allow Apps From Anywhere in macOS Sierra
  • macos sierra mission control
    Enable Reduce Motion in macOS Sierra to Speed Up Mission Control
  • sierra picture in picture controls
    Use Picture-in-Picture for iTunes and Safari Videos in macOS Sierra
  • macos sierra keyboard macbook
    New in macOS Sierra: Add a Period With Double-Space

Explore More Topics

Amazon Android Apple Apps Benchmarks Beta Software Consoles Deals Displays Editorial Games Gaming Google How To iOS iOS 7 iOS 8 iPad iPhone iPod touch iTunes Mac Microsoft Microsoft Office Operating Systems OS X OS X Mavericks OS X Yosemite Podcast Review Safari Security Smartphones Software Updates Sponsor Tablets Tips UI Customization Web Browser Windows Windows 7 Windows 8 Windows 8.1 Windows 10 Xbox One

Tips

  • Apps
  • Gaming
  • Mac
  • Mobile
  • Online
  • Windows
  • adobe acrobat
    How to Change the Default View for PDFs in Adobe Acrobat
  • gotomeeting mac
    Quick Tip: Remove Old Versions of GoToMeeting for Mac
  • spell check word
    How to Turn Off Real-Time Spell Check in Microsoft Word
  • format skype text chats
    How to Format Skype Text Chats
  • classic solitaire windows xp
    How to Play Classic Windows XP Solitaire in Windows 10
  • ipad controller game
    How to Set Up and Game With an iOS Controller on Your iPhone or iPad
  • ps4 remote play mac
    How to Change PS4 Remote Play Resolution & Frame Rate on the Mac
  • steam trash
    How to Remove a Game From Your Steam Library
  • secure erase hard drive
    How to Securely Erase External Drives with Disk Utility on the Mac
  • hide mac app store purchases
    How to Manage and Hide Mac App Store Purchases
  • mac photos smart albums
    Organize Your Pictures Quickly with Smart Albums in Photos for Mac
  • chrome offline installer
    How to Enable Offline Access of Google Drive Documents on the Mac
  • facebook iphone pixelated
    Quick Tip: Configure the Facebook iOS App to Upload High Quality Photos
  • iphone navigation maps
    How to Avoid Toll Roads When Navigating with Apple Maps
  • macos sierra messages
    How to Manage iMessage Read Receipts on the iPhone and Mac
  • iphone clear all notifications
    How to Clear All Notifications on Your iPhone
  • youtube loop
    How to Loop YouTube Videos
  • netflix bandwidth data usage
    How to Reduce Netflix Bandwidth Usage to Avoid ISP Data Caps
  • netflix autoplay
    How to Stop Netflix From Automatically Playing the Next Episode
  • distracted man computer
    How to Turn Off Distraction-Free Mode in WordPress
  • Cortana Helps You Shop By Automatically Finding Coupons in Edge
  • windows 10 suggestions notifications
    How to Turn Off Windows 10 Tips, Tricks, and Suggestions Pop-Ups
  • speakers
    Quickly Change the Audio Playback Device in Windows 10 Anniversary Update
  • windows 10 snipping tool
    How to Take Windows 10 Screenshots with the Snipping Tool
Company
  • About TekRevue
  • Get in Touch
  • Sponsorships

Sign Up for the TekRevue Weekly Digest

© TekRevue LLC. All Rights Reserved.

  • TekRevue User Agreement
  • TekRevue Privacy Policy

Built by Blazer Six