TekRevue

  • Home
  • Mac
  • Windows
  • Mobile
  • Games
  • Home Theater
  • Reviews
  • Editorials
  • Tips
    • Windows
    • Mac
    • Mobile
  • Twitter
  • Facebook
  • Google+
  • Feed

 070

Mac / Tips

How to Uninstall iTunes in Mac OS X

By Jim Tanous on August 21, 2014 at 5:40 AM • @mggjim

iTunes is arguably the most important application Apple has ever released, and is installed on hundreds of millions of Macs and PCs around the world. Although no longer necessary for the use of iOS devices, iTunes is still an important portal for managing, purchasing, and enjoying digital media. But some users just don’t like iTunes, and prefer to use other media software like VLC, Fidelia, or Vox. For these users, it’s easy to uninstall iTunes in Windows, but a bit trickier for those running OS X. Don’t fret, however, as there’s a relatively simple workaround. Here’s how to uninstall iTunes in Mac OS X.

Listen to millions of songs for free with a 30-day trial of Amazon Music Unlimited.

Unlike Windows, iTunes comes preinstalled as part of OS X, and is considered “required” software by operating system. If you therefore try to simply drag the iTunes application file to the Trash, the system will stop you and present a warning message.

The warning is a bit exaggerated, of course. iTunes isn’t required for the basic operation of OS X. Sure, you might need to play media files from time to time, but QuickTime (which is unaffected by the steps presented in this article) can handle any playback needs.

To disregard OS X’s warning and uninstall iTunes, navigate to the Applications folder and find the iTunes app file (/Applications/iTunes.app). Right-click (or Control-click) on iTunes and select Get Info. Locate and click on the padlock icon on the bottom right side of the window and enter your admin password. This is necessary in order to make changes to the app’s permission settings.

Next, expand the Sharing & Permissions section of the window if it’s not already visible and change the privileges for “everyone” to Read & Write. This will give us complete control of the iTunes application so that we can override the operating system’s warning and delete it.

Close the Get Info window and try again to drag the iTunes application file to the Trash. This time, there’s no warning, and the file is immediately trashed. Empty the Trash to complete the process.

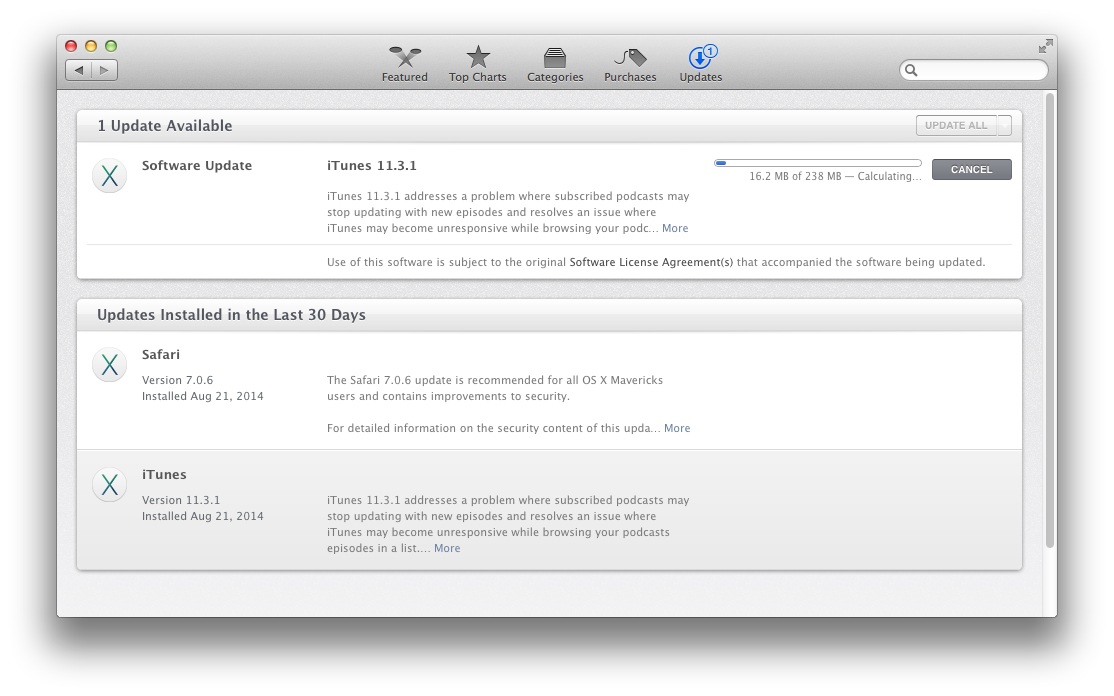
iTunes is now no longer installed on your Mac, and you’re free to install and use the third-party media software of your choice. If you wish to reinstall iTunes, just launch the Mac App Store’s Software Update section (or the old standalone Software Update if you’re running a version of OS X prior to Mountain Lion). With iTunes absent from your hard drive, Software Update will automatically offer to install it for you again. Alternatively, you can manually download and launch the iTunes installer from Apple’s website.

iTunes Software Update

It should be noted that the steps discussed here do not affect your iTunes library file or your actual iTunes media, both of which are stored outside of the application file we deleted. This means that if you later reinstall iTunes, you can point it to your old iTunes library and pick up right where you left off. It also means, however, that if your goal is to scrub all vestiges of iTunes from your Mac — including your library and media files — you’ll need to find and delete those files as well, which are located by default in the user’s Music folder.

Want news and tips from TekRevue delivered directly to your inbox? Sign up for the TekRevue Weekly Digest using the box below. Get tips, reviews, news, and giveaways reserved exclusively for subscribers.

 070

  • Categories: Mac / Tips
  • Tags: #Apps #How To #iTunes #OS X #Tips

Sign Up for the TekRevue Weekly Digest

Read more in Mac or Tips on TekRevue

  • email search
    Configure Apple Mail to Prevent Duplicate Drafts with Gmail Accounts

    Filed Under: Mac

  • mac magnifying glass
    How to Rebuild the Spotlight Index on Your Mac

    Filed Under: Mac

  • apple tv 4k xmen
    How to Get Cheap 4K iTunes Movies with Blu-ray and DVD Digital Codes

    Filed Under: Home Theater / Mac

Comments

  1. knoddix says

    October 12, 2014 at 8:57 AM

    I would just sudo rm -rf /Applications/iTunes.app or login into the root user and delete it this is a way I would have never thought of doing it top job Sir you taught me something

    Reply
    • Jd Daniel says

      November 25, 2014 at 3:00 PM

      Agreed, unfortunately some people are scared of the terminal.
      I can see this happening: rm -fr / Applications/iTunes.app

      😉

      Reply
      • Involans says

        December 11, 2015 at 10:22 AM

        Then `cd /Applications && rm -rf iTunes.app` - nice and safe.

        Reply
  2. sgarbatello says

    October 18, 2014 at 8:46 AM

    if i only knew this 5 years ago!

    Reply
  3. Sophia Fisher says

    October 25, 2014 at 7:38 PM

    thank you SO much this literally saved my life. I’ve been researching how to fix my iTunes not opening for DAYS. i love u

    Reply
  4. 360 degrees says

    November 9, 2014 at 12:40 PM

    Works with Yosemite as well. Although you might have to watch out as there maybe 2 user groups called “everyone”.

    Reply
  5. RootOne says

    November 10, 2014 at 7:42 PM

    It went easily as planned but unfortunately didn’t solve my problem. The fresh installed iTunes when “iMatching” crashed (as is always happening since two years) leaving behind the message: “iTunes a quitté de manière imprévue lors de l’utilisation du module libgnsdk_dsp.3.06.0.dylib.”.
    Well, that’s french… what shall I do with this module libgnsdk_dsp.3.06.0.dylib? Any tip? With all the Apple gadgets in the house its hard not to iMatch…
    MacBook (2008) / Mac OS X 10.7.5 / iTunes 12.0.1.26 / iTunes Library 91Go (heavy!)
    Thanks et bon matin.

    Reply
  6. Frans Klammer says

    November 23, 2014 at 3:27 PM

    Thank you Jim for teaching me how to uninstall iTunes, and thank you Apple for letting it be possible. My MacBook still seems to work just fine without it.

    Reply
  7. Justin Finkelstein says

    December 8, 2014 at 8:42 PM

    This doesn’t work. In Yosemite, iTunes automatically re-installs itself without prompting or warning. Any other suggestions?

    Reply
    • John M. says

      December 23, 2014 at 12:36 AM

      Check out this link http://iclarified.com/4045. You have to do alot more than just simply move the iTunes file from your applications folder including quitting and removing iTuneshelper otherwise it will run every time you login. I hope this helps.

      Reply
      • Justin Finkelstein says

        December 23, 2014 at 1:43 AM

        There’s a quicker/easier way if you’re comfortable with the Terminal:

        killall -9 iTunesHelper
        rm -rf /Library/iTunes
        rm -rf /Users/yourusername/Library/Preferences/*iTunes*
        rm -rf /Users/yourusername/Library/Caches/*iTunes*
        rm -rf /Users/yourusername/Library/*iTunes*

        Then, and the this is magic to stop it coming back:

        * Open System Preferences
        * Go to Software Update
        * Open App Store preference
        * Untick EVERYTHING except ‘Automatically check for updates’

        Having spent a good couple of hours with 2nd line support, there is no current way to prevent App Store telling you about the update (the ‘Hide Updates’ option doesn’t work for iTunes) but this is as close as you can get.

        Don’t forget - you’ll need to manually install all updates from now on (not as big a headache as might think).

        Reply
        • Rowe Morehouse says

          March 28, 2015 at 12:35 AM

          Great!

          Some people may have to “sudo” your above suggested commands in terminal.

          for example:

          sudo rm -rf /Library/iTunes

          Am I the only one that hates iTunes? … I don’t even want the *installer* on my machine.

          Thanks for your pointers, Justin.

          Reply
  8. gaucho says

    December 26, 2014 at 7:45 PM

    thank you

    Reply
  9. Richard Ellicott says

    January 28, 2015 at 8:16 AM

    lol i just gutted it, so you can just open the “app” folder and delete the “contents”. Absolutely no negative effects, wav files still preview in finder.

    it took up 350 MB on my tiny 64GB ssd!

    Reply
  10. memtech3 says

    February 16, 2015 at 9:22 PM

    THANK YOU SOOOOOOOOO MUch I needed that for months

    Reply
  11. Scotty777 says

    March 22, 2015 at 2:20 PM

    If you also have iTunes and want to uninstall iTunes on a PC running Windows XP, Vista, 7 or 8 the information at this website dedicated to helping people remove iTunes was very helpful http://HowToUninstalliTunes.com not for MAC OS so just in case you have a Windows based computer as well, the info there can help you.

    Reply
  12. Nadia Ali says

    July 30, 2015 at 9:54 PM

    I got to “get info” but mine is set to “custom” and I cannot change it to “read and write”. Can anyone explain how to fix it?

    Reply
  13. Johnny Dangerous says

    September 6, 2015 at 7:22 PM

    What a relief - I HATE iTunes with a passion - bloatware, always updating, sluggish, unintuitive crapware. I assume doing the same with the pointless Photo Booth app would be fine also.

    Reply
  14. Kim Droptiny says

    September 18, 2016 at 4:29 AM

    Thank you very much. It was easy and it worked!

    Reply
  15. kira says

    September 28, 2016 at 5:37 AM

    i followed the steps and was able to uninstall itunes in my mac but when i wished to reinstall it again, i tried to manually download it but there was no download button on the apple site at all plus the software update hasnt offered to download/upgrade anything for the past few days?

    Reply
  16. Ryan Conway says

    March 29, 2017 at 5:14 AM

    Still says it’s not allowed even after overriding the read and write permissions.

    Reply
  17. migsly says

    April 20, 2017 at 2:45 AM

    thanks!

    Reply

Leave a Reply Cancel reply

Your email address will not be published. Required fields are marked *

Search

Related Articles

  • Xbox Games with Gold List
    The Complete Xbox Games with Gold List and Details
  • apple tv 4k xmen
    How to Get Cheap 4K iTunes Movies with Blu-ray and DVD Digital Codes
  • qr codes iphone ios 11
    iOS 11: Scan QR Codes in the iPhone Camera App

Connect with TekRevue

  • TekRevue on Twitter
  • TekRevue on Facebook
  • TekRevue on Google+
  • Cheats
  • Deals
  • Distractions
  • Editorials
  • Gadgets
  • Games
  • Giveaway
  • Hardware
  • Home Theater
  • More in Mac
  • Mobile
  • News
  • Podcast
  • Reviews
  • Sponsor
  • Tips
  • Windows
  • email search
    Configure Apple Mail to Prevent Duplicate Drafts with Gmail Accounts
  • mac magnifying glass
    How to Rebuild the Spotlight Index on Your Mac
  • apple tv 4k xmen
    How to Get Cheap 4K iTunes Movies with Blu-ray and DVD Digital Codes
  • safari wesbite settings high sierra
    macOS High Sierra: Block Ads and Set Zoom Levels With Website Settings in Safari
  • parallels desktop 13
    Parallels Desktop 13 Launches With Support for macOS High Sierra and Touch Bar
  • repair photos mac
    How to Repair Your Photos Library on the Mac
  • document watermark
    How to Add a Watermark in Microsoft Word for Mac
  • mac time machine
    How to Copy Time Machine Backup Files
  • Email Attachment Paperclip
    Mac Mail: Save Multiple Email Attachments at Once
  • macbook email
    How to Change Email Account Names and Keep Your Mac Mail App Organized
  • macbook bed sleep
    Sleep Better with Night Shift on the Mac
  • mail email
    Organize Email Like a Pro With Favorite Mailboxes in Apple Mail for macOS
  • bluetooth icon mac
    macOS Troubleshooting: How to Unpair Bluetooth Devices
  • macos dock
    macOS: How to Quickly Hide the Dock with a Keyboard Shortcut
  • onenote featured
    How to Open Multiple Windows in OneNote for Mac
  • messages photos mac
    How to Save Images from Messages on the Mac
  • How to Extract Text from a PDF Using Your Mac’s Free Built-In Tools
  • bootable macos high sierra usb installer
    How to Create a Bootable macOS High Sierra USB Installer
  • imac target display mode
    Target Display Mode Remains Absent from 2017 iMac Update
  • signature
    How to Sign a PDF in Mail on the Mac

Tips

  • Apps
  • Gaming
  • Mac
  • Mobile
  • Online
  • Windows
  • onenote featured
    How to Open Multiple Windows in OneNote for Mac
  • reset kindle gift
    How to Factory Reset Your Kindle Before Selling or Giving It Away
  • office offline installer download
    Office 365 Tip: How to Download the Office Offline Installer
  • adobe acrobat
    How to Change the Default View for PDFs in Adobe Acrobat
  • classic solitaire windows xp
    How to Play Classic Windows XP Solitaire in Windows 10
  • ipad controller game
    How to Set Up and Game With an iOS Controller on Your iPhone or iPad
  • ps4 remote play mac
    How to Change PS4 Remote Play Resolution & Frame Rate on the Mac
  • steam trash
    How to Remove a Game From Your Steam Library
  • email search
    Configure Apple Mail to Prevent Duplicate Drafts with Gmail Accounts
  • mac magnifying glass
    How to Rebuild the Spotlight Index on Your Mac
  • apple tv 4k xmen
    How to Get Cheap 4K iTunes Movies with Blu-ray and DVD Digital Codes
  • safari wesbite settings high sierra
    macOS High Sierra: Block Ads and Set Zoom Levels With Website Settings in Safari
  • ios app ask for rating
    How to Stop Apps from Asking for Reviews on Your iPhone or iPad
  • apple watch do not disturb
    How to Avoid Apple Watch Workout Interruptions with Do Not Disturb
  • qr codes iphone ios 11
    iOS 11: Scan QR Codes in the iPhone Camera App
  • iphone call declined
    How to Decline a Call From the iPhone Lock Screen
  • dropbox file request
    How to Get Files From Anyone Using Dropbox File Request
  • How to Turn on Google 2-Step Verification (And Why You Should!)
  • youtube loop
    How to Loop YouTube Videos
  • netflix bandwidth data usage
    How to Reduce Netflix Bandwidth Usage to Avoid ISP Data Caps
  • Quick Tip: Remove the People Button From the Windows 10 Taskbar
  • windows protected your pc
    Windows Defender SmartScreen: How to Deal With ‘Windows Protected Your PC’ Warnings
  • computer time clock
    How to Change the Time Server in Windows 10
  • windows 10 watermark
    How to Remove the Windows 10 Watermark From Insider Program Desktops
Company
  • About TekRevue
  • Get in Touch
  • Sponsorships

Sign Up for the TekRevue Weekly Digest

© TekRevue LLC. All Rights Reserved.

  • TekRevue User Agreement
  • TekRevue Privacy Policy

Built by Blazer Six