TekRevue

  • HOME
  • MAC
  • macOS MOJAVE
  • iOS 12
  • WINDOWS
  • MOBILE
  • GAMES
  • REVIEWS
  • EDITORIALS
  • TIPS
    • Windows
    • Mac
    • Mobile
  • Twitter
  • Facebook
  • Google+
  • Feed
preview mac invert selection

Mac

macOS: Edit Images With “Invert Selection” in Preview for Mac

By Melissa Holt on November 4, 2017 at 10:00 AM • @MelissaCHolt

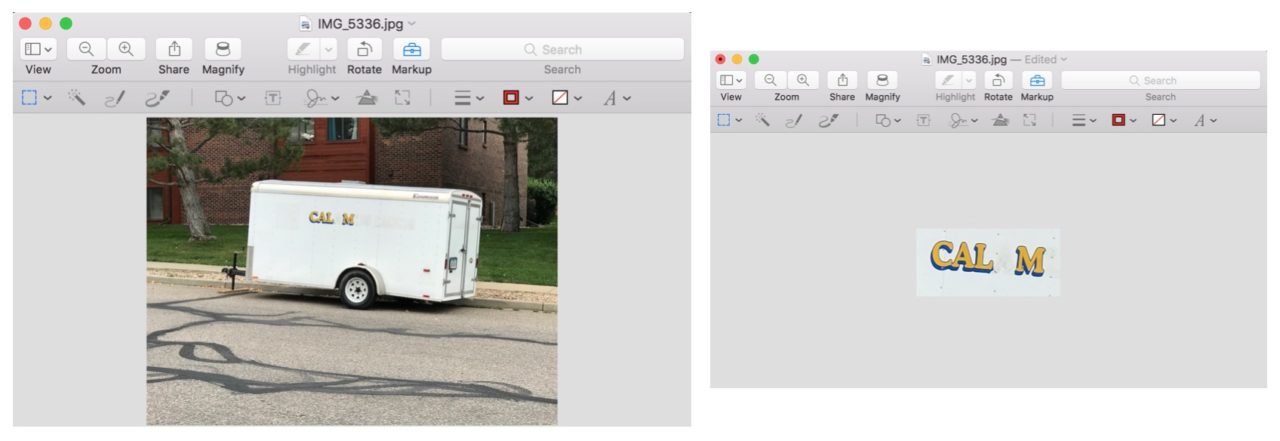
If you’re familiar with the Preview app in macOS, you probably already know that one of its features is the ability to crop an image. For example, in the screenshot below, I took the image of a parked trailer and cropped it to display just the worn text on the side:

Cropping Images

But what if you need to edit the image in the opposite way? That is, crop out a specific portion of the image while leaving the rest of it intact?
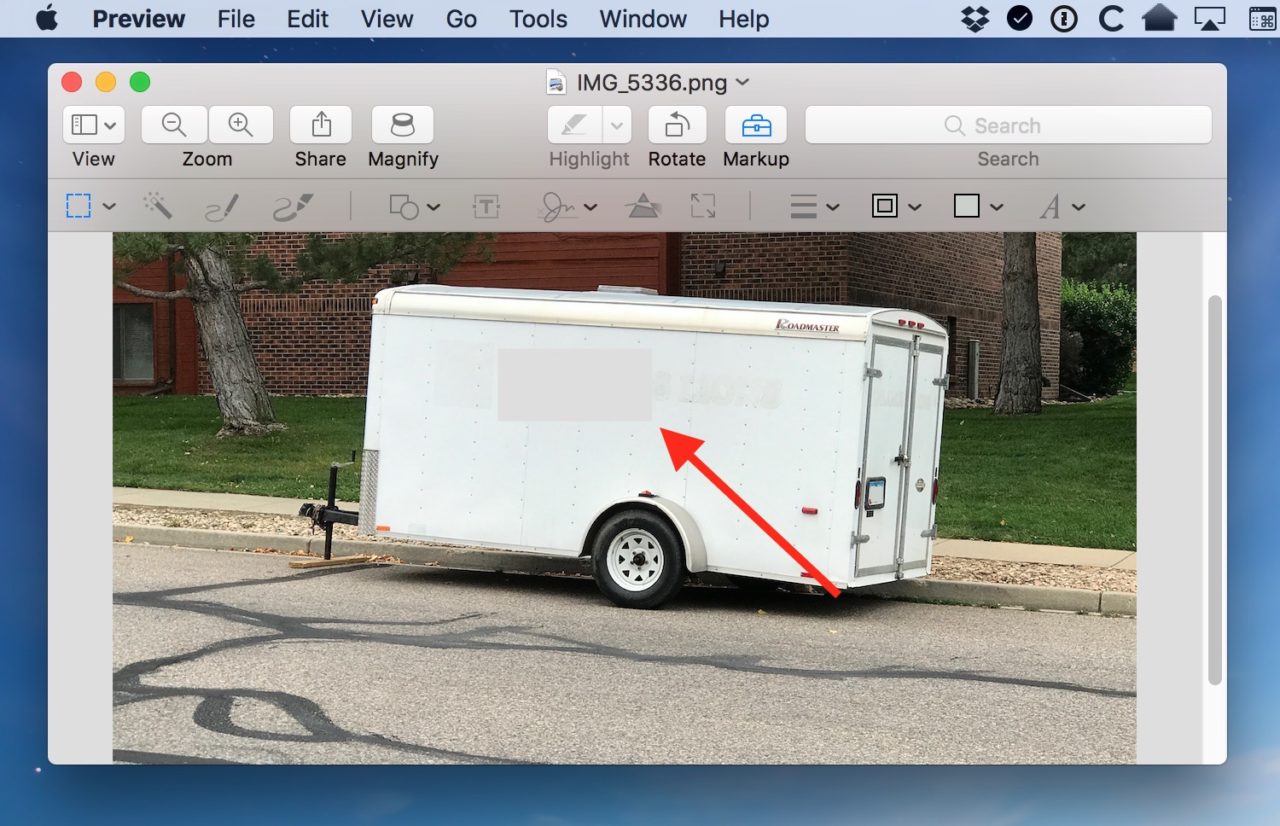
Piece Removed
Yeah, this looks awesome. I’m leaving this picture this way.

That’s where the Invert Selection function comes in. Those familiar with Photoshop and other image editing applications should already know about this feature, but it’s super simple to use for novices, too!

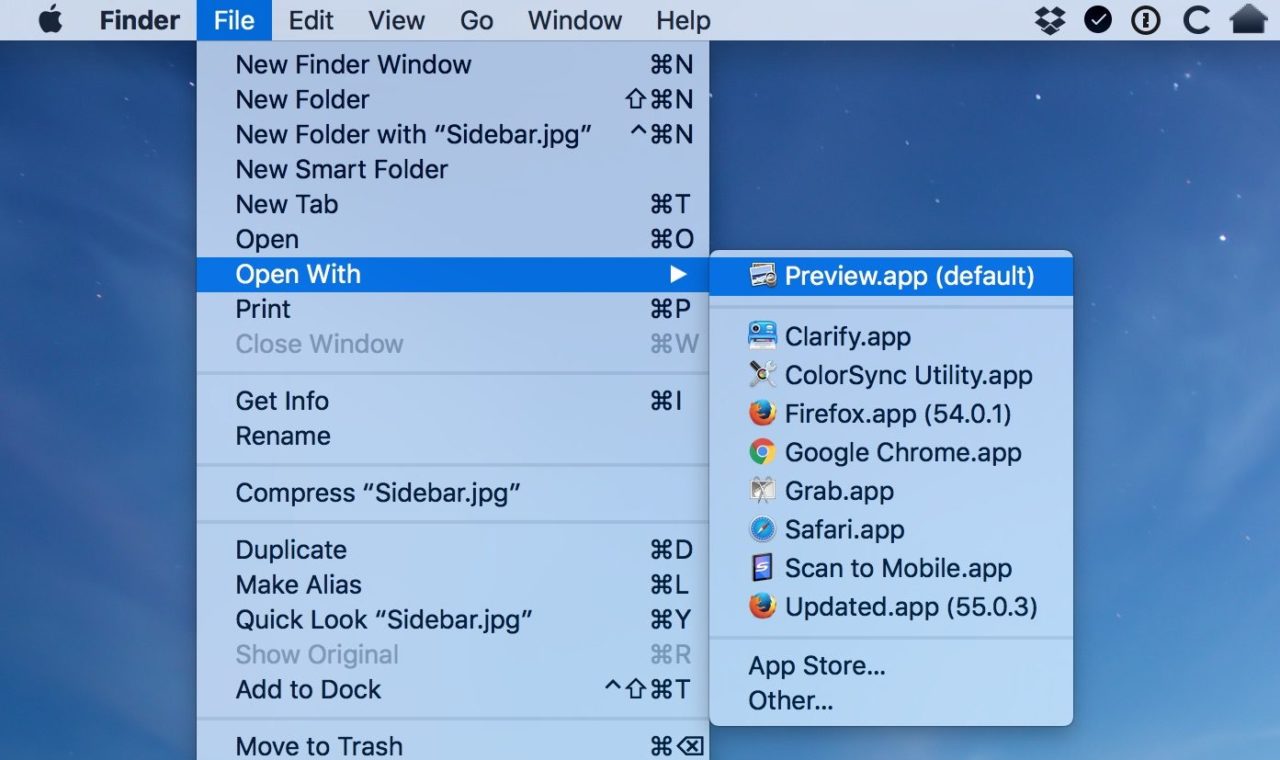
To get started, first open your image in the Preview app. In a default macOS installation, Preview should automatically launch whenever you double-click on a common image format, such as JPG or PNG. If it doesn’t, you can manually force Preview to open the image by selecting the file in Finder and choosing File > Open With > Preview from the menu bar at the top of the screen (you can also access the Open With menu by right-clicking on the image file in Finder).

Open With Menu

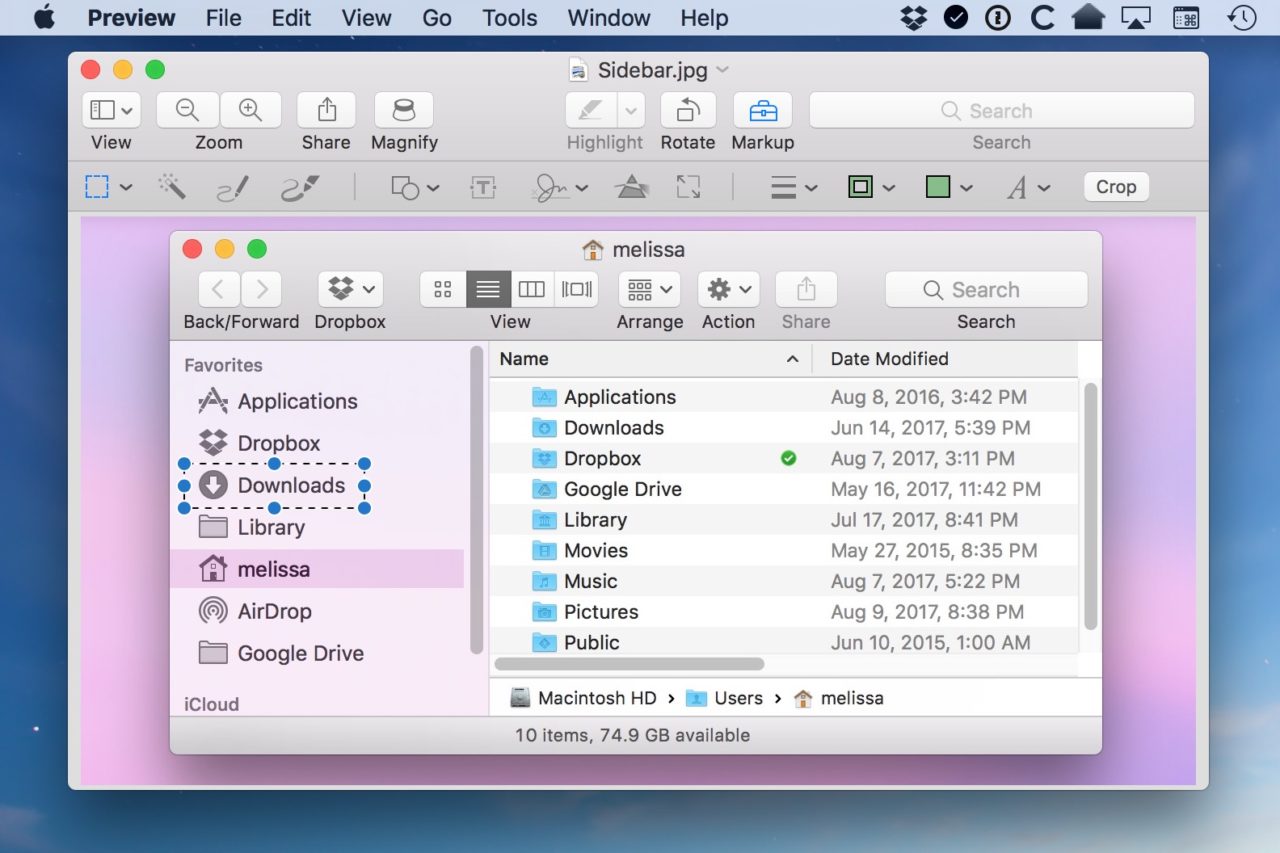
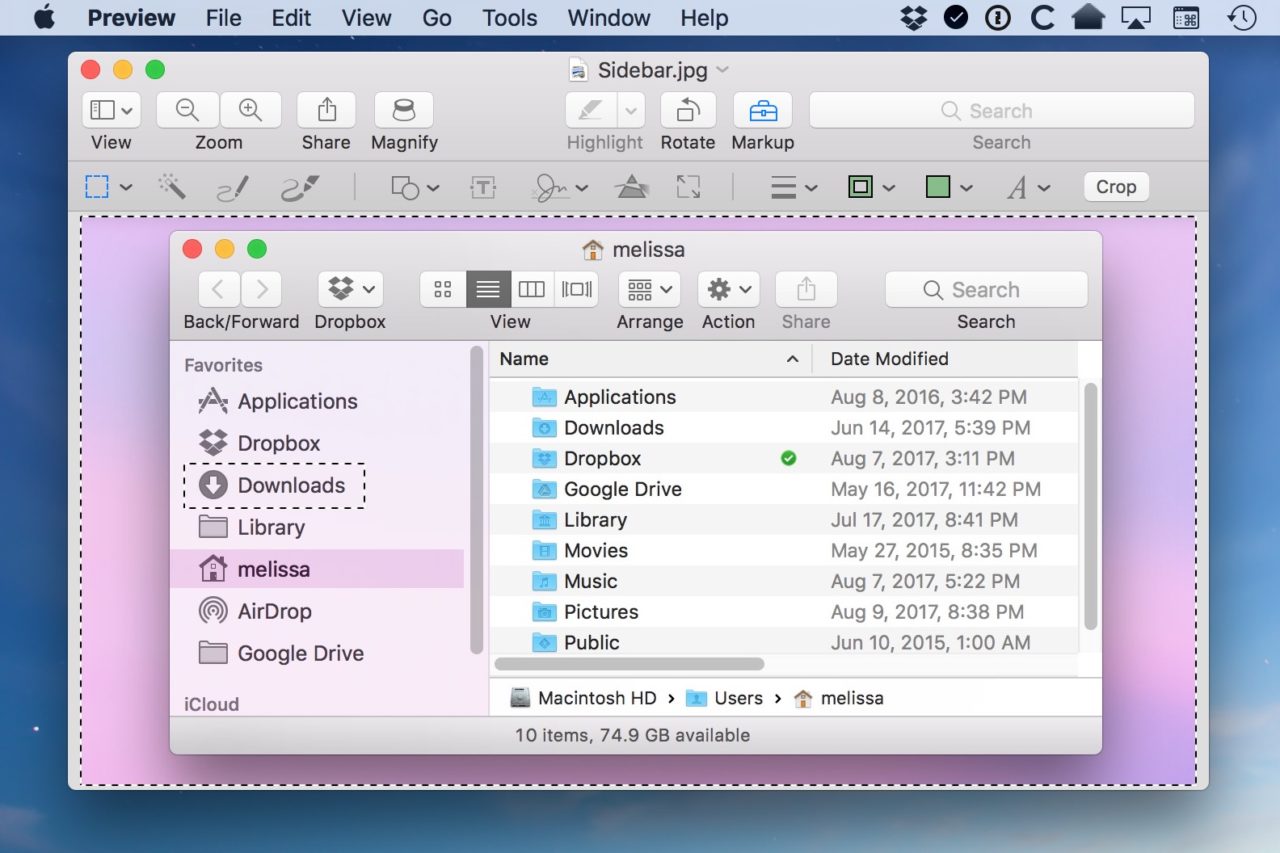
Once your image is open in Preview, use your mouse or trackpad cursor to click and drag a selection. In my example screenshot below, I’ve selected the “Downloads” entry from my screenshot of a Finder window.

Selection

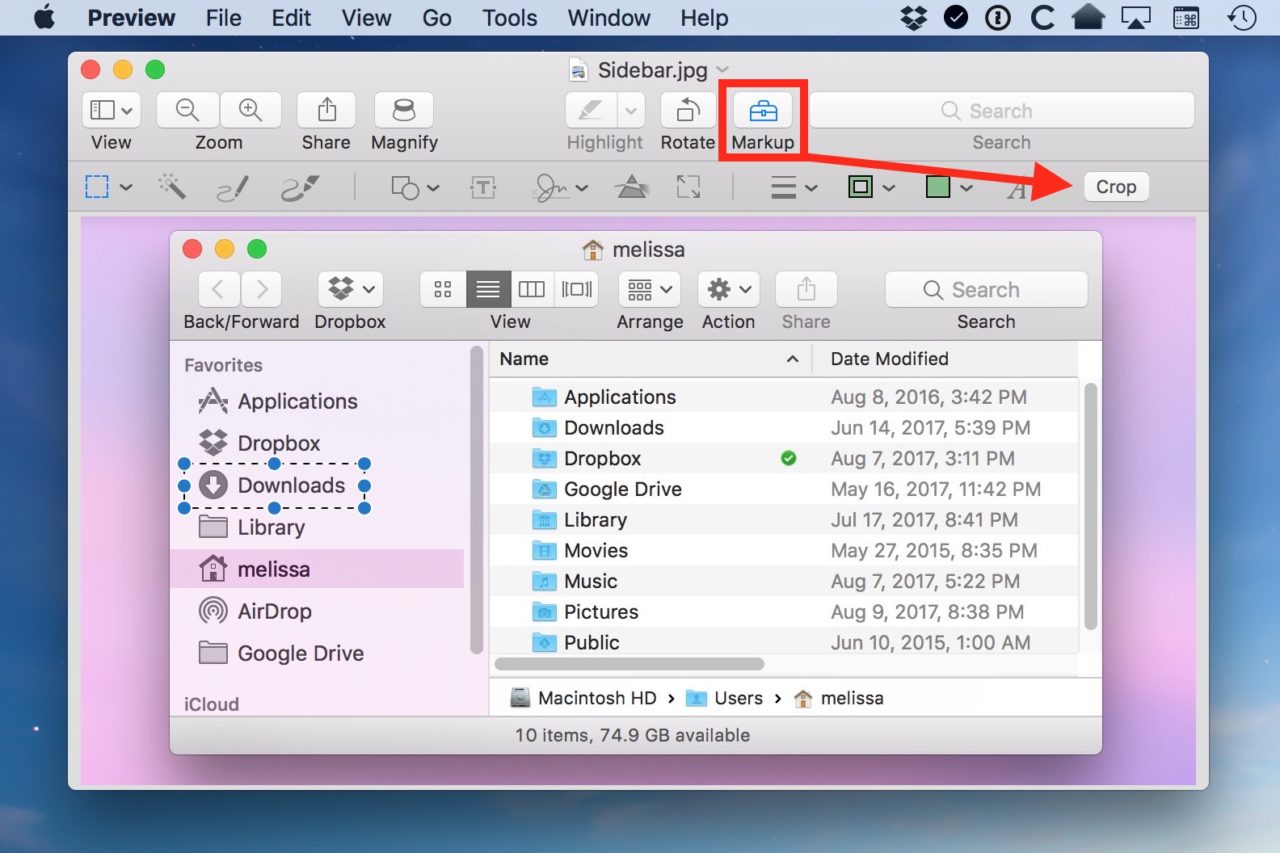
Now here’s where a lot of folks get confused. If you click the Markup button in the toolbar at this point and select the Crop button…

Markup Button

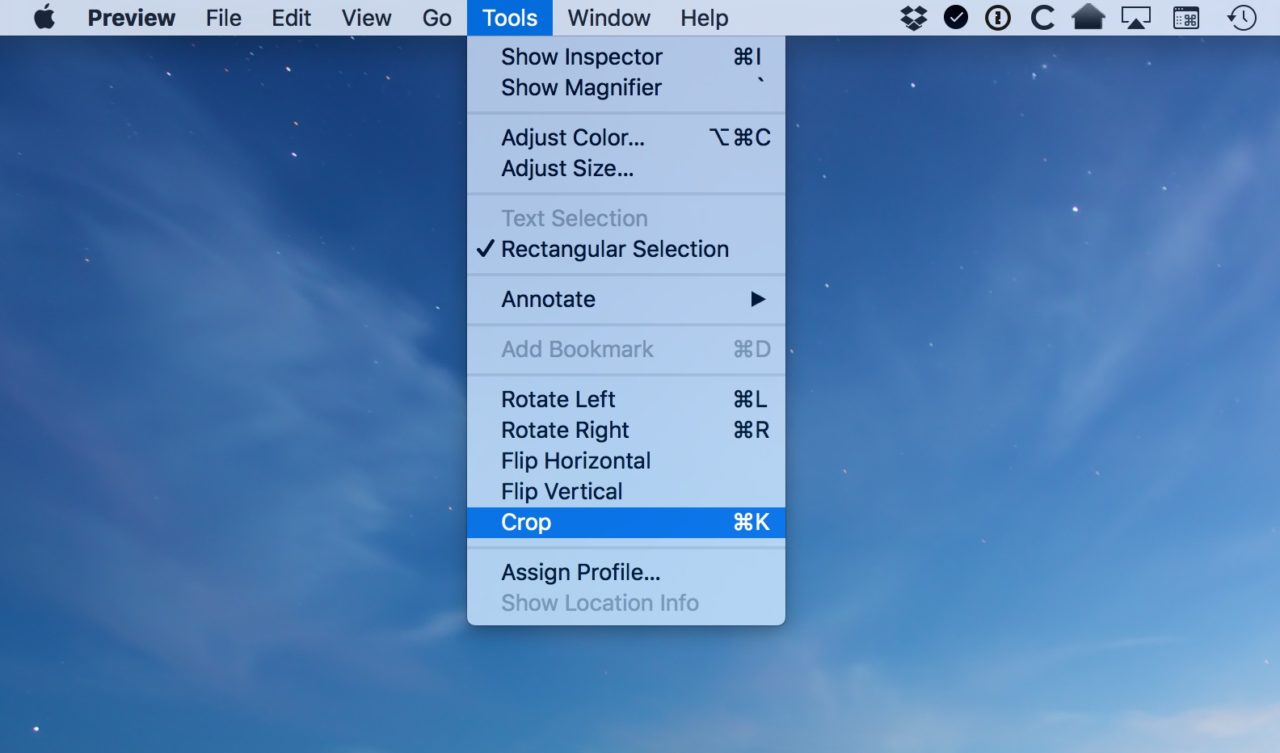
…or if you press Command-K, which is the keyboard shortcut for Tools > Crop…

Tools Menu

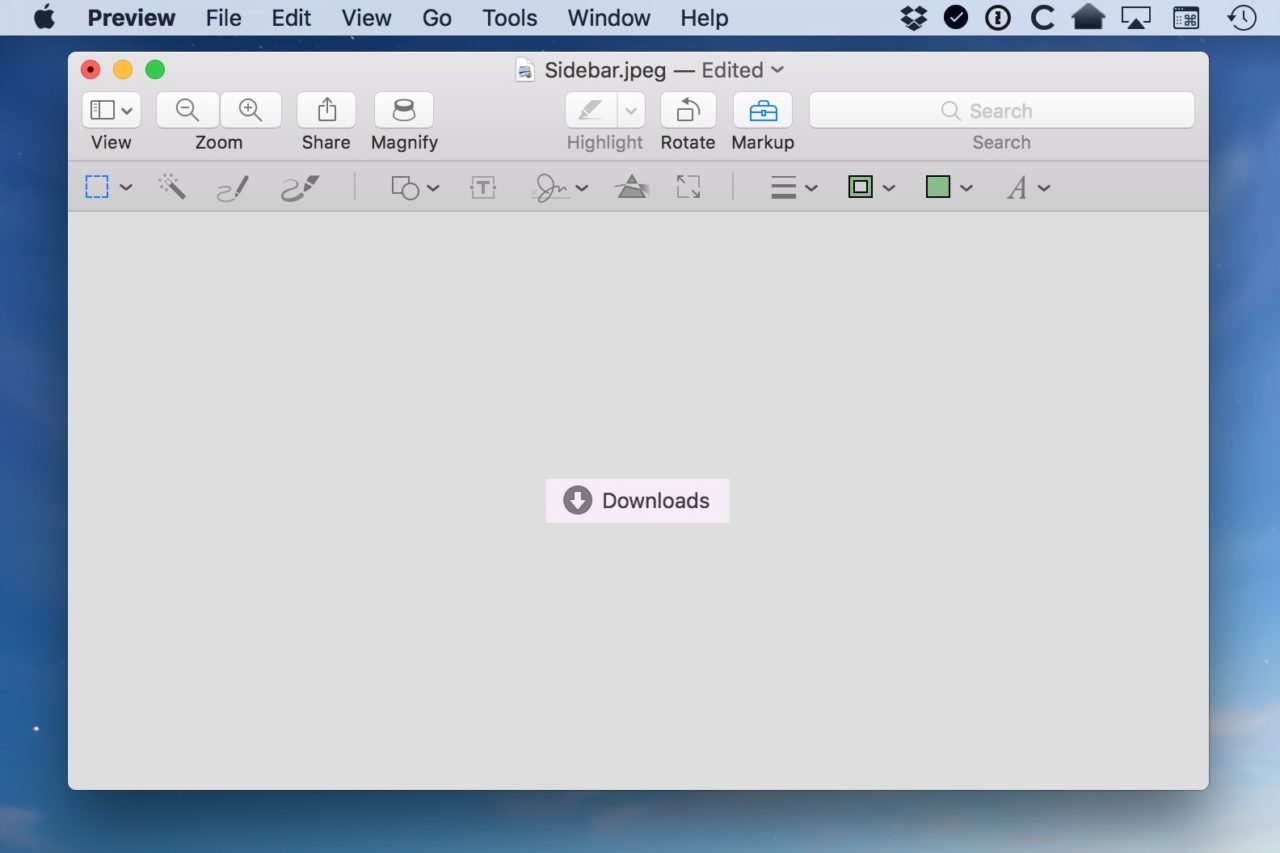
…then you’ll be left with just the chunk of the picture that you selected.

Small Cropped Portion

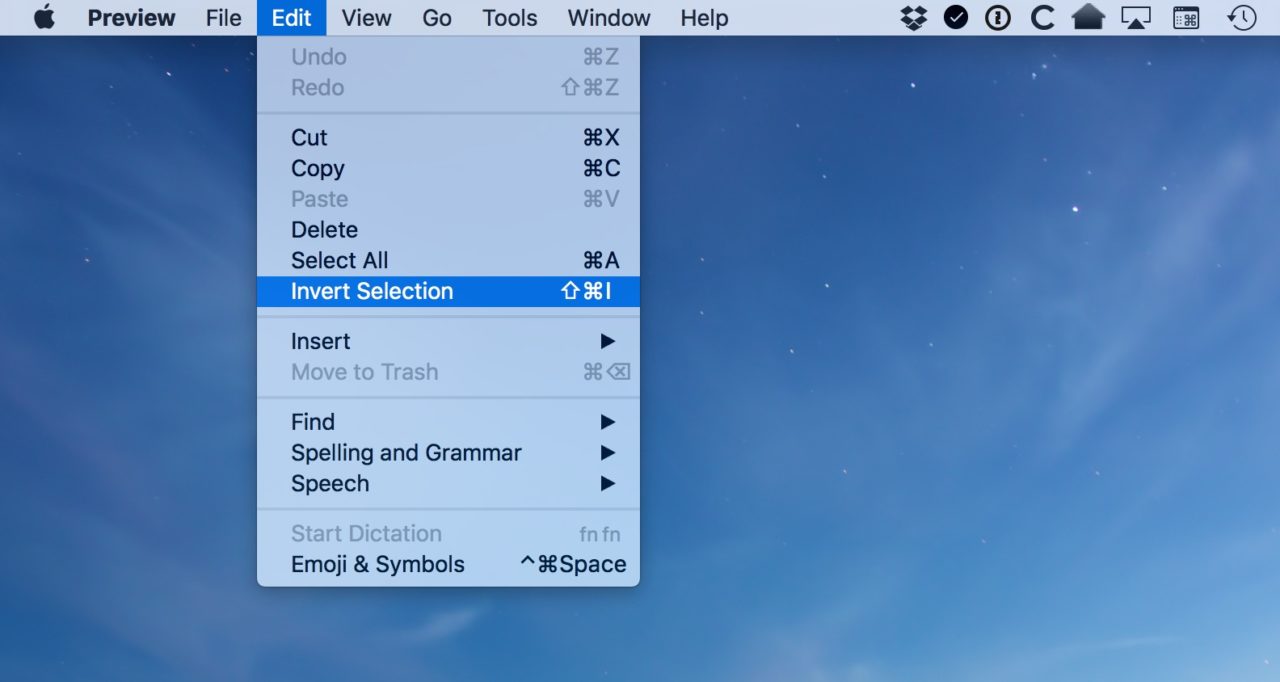
What we need to do first is use the Invert Selection function to select everything in our image except the initially selected area. Invert Selection can be found in the Edit menu of Preview’s menu bar, or by using the keyboard shortcut Shift-Command-I.

Invert Selection from Edit Menu

Upon choosing Invert Selection, the dotted selection line in your Preview image will switch to include everything except your initial section.

Inverted Selection

At this point, you can now use the Markup > Crop option or press Command-K and you’ll see only the portion of your original selection disappear, leaving the rest of the image intact.
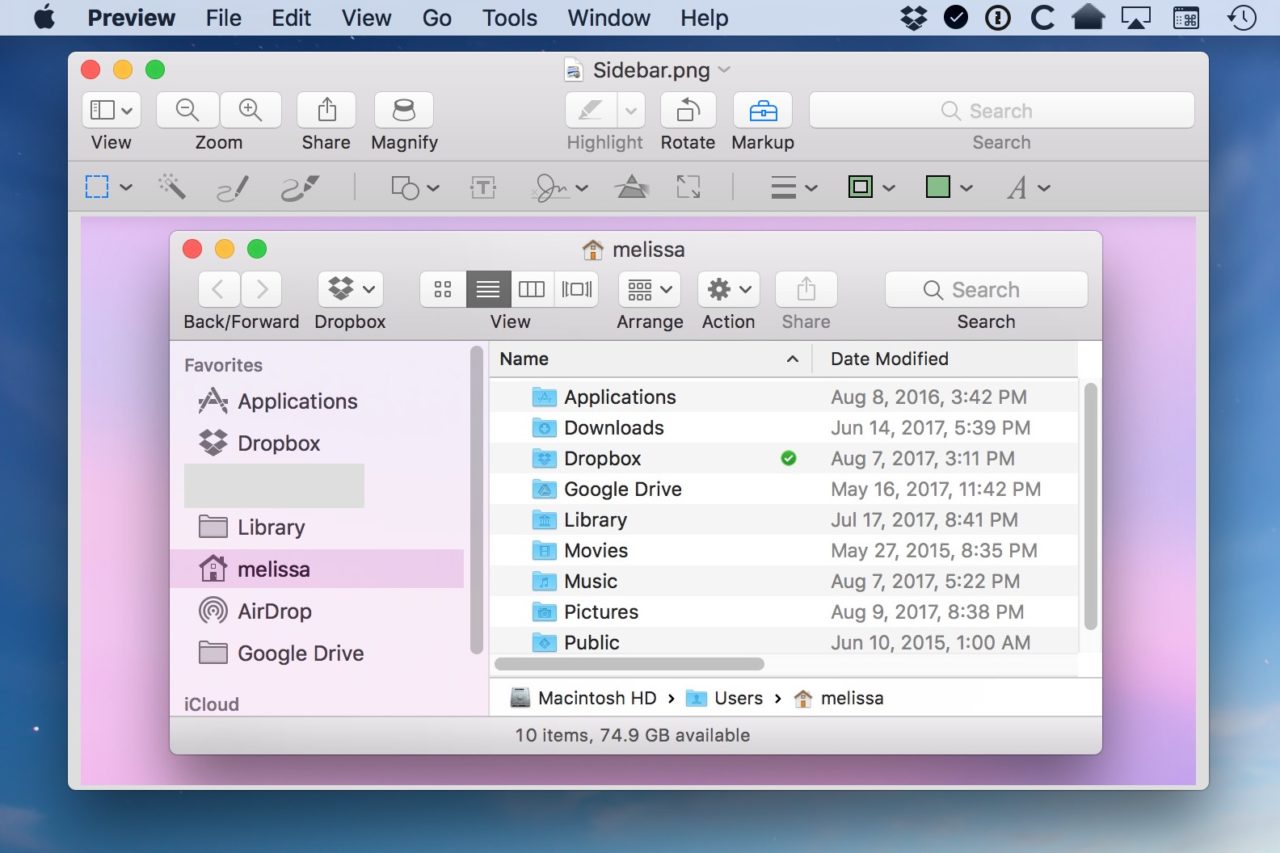
Piece Removed from Image
It was very important that I redact my Downloads shortcut for some reason.

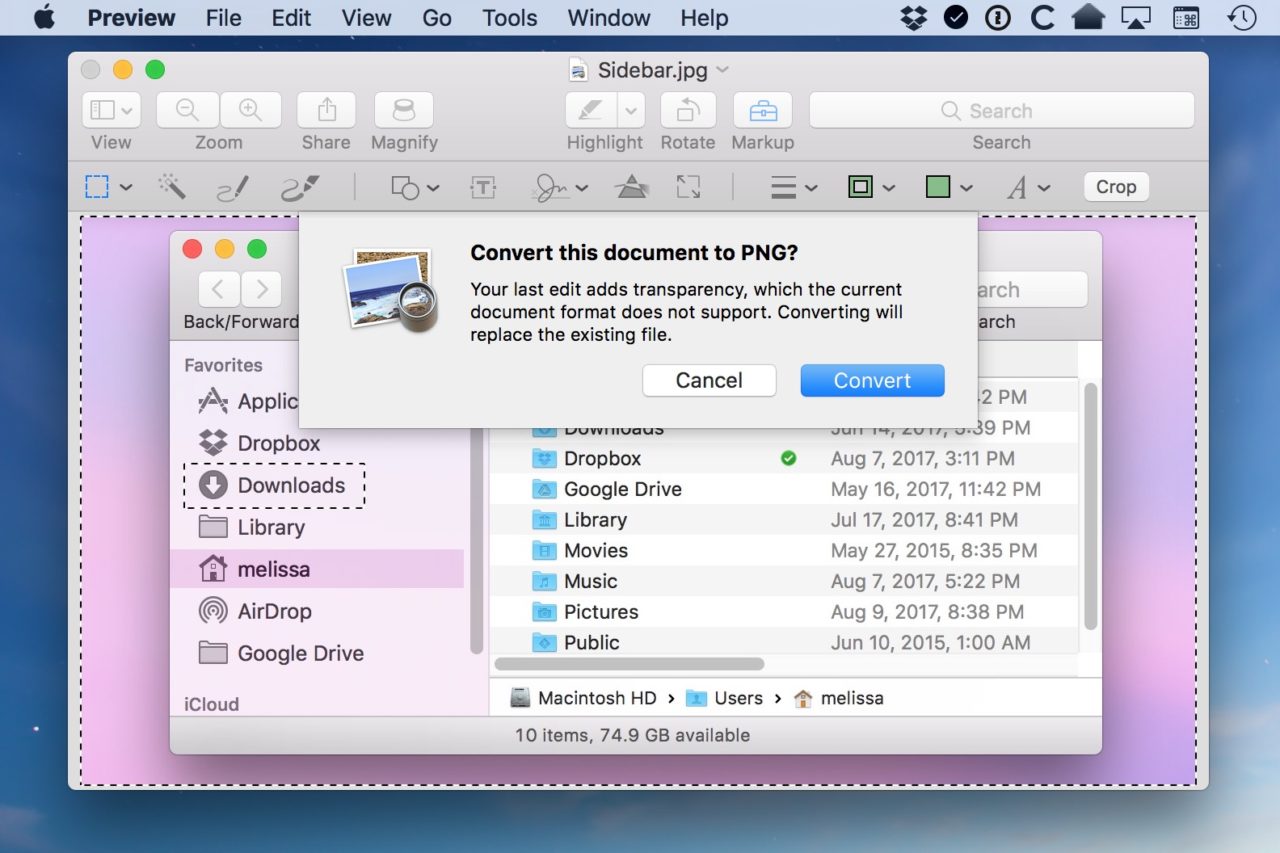
Note, however, that this creates a “hole” in your image, which requires the conversion to a PNG file format with transparency. So, if you started with a JPEG image or a PNG file that didn’t support transparency, Preview will ask you to convert it when saving the file.

Convert to PNG Warning Box

This could result in a larger file size for your image, but you can always convert back to JPG if you don’t need to have the transparency value (the transparent parts will simply display white by default when converted).

Want news and tips from TekRevue delivered directly to your inbox? Sign up for the TekRevue Weekly Digest using the box below. Get tips, reviews, news, and giveaways reserved exclusively for subscribers.
Share this:

  • Facebook
  • Twitter
  • LinkedIn
  • Reddit
  • Pinterest
  • Email

  • Categories: Mac
  • Tags: #How To #Images #Mac #macOS #OS X #Photo Editing #Pictures #Preview #Tips

Sign Up for the TekRevue Weekly Digest

Read more in Mac on TekRevue

  • disable auto-brightness mac
    How to Disable Auto-Brightness on Your Mac

    Filed Under: Mac

  • siri touch bar mac
    How to Remove Siri from the Touch Bar

    Filed Under: Mac

  • mac gpu usage history
    How to View GPU Usage in macOS via Activity Monitor

    Filed Under: Mac

Search

Related Articles

  • mac magnifying glass
    How to Use the Get Info Window to View the Combined Size of Multiple Files in macOS
  • Mac OS X Dock
    macOS: Tips on Minimizing Windows into the Dock
  • pdf mac os x
    How to Extract Pages from a PDF Document in Mac OS X Preview
  • osx-preview-export-formats-expanded
    How to Reveal the Secret Image Format Export Options in OS X Preview

Connect with TekRevue

  • TekRevue on Twitter
  • TekRevue on Facebook
  • Cheats
  • Contributor
  • Deals
  • Distractions
  • Editorials
  • Gadgets
  • Games
  • Gaming
  • Giveaway
  • Hardware
  • Home Theater
  • More in Mac
  • Mobile
  • News
  • Podcast
  • Reviews
  • Sponsor
  • Tips
  • Windows
  • disable auto-brightness mac
    How to Disable Auto-Brightness on Your Mac
  • siri touch bar mac
    How to Remove Siri from the Touch Bar
  • mac gpu usage history
    How to View GPU Usage in macOS via Activity Monitor
  • clipped documents
    How to Use Mojave’s Quick Actions to Quickly Combine PDFs on the Mac
  • razer core x egpu macbook pro
    MacBook Pro eGPU Benchmarks: Razer Core X & AMD Radeon Vega Frontier Edition
  • hide app mac
    How to Hide Mac Apps in macOS via the Terminal
  • microsoft word for mac mojave
    How to Change Case in Microsoft Word for Mac
  • dockcase p1 adapter
    DockCase P1 Adapter: A USB-C Hub that Connects to Your MacBook Pro Charger
  • change font notes mac
    How to Copy and Paste Styles to Easily Format Text in macOS
  • locked pages document
    How to Password Protect a Pages Document
  • chrome hold command q to quit
    How to Turn Off the ‘Hold Command-Q to Quit’ Warning in Chrome for macOS
  • sort bookmarks safari
    How to Automatically Sort Bookmarks in Safari for Mac with SafariSort
  • chrome picture in picture
    How to Use Chrome Picture in Picture in macOS
  • outlook for mac logo
    How to Use Text Replacement in Office for Mac
  • airdrop website between iphone ipad mac
    How to AirDrop Websites Between the iPhone, iPad, and Mac
  • exclude app dark mode mac mojave
    How to Exclude an App From Dark Mode in macOS Mojave
  • apple books download location
    Where Are Apple Books Downloads Stored in macOS?
  • notes app mac
    Float Notes in the macOS Notes App to Keep Them Always On Top
  • mac lock screen message featured
    How to Add a Lock Screen Message to macOS
  • app categories mac
    Quick Tip: Arrange Applications by Category in macOS

Tips

  • Apps
  • Gaming
  • Mac
  • Mobile
  • Online
  • Windows
  • parallels custom touch bar
    Parallels Desktop: Using XML to Create Custom Touch Bar Buttons for Windows Apps
  • replace notepad notepad plus plus
    How to Completely Replace Notepad With Notepad++ in Windows
  • chrome picture-in-picture windows
    How to Use Chrome Picture-in-Picture in Windows 10
  • eartrumpet
    EarTrumpet for Windows 10: A Better Windows Volume Mixer
  • xbox store autoplay video
    How to Turn Off Xbox Store Autoplay Videos on the Xbox One
  • slow steam browser windows
    Here’s One Potential Fix for a Slow Steam Browser in Windows
  • How to Manually Dim the Xbox One Screen
  • xbox one store games
    How to Browse Games by Genre in the Xbox One Store
  • disable auto-brightness mac
    How to Disable Auto-Brightness on Your Mac
  • siri touch bar mac
    How to Remove Siri from the Touch Bar
  • mac gpu usage history
    How to View GPU Usage in macOS via Activity Monitor
  • clipped documents
    How to Use Mojave’s Quick Actions to Quickly Combine PDFs on the Mac
  • flip camera facetime ios 12
    How to Check FaceTime Data Usage on the iPhone
  • change default card apple pay watch
    Apple Watch: How to Change the Default Apple Pay Card
  • siri mac sierra
    Enable ‘Type to Siri’ to Type Your Siri Questions Instead of Speaking
  • iphone live photo
    How to Convert a Live Photo to a Still Image With a Custom Key Photo
  • plex web shows
    How to Disable Web Shows in Plex
  • youtube dark theme web
    How to Enable the YouTube Dark Theme in a Desktop Browser
  • chrome new look vs old
    How to Switch Back to the Old Chrome Design
  • google drive shared expiration
    How to Set Expiration Dates for Shared Google Drive Files
  • windows 10 lock screen tips
    How to Turn Off Windows 10 Lock Screen Tips
  • av1 windows 10
    How to Play AV1 Videos in Windows 10 With the Free AV1 Codec
  • replace notepad notepad plus plus
    How to Completely Replace Notepad With Notepad++ in Windows
  • windows 10 power user menu
    How to Edit the Power User Menu (Win+X Menu) in Windows 10
Company
  • About TekRevue
  • Get in Touch
  • Sponsorships

Sign Up for the TekRevue Weekly Digest

© TekRevue LLC. All Rights Reserved.

  • TekRevue User Agreement
  • TekRevue Privacy Policy

Built by Blazer Six

loading Cancel
Post was not sent - check your email addresses!
Email check failed, please try again
Sorry, your blog cannot share posts by email.